Overview
If you’ve been following this series, get ready to create your first virtual machine!
This first virtual machine isn’t the most exciting thing on the surface, but will lay the foundation for other virtual machines, including the Samba file sharing server in the next post!
The high level view of the steps for this are:
- Create the virtual machine
- Configure parameters (CPU, RAM, Storage, etc.)
- Start machine and install OS
Let’s get into the details…
Create the Virtual Machine
Load ISO onto Server
First, we have to download an ISO image of the OS of your choice (in this tutorial we will stick with Ubunutu 20.04). Put the ISO on a flash drive. Be sure to take note of the size of the drive.
Insert the drive into the server, then run the command:
lsblk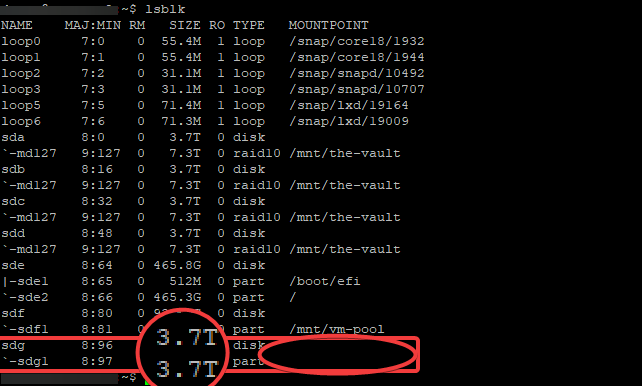
You’ll be able to identify the proper drive by the size (magnified) and the fact that it isn’t mounted yet (nothing in the “MOUNTPOINT” column).
When mounting, it’s important to remember that we are mounting the configured and usable area of the drive – the partition. Partitions are under the drive name and have a number at their end. In the above instance we are looking to mount “sdg1”, so we will mount this somewhere on the system.
Because I am OCD, I like to create a directory specifically for flash media under the “mnt” (mount) directory:
sudo mkdir /mnt/flash-mediaEnter your password if you are prompted to do so. Now we are ready to mount the flash drive so that we can access the ISO. The next command takes the form of:
sudo mount /dev/[PARTITION-NAME] /mnt/[NAME-OF-DIRECTORY]and in our example looks like this:
sudo mount /dev/sdg1 /mnt/flash-mediaTo double check, you can navigate to the directory and list it’s contents by combining two command in one line:
cd /mnt/flash-media && lsYou should see the name of the ISO file on the screen. Now if you’d like to put all of your ISO images on the raid we’ve installed on the host server for easy access, then we can simply copy the ISO over into the raid array.
In our blog series’ case I would create a subdirectory on the raid array to hold the iso images:
sudo mkdir /mnt/raid-array/iso-imagesThis will create a directory named “iso-images” in the raid. Now we need to copy the file over to that directory. The cp command has the following form:
cp /[DIRECTORY]/[FILE-IS-IN]/[FILE-NAME] /[WHERE]/[YOU-WANT-IT]So in our example, if the file was named “Ubuntu-ISO.iso” the command would be:
cp /mnt/flash-media/Ubuntu-ISO.iso /mnt/raid-array/iso-images/You should now have a copy of that ISO image permanently stored in raid. Check by going to the “iso-image” directory and listing the files there:
cd /mnt/raid-array/iso-images && lsYou should see the .iso file listed on the screen. Now that we have the file accessible on the host, we can unmount and remove the flash drive:
sudo umount /mnt/flash-mediaTo check this, you can run the “lsblk” command to ensure that the drive no longer has a mount point. With that confirmed, you may safely pull the flash drive from the USB port.
Now we are ready to start a new virtual machine!
Start VM Creation
In our previous post, you loaded KVM and the virt-manager package into your server. Now let’s put them to use!
While you can do these actions on the server directly, why not take advantage of the SSH we configured in this series’ last post and log in from your laptop from the comfort of your couch?
Once you’ve logged in using your SSH credentials, you’ll need to make sure Xming (or whatever your X11 forwarding server of choice might be) is running in the background if you’re using a Windows client. Click on the Windows icon in the lower left (or hit the Windows key on your keyboard) and start typing “Xming”. When it pops up, double click on the program.
now return to your SSH session window and type:
virt-managerAfter hitting enter, it may take a moment or two but the Virtual Machine Manager window should pop up:
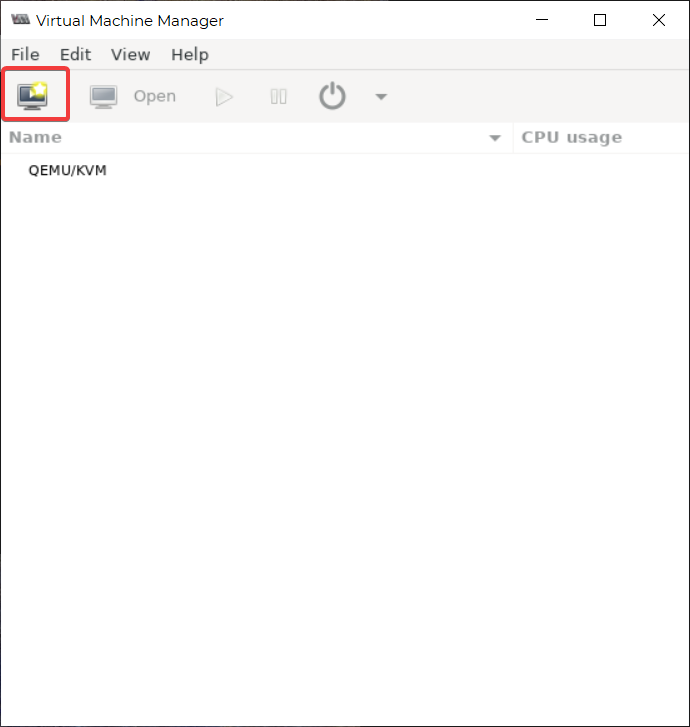
From here, we will click on File> New Virtual Machine (Or click the icon indicated above).
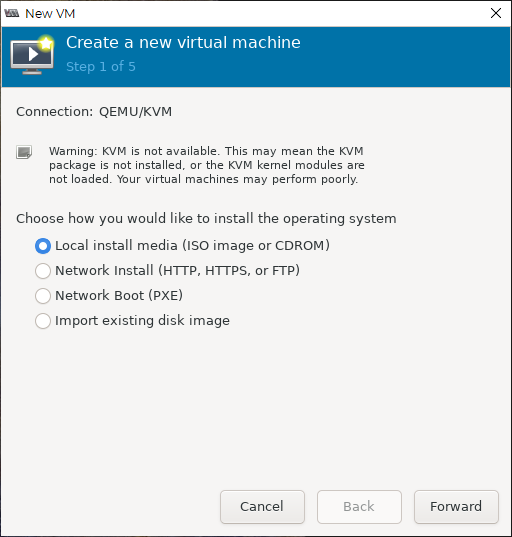
On the first screen it will ask you where the operating system is located that you’d like to install. I put all of my “base_images” (ISO images) on the RAID array that we set up in our server, we can select “Local intsall media” and Click Forward.
In the next screen you will be prompted to choose the ISO. Click the “Browse” button. In the next window you will be presented with what looks like a sparse set of options. Click on the “Browse Local” option in the bottom right of the window. From there, you’ll need to navigate to where you saved the ISO image. In my case, I have several subdirectories in my raid-array and saved the file under raid-array>OS_images>base_images:
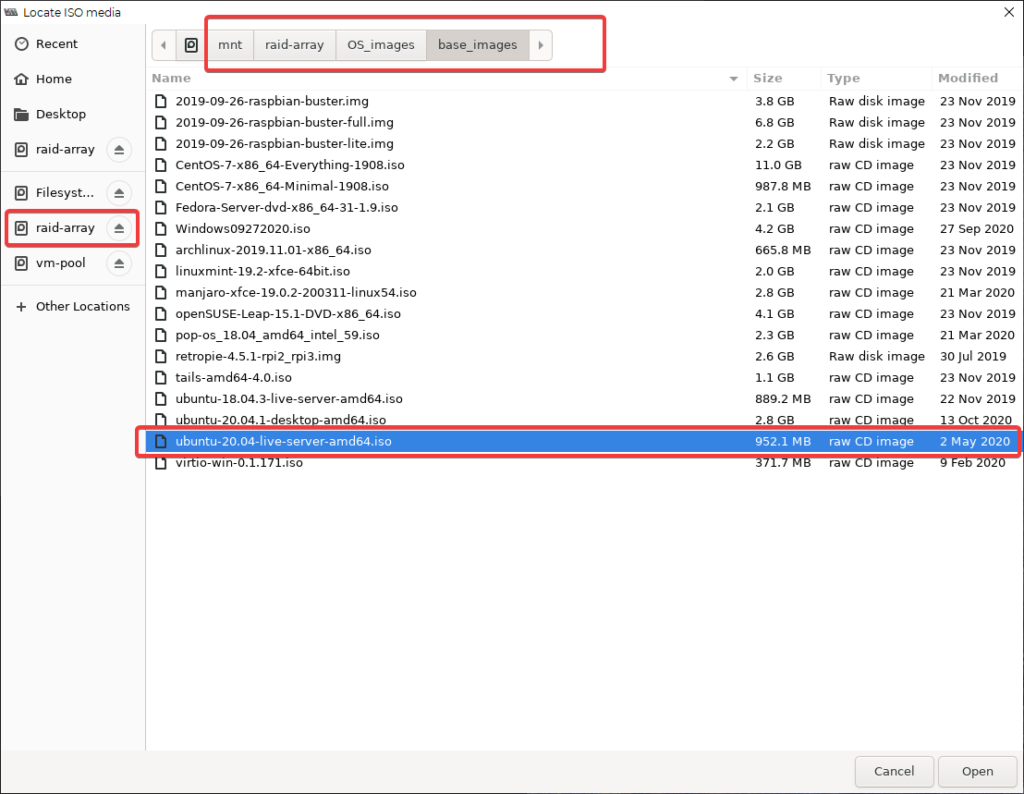
Click “Open” in the lower right and you’ll be brought back to the Creat a new virtual machine Screen with your file path entered into the “Choose ISD or CDROM install media” field. Click “Forward” in the lower right.
NOTE: If your operating system isn’t automatically detected from the iso file, you can type in the operating system at the bottom to try a search, or select Generic default.
Configure Parameters
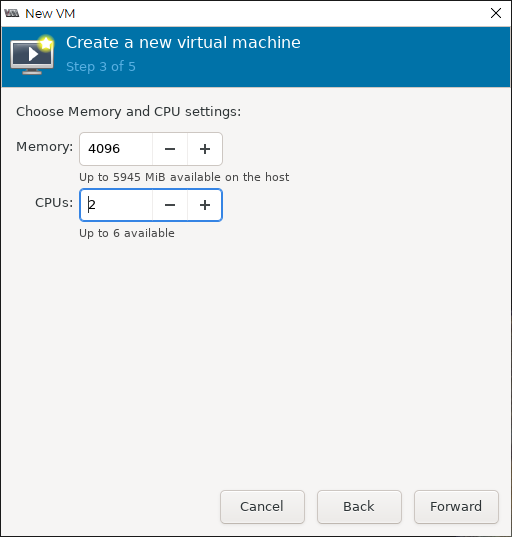
Next, you’ll be prompted to set the size of your RAM and the number of CPU cores you’d like to use. What you choose will vary depending on the intended purpose of the virtual machine. I would recommend searching for minimum requirements of your operating system online as well as minimum requirements of the service(s) you plan on running. Don’t worry too much, though, as you can bump these settings up or down as you need even after the machine is created (you just need to ‘power down’ the virtual machine and change the settings and restart).
NOTE: For the purposes of this series, the first virtual machine we will launch is going to be the a file server- a Samba server more specifically- so the settings you will see from here will be based on that need.
CPU and RAM
Storage
In the next step, you’ll set up storage. If you just want to create the image on the host OS drive, you can just select “Enable Storage” and “Create a disk image for the virtual machine” and click “Forward. Skip the next step.
However, in our series you’ll recall we installed a separate SSD to hold the VM pool. This was to create a separation of concerns and leave the OS as clean as possible. If you have a similar setup, make sure you enable “Select or create custom storage” and click the “Manage…” button.
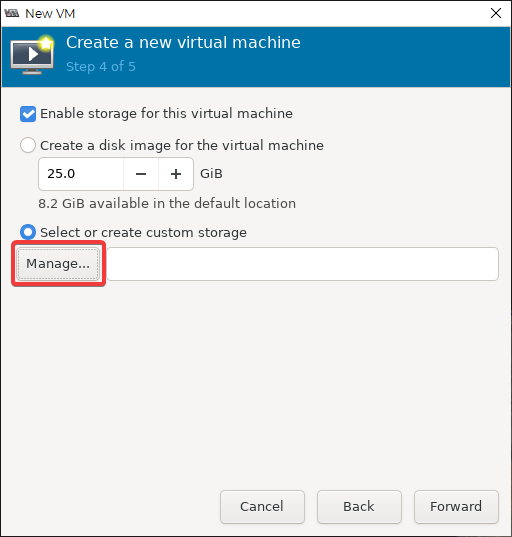
From here you’ll have to select where your vm-pool is located. In the next screen, if you do not see your vm-pool in the left viewport, you’ll have to click “Add Poll” in the lower left of the window (#1 below).
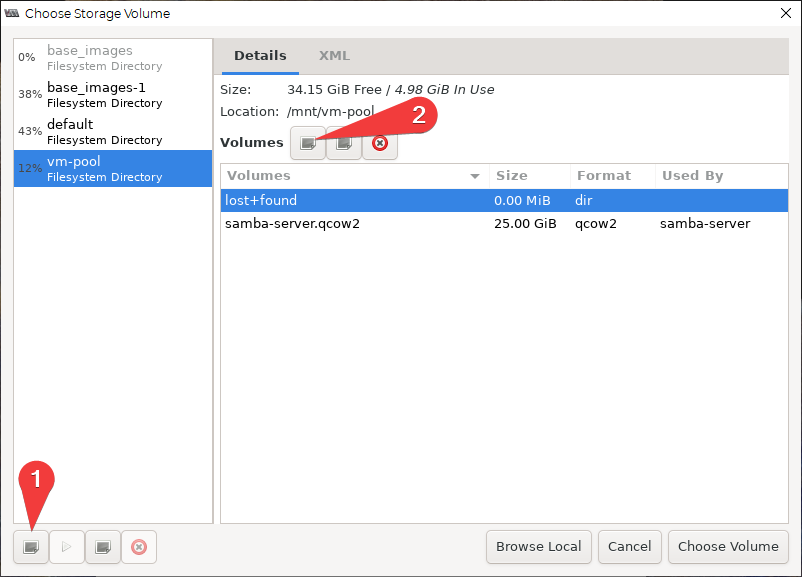
Navigate to the file system directory you’d like to store your VMs, (we named the drive “vm-pool” in our series) and select it. Then select “Create new volume” (#2 above) and fill in the information. For the VM we will create next in our series, 25GB space is sufficient.
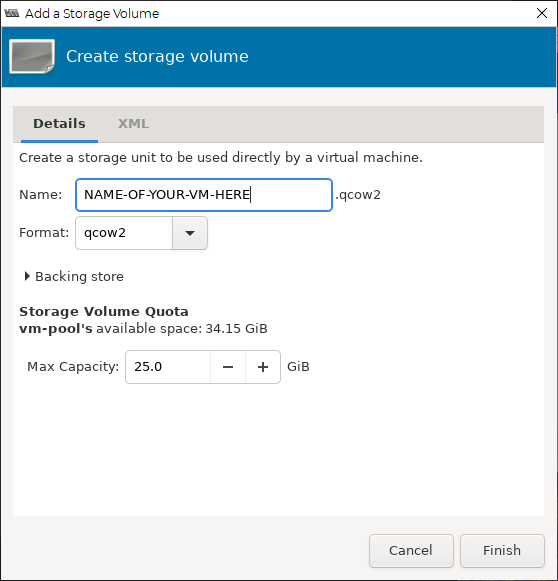
Once created, make sure your creation is highlighted and click “Choose Volume” in the lower right of the window. You will be redirected back to the New VM window. Click “Forward” in the lower right corner. In the final screen, I’d recommenc checking the “Customize configuration before install” box and making sure the network selection is appropriate for your use case (ours is the bonded network connection we’d created previously).
Finalize the Configuration
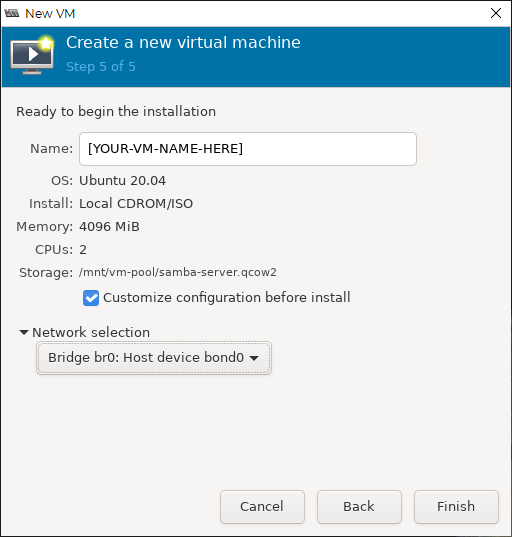
From here, the below image will pop up. This is the last stop before you actually install the operating system. Here is where you can add other hardware, filesystems, add “passthrough” devices, etc. All of this and more will be covered later in the blog post series. In fact in the next series you’ll need to pass through the raid array directly to the samba file-server we are about to create!
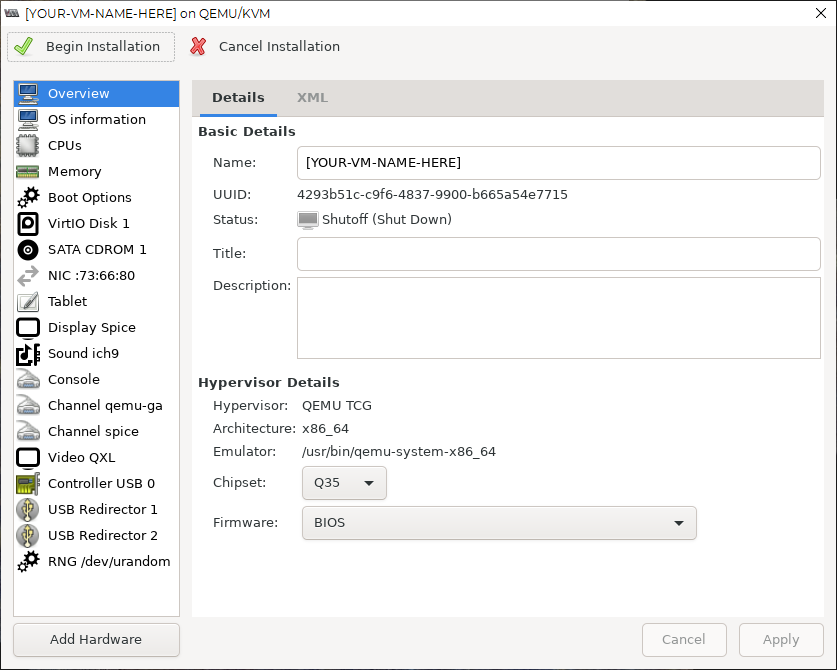
Before we move on, I will point out that you should head over the “CPUs” option. Here you can make sure that all of your cores that you’ve given the machine are actually being applied. You can also manually configure the topology of the CPU to mimic a real life CPU. The below is an example of creating a single socket ( CPU) that has 2 cores and 2 thread per core (accounting for all 4 vCPUs assigned to the machine).
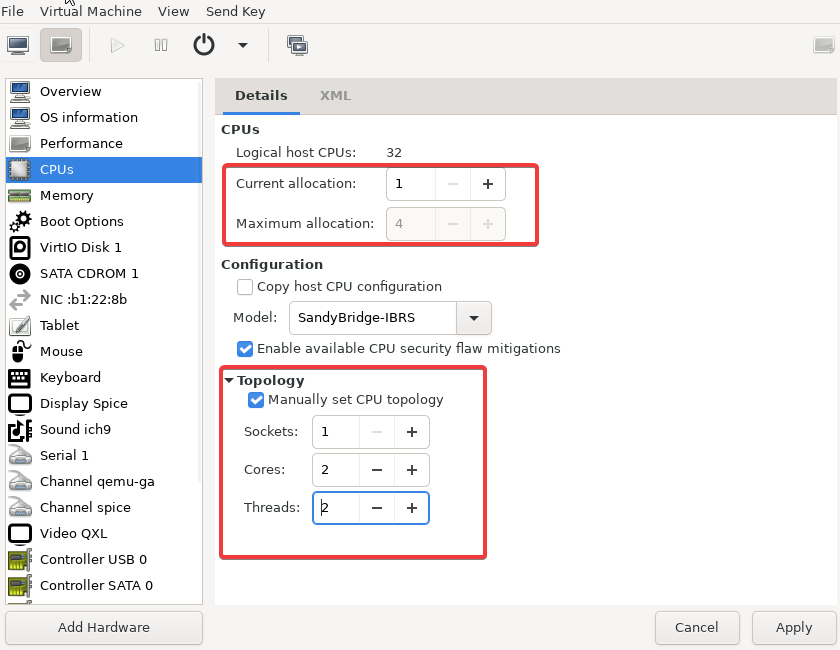
NOTE: While the machine was given a maximum of 4 vCPUs, the machine is currently only set to use 1 in the above example. To make the topology work, all 2 cores need to be allocated.
Start Machine and Install OS
Once you’ve made any final tweaks to your system, click “Begin installation” and away you go! This is a very similar process to installing the server operating system as covered here. The only major differences are that you won’t need to create a bonded network, so you can set up the static IP during the installation (covered here) and you’ll also not need to worry about configuring a raid array or additional drives.
Wrapping Up
That’s all there is to it! Of course I should mention that you can also do all of this in the command line without the need to call virt-manager. This would increase security as you could then eliminate the need for x11 forwarding in your SSH sessions. However, that is out of scope for this series as we are not opening our local network to the big bad internet with any ports, and I find the virt-manager interface much more user friendly for those just getting started. Perhaps we will cover this in a separate more advanced series down the road.
Any extra tips you might have regarding virt-manager best practices? Leave a commetn below and share your knowledge!
Terms
Commands Used
- lsblk (list block) – Lists out the block ID devices connected to the computer (whether they are mounted and accessible or not)
- ls (list) – Lists files. If no filepath is defined it will list the present working directory’s files.
- mkdir (make directory) – Creates a directory at the instructed location. If no location is given, creates the directory in the present working directory.
- mount/umount – mounts a storage device to a desired location
- cp (copy) – Copies a file from one location to another. (cp /mnt/folder1/file1 /mnt/folder2)
- cd (change directory) – Moves the command line to the desired directory (location in the file system).




Pingback: Super Simple Samba Server! – Home Virtualization Server Part 8 – Ctrl Alt Develop
Pingback: Perplexed by Plex? Easy Install – Home Virtualization Server Part 9 – Ctrl Alt Develop
Pingback: Docker; The Easy Way? – Home Virtualization Server Part 11 – Ctrl Alt Develop
Pingback: (My) Perfect Gaming VM Setup with GPU Passthrough – Virtualization Server Part 14 – Ctrl Alt Develop