
Overview
Another post in our “Utility” series, Here we will discuss creating a static IP for your Linux OS on your home network. We will cover both single network connection and multiple bonded ports. There are a few ways to tackle this depending on your circumstance, so we will cover several situations but all of them are, at the core, performing the same function.
as with our previous posts, this tutorial is using Ubuntu 20.04. Let’s get started!
NOTE: If you’ve come to this post from the virtualization server series and have a multiple network connections to your server, skip to Situation 3.
Situation 1: Single Network Port (during OS installation)
The first (and easiest) case is setting up a static IP for a single network port during the installation of the operating system. Since we’ve covered OS installation elsewhere, we will pick up this tutorial at the “Network connections” screen:
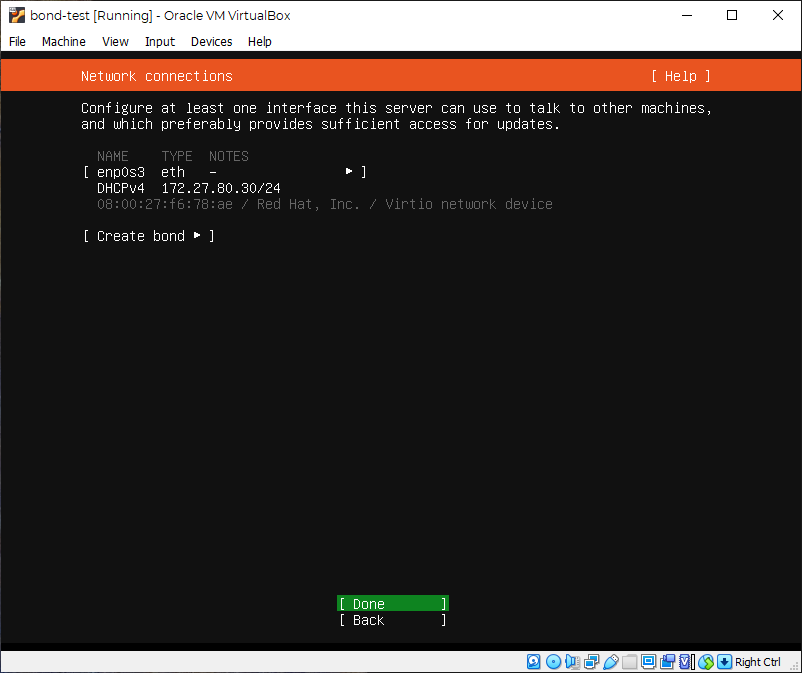
Move to highlight the “enp#s#” or whatever your ethernet connection is labeled and hit enter:

Select “Edit IPv4”. Hit “Enter” on the pop-up while “Automatic (DHCP)” is highlighted. Use the arrow keys to move to the “Manual” option and hit enter. You will be greeted with the below screen:
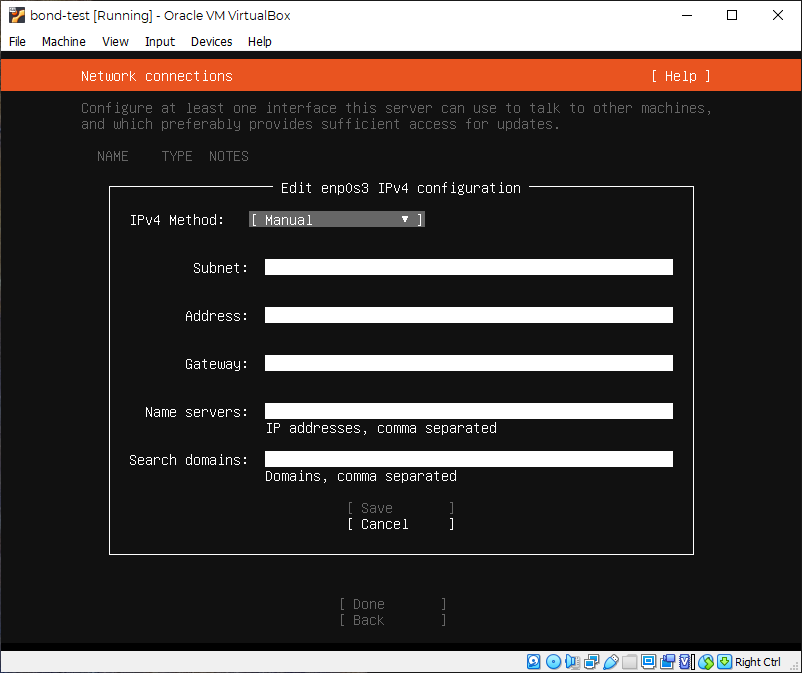
Let’s go through each of these fields individually….
- Subnet – This field uses a CIDR format. Without going into too much detail it is a way of defining the IP range and the network mask in one line. For a home network, it will typically take the form of the first 3 numbers (octets) of your home network’s IP, followed by a “0”, and then a “/24” at the end (see image below).
- Address – This will be where you enter the actual IP address you’d like to permanently assign to your device. IPv4 addresses are made up of 4 numbers, or octets. Make sure the IP is available in your router!
- Gateway – This is the IP address of the device that allows traffic back and forth from your local home network and the internet. Namely- it’s your router.
- Name servers – Better known as Domain Name Servers (DNS), these are servers that help match up friendly website names (like ctrlaltdevelop.com for example) with the actual IP address of the site. This is known as “resolving”.
- Search Domains – Again, without doing a deep dive, this is used for appending text to the end of friendly URL for quicker searches on your local network. For instance if you put all of your computers on a domain (outside the scope of this tutorial) like “myplace.com” then you could search for a computer, say, “myLaptop” by simply typing “myLaptop” instead of “myLaptop.myplace.com” if you add the “myplace.com” in this field. For now we can leave it blank
Once you fill in the fields, it will look similar to this:
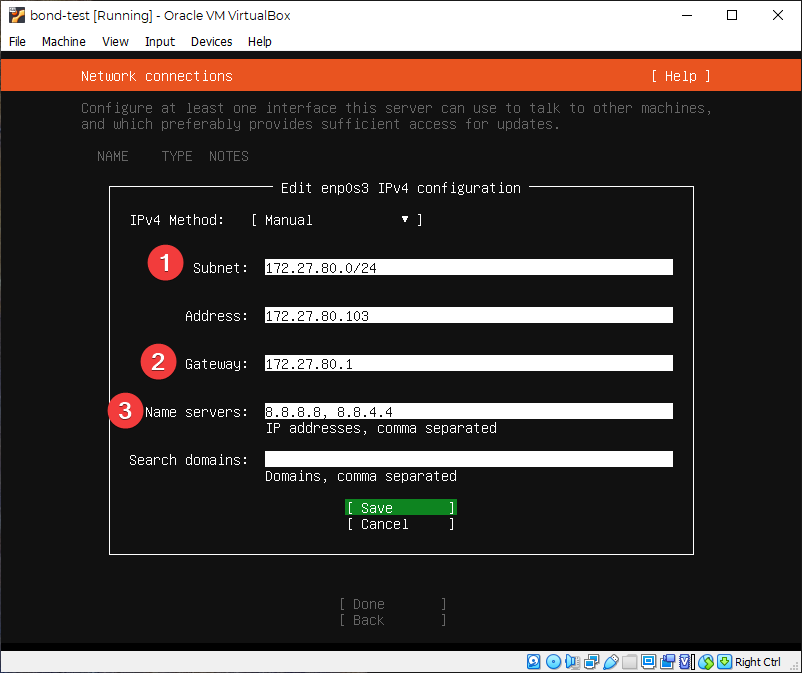
A few points on the above:
- Again, the Subnet will be the first 3 numbers that are the same as all of your other home network device IPs, then a “0” and a /24 like above.
- This is your router. It is almost always the first 3 numbers of your IP range followed by a “1”.
- These nameservers are Google’s DNS servers and work well. If you are concerned about privacy, however, I would recommend other DNS-es like 9.9.9.9 or 1.1.1.1 – Do some research and you’ll find what will work best for you.
That’s it! You’re done. Hit “Save” and finish out the configuration. If the IP address you manually assigned was a.) free and b.)correctly formatted, you’ll be connected no problem!
Situation 2: Single Network Port (after OS installation)
Let’s say you were in a hurry when you set up the system. Or you didn’t know at the time you’d need a static IP. Or someone else set the system up and is now crying to you for help changing the network configuration!
Whatever the reason, now you’re here. What do you do? Well, first, login as a user with sudo privileges- that’s always a good bet (whoever set up the server and should have sudo).
Next, type the following commands into the terminal (hitting enter at the end of each line):
cd /etc/netplan
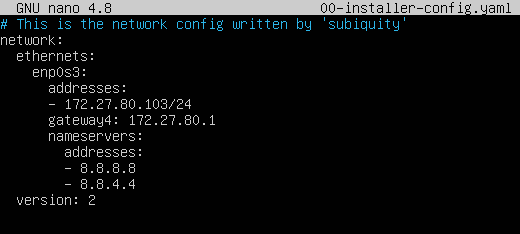
sudo nano 00-installer-config.yamlThe above commands move you into the directory that the network configuration file is in, then opens the file in an editor (nano). If you are asked for the user password, enter it and you should see something similar to this:
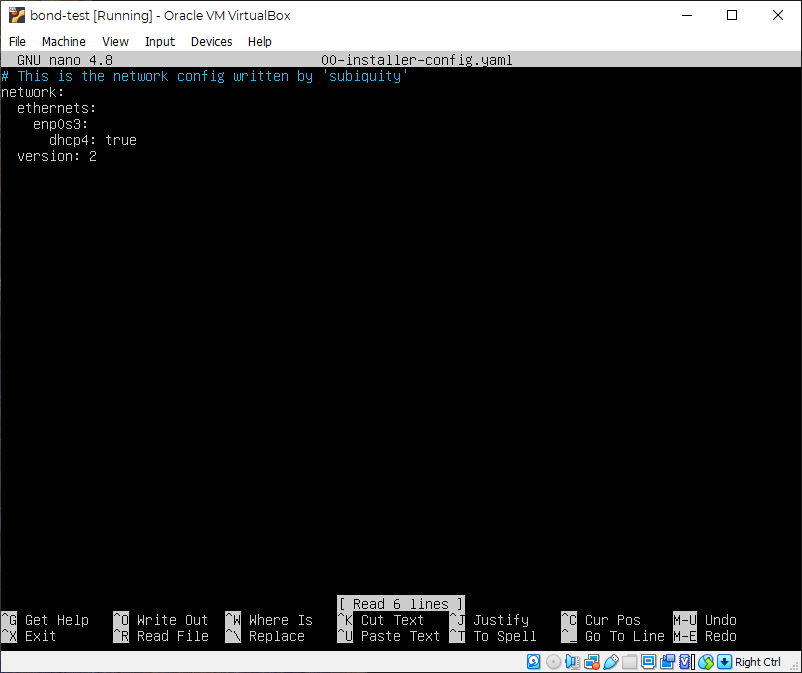
As you can see, DHCP is set to “true”, so a lot of things happen under the hood to give you whatever IP you got. You’re going to need to alter a few lines here to assign a static IP. Use the arrow keys to navigate down to the line that says “dhcp4: true”. Delete it. We are going to change things according to the format below:
network:
  ethernets:
    [ETHERNET-CONNECTION-NAME]:
      addresses:
      - [IP-YOU-WANT-TO-ASSIGN]/24
      gateway4: [ROUTER-IP]
      nameservers:
        addresses:
        - [DNS-IP]
        - [ADDITIONAL-DNS-IPS]
version: 2
So my config file would look like this:
Once you’ve adjusted the file, save by pressing “Ctrl+X”, “y”, “Enter”.
You should be back in the terminal. From here, type:
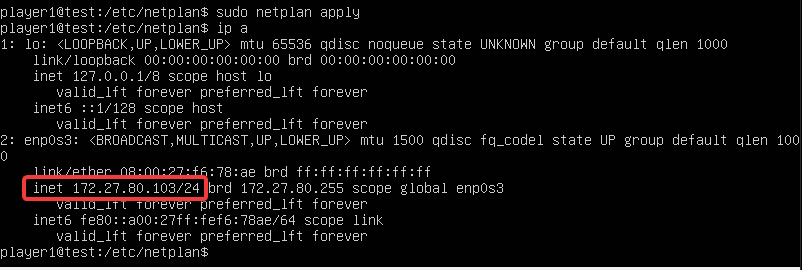
sudo netplan applyIf there are any errors, the terminal will complain to you and give you hints at what the issue might be. If nothing happens, you can verify the changes took by typing:
ip aThis will print the ip information to the screen. Look for the line with the IP you told the device to grab for itself:
Finally, go ahead and make sure you still have internet access by typing:
ping 8.8.8.8This will send a signal to Google’s DNS, which will (in return) ping back to your computer to verify signals are able to get out of and back into your local network. once you see a few lines print, stop the process by hitting “Ctrl + C” on your keyboard. This will stop the pinging process and give you the results. If everything is working properly, you should not have any lost packets:

Reboot the computer, log in, and then run the last two commands (“ip a” and “ping”) again just to be sure everything is persistent across reboots. If all is well, you’re done. Remember your IP, cause it ain’t changing unless you tell it to!
Situation 3: Multi-port Bonded Network (after installation only)
This option has no alternate “during os installation” because while it is an option during OS installation to create a bond, in our experience, it is heavily buggy and rarely works correctly. So it is better to leave any and all connections in their default dhcp setting upon install and configure it after you’ve installed the OS and rebooted.
Just like in situation 2, leave the network as default on install and after you’ve installed, rebooted and logged in, type:
cd /etc/netplan
sudo nano 00-installer-config.yaml
(Remember to hit “Enter” at the end of each line)
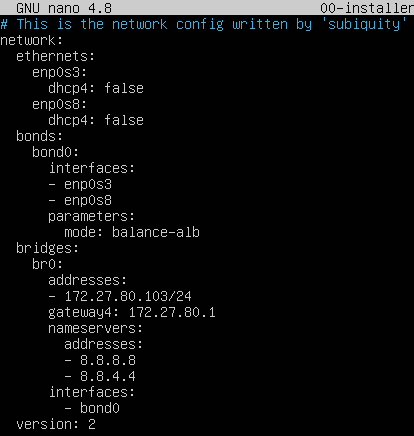
Back in the config file, you’re going to change the file again, but this time it will be in the format:
network:
  ethernets:
    [ETHERNET-CONNECTION-NAME]:
      dhcp4: false
    [OTHER-CONNECTION-NAME]:
      dhcp4: false
  bonds:
    bond0:
      interfaces:
      - [ETHERNET-CONNECTION-NAME]
      - [OTHER-CONNECTION-NAME]
      parameters:
        mode: balance-alb
  bridges:
    br0:
      addresses:
      - [IP-YOU-WANT]/24
      gateway4: [ROUTER-IP]
      nameservers:
        addresses:
        - [DNS-IP]
        - [OTHER-DNS-IP]
      interfaces:
        - bond0
version: 2
A few comments regarding the above format:
- Until late 2020, manually assigning an IP like this for bonded NIC ports had a major bug that prevented this from working (bug #1860926). The only way to create a static IP was to reserve the IP on your router. Thankfully, this has been patched. Make sure you update/upgrade the OS before you change this.
- The bond mode (“balance-alb” above) is the easiest mode that allows for load balancing and speed increases without needing special configuration on a network switch. Make sure you do your research on the bond mode you’d like to choose.
After you’re done, save and test using the “ip a” and “ping” commands (see the end of situation 2 for details on that). You should be good to go!
FINAL NOTE: In situations 2 and 3, when editing the network configuration file, it is essential that spacing is consistent. Each indentation is two spaces!
Wrapping Up
As you can see, while the devil is in the details, the process is simple: edit 1 file to reflect the ip address you’d like to permanently assign the device.
Do you have any added nuances that you prefer? Networking wizardry you’d like to share? Drop a comment below so we can learn together!
Thanks for reading!
Terms
- CIDR – Classless Inter-Domain Routing. A sort of short-hand way of defining both IP address and the network mask. It defines which parts of the address are a network prefix and what parts are actually assigned to the device as its own defining address.
- Network mask – A system that shows which parts of an address belong to the network prefix and which identify the actual device. Unlike CIDR, this is a separate set of octets, where an octet that is 255 is a part of the network prefix and any other number (typically 0) is a placeholder for a device ID. Most home networks have a Class C subnet mask of 255.255.255.0, which means the first three octets (numbers) belong to the network and the last is to assign to the device.
- Static IP – A manually assigned network address that never changes.
- DHCP – Dynamic Host Control Protocol. A method of automatically assigning IP addresses to devices. Fast and easy, but the IPs are only leased, and can be reclaimed and changed without notice.
- Octet – a number representing an 8-bit quantity used to create IP addresses. IPv4 uses 4 octets separated by a “.”. Technically the octet values range from 0-255 (i.e. 0.0.0.0 to 255.255.255.255)
- DNS – Domain Name Server. Computers whose sole job it is to pair the name of a website (www.ctrlaltdevelop.com) to its actual IP address. This process is known as “resolving”.


Pingback: Super Simple Samba Server! – Home Virtualization Server Part 8 – Ctrl Alt Develop