Ever wanted to spy on your roommates or family? Find out who is leaving those dishes on the couch? (Spoiler- it’s probably the kids… if not then you need a new roommate). Well… you’re in luck! Getting a security camera system can be an expensive proposition but it doesn’t have to be!
Armed with some 9 dollar cameras and a free and open sourced software called ZoneMinder, you’ll be feeling like a 90s supervillain in no time at all!
Overview
There’s a lot to cover here setup wise, but you’ll feel like a mad genius once you’re done! The overall steps are as follows:
- Install ZoneMinder
- Configure the Cameras
- Connecting the Cameras to ZoneMinder
- Using the Mobile App
WARNING: Before going further, you should know that the mobile application (ZM Ninja) is currently scheduled for end of life at the end of 2021. There are talks from the creator that the ZoneMinder community will be taking over development on it, but so far as we know nothing is set in stone. This means that future updates for ZoneMinder or your Phone could break functionality on the mobile app. That said, the app is still working at the time of writing. In a future post we will be covering an alternate software to ZoneMinder so if you’re concerned about mobile app functionality, we’ll have you covered over there!
UPDATE (4/23/2022): A recent check of the Zoneminder github site does in fact show that the Zoneminder team has taken over maintaining the project! Though we have not tested the software since the changeover.
Bill of Materials
Below is a list of things you’ll need (and a few optionals) to get things set up.
NOTE: The below list contains affiliate links to products. Using these links gives Ctrl Alt Develop a (very) small profit from the sale at no cost to you. This allows us to keep creating valuable content and how-tos. If you choose to use these links, we thank you.
- Old/spare laptop (or create a vm/container)
- 5 pack of ESP32-CAM cameras
- FTDI USB to serial adapter
- Wide angle camera lenses (optional)
Install Zoneminder
While there are several options for how to install ZoneMinder (ZM), this tutorial will cover running ZM in a Docker container. The reasoning for this is simple; given the mobile app’s possible fate combined with the fact that you are likely just testing this system out, you would be better off creating a container that can be easily created and destroyed without having to worry.
Additionally, we also have the basic steps for setting up docker containers and managing them through an easy to use GUI (Rancher) in our Virtualization series. For a rundown of the basic steps (or to get a docker server up and running) please see this post here. Once you familiarize yourself with the process, continue below.
Host Command Line Setup
Before we jump into docker, we have to do a quick chore in the command line of the host machine (the computer that has docker and rancher on it). SSH into the host (see our former post for help with that) or just login if you have a monitor attached.
Once you’re logged in, make sure you are in your home directory:
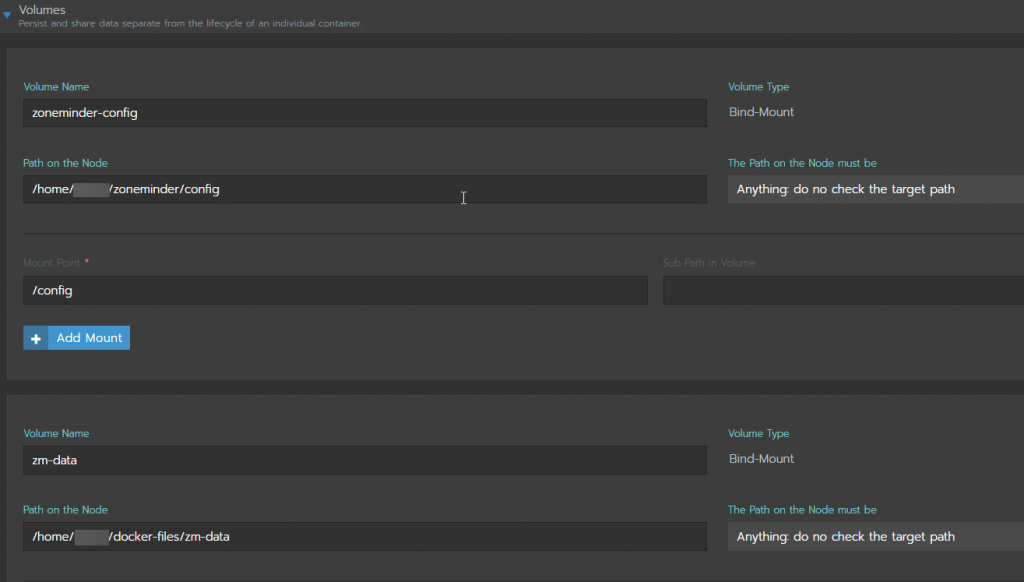
cdNext, you’ll need to create a few directories. First, we’ll create a zoneminder directory and then move into that directory:
mkdir zoneminder && cd zoneminderThen we will create another folder to save all of the configuration information (user and password, camera settings, etc):
mkdir configNext we’ll need to go back to the home directory create another folder to save recorded camera footage.
cd && mkdir docker-filesThen go into the directory and create a zm-data folder:
cd docker-files && mkdir zm-dataNOTE: Instead of storing the recorded footage directly on the host device, you could also save it to some network storage that is connected to the host or within a RAID array attached to the device. But again- that is for you to decide and explore
We will not be going into that part of the configuration in this tutorial (it’s going to be long enough) but we can at least create the folder for now.
ZoneMinder Config in Rancher
For our docker image, we’ll be using dlandon’s standard image. The configuration is relatively simple; two ports and a precious few environment variables needed:
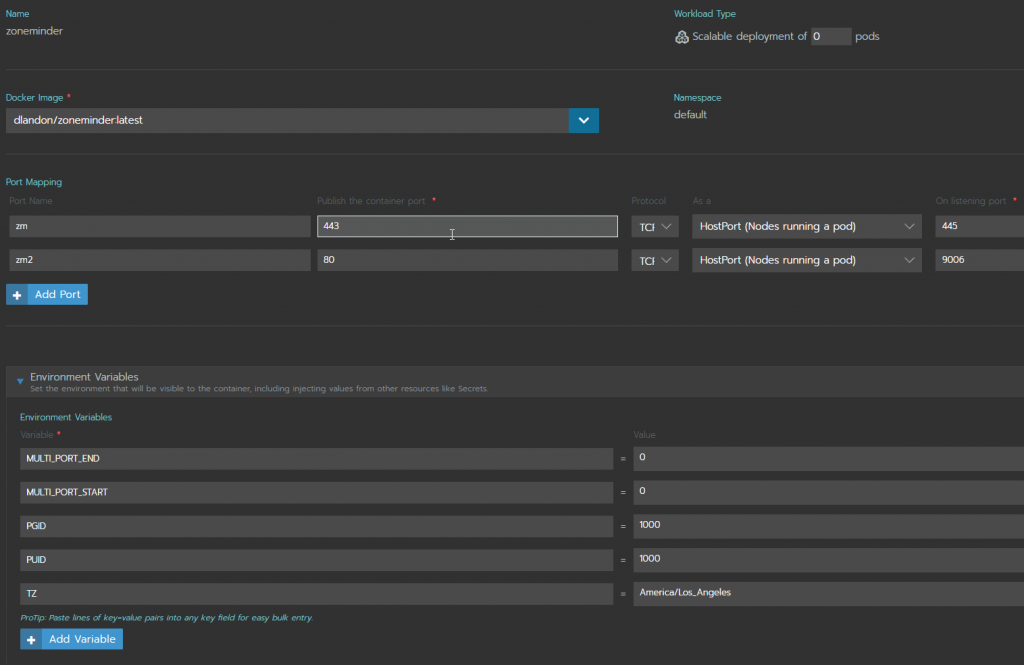
A few things to note:
- We’ve declared the MULTI_PORT variables as zero in order to explicitly remove the option. This option overcomes the limit many broswers put on how many streams may be viewed at the same time from the same port. See this article for more info if you’re interested in utilizing this feature.
- The docker image we are using is the basic zoneminder as opposed to the zoneminder.machine.learning image that dlandon also supports. The reason for this that that a recent update to the database caused issues to the container starting up for us. You can certainly try the machine learning version (by substituting “dlandon/zoneminder.machine.learning:latest” in the Docker Image field), but know that the basic version is a working fallback.
You’ll also need to link the two storage areas on the host you set up to the docker container in order to keep your configuration and other data like recorded camera footage (beyond the scope of this tutorial). Keeping these things on the host will ensure that this information persists when the container gets shut down.
Finally, Make sure you select “Kill all pods then start new” under the Scaling options. That’s it! Hit “Launch at the bottom of the screen and give it some time to boot up.
Setting up the database and the app itself can take a bit of time depending on your hardware and resources. You can check on the status by clicking on the name of the container (zoneminder) and then clicking on the three dots on the right of the screen. In the dropdown select “View logs”.


Once the logs say the image is ready, you can navigate to the web interface by opening a new tab on your browser typing in the host’s local IP followed by the port you’d assigned to container port 80 (in our tutorial we’ve assigned 9006). Using the following format, type into the URL bar:
[HOST.LOCAL.IP.ADDRESS]:[PORT]/zm
//In our example:
172.27.80.210:9006/zm
NOTE: You’ll need to make sure you add the “/zm”after the port number otherwise, you’ll just get an Apache2 Webserver page that states it is “working”.
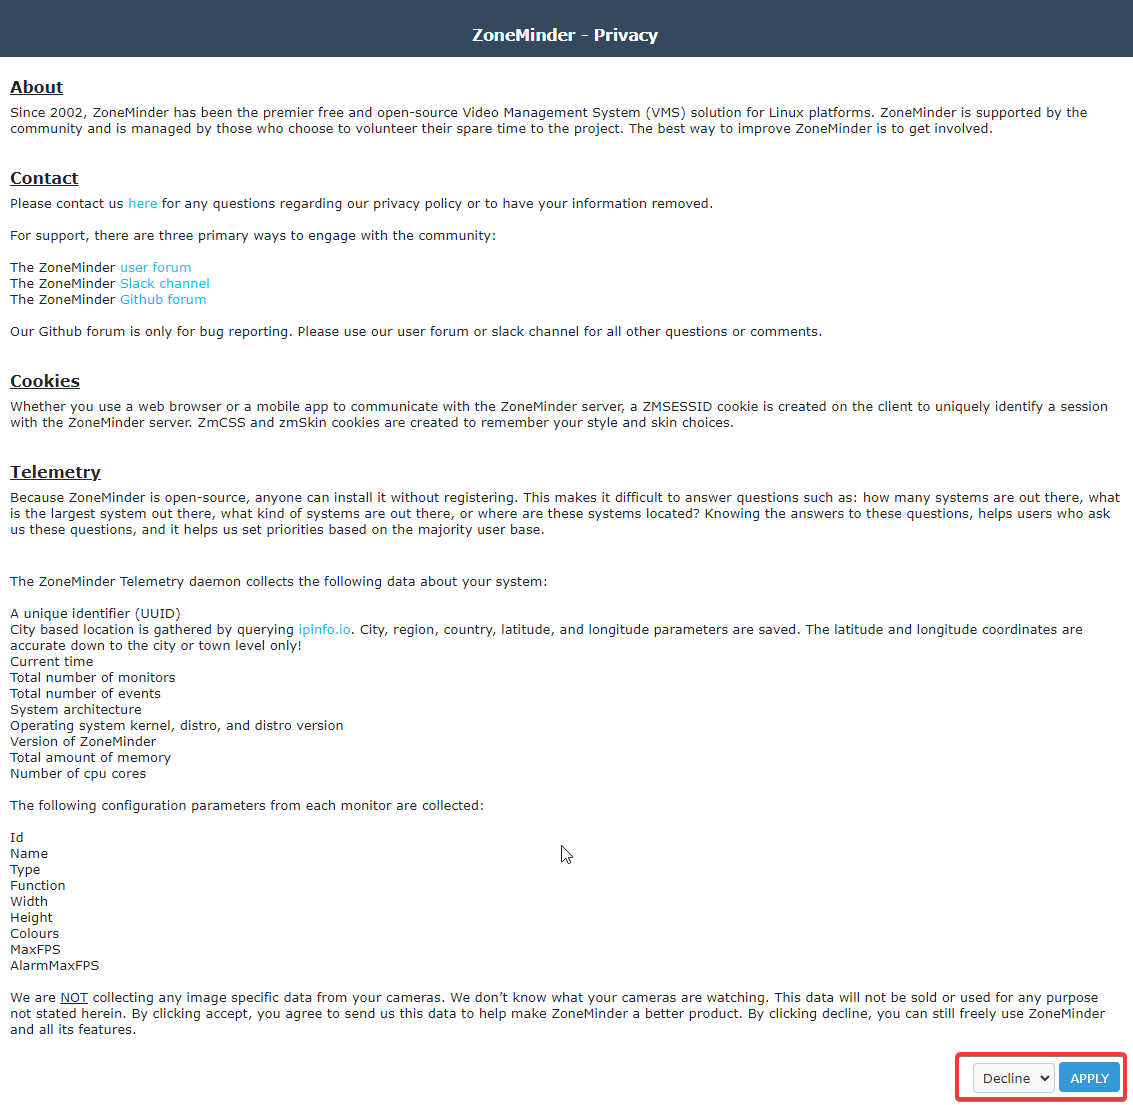
You’ll be greeted with a Privacy Policy statement. Select “accept” or “decline” and hit “Apply”:
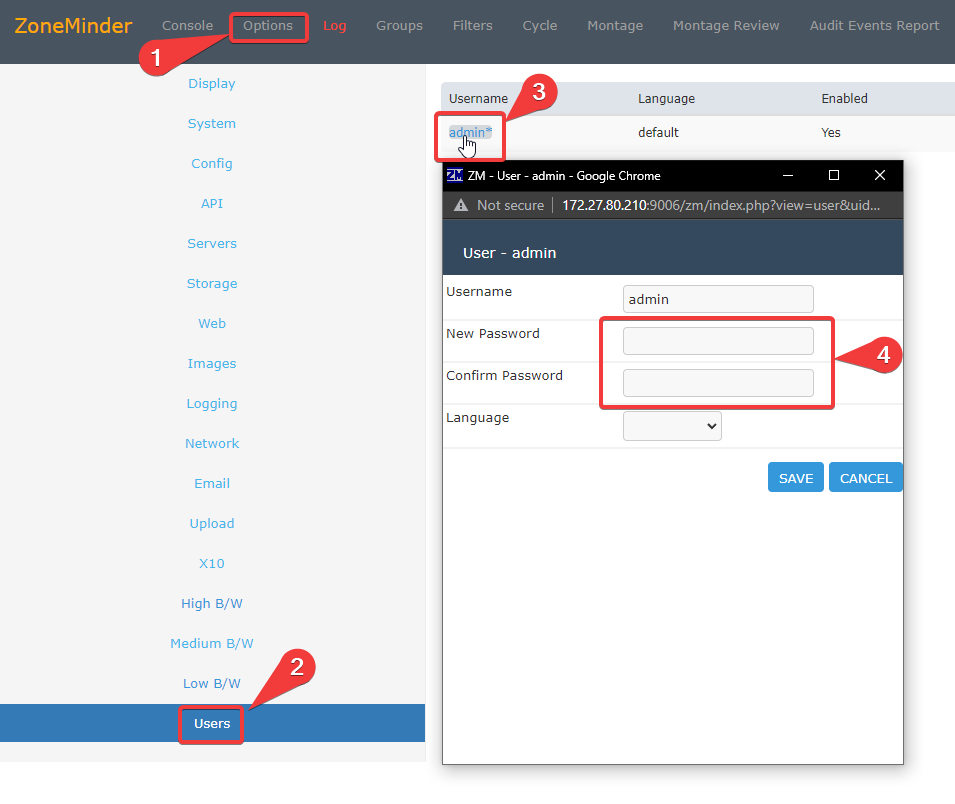
From there you’ll be dropped directly into the main page. Since you don’t have any cameras added yet, it will look pretty sparse. Before we move on to the camera setup, I’d recommend changing the password of the admin account from whatever the default is. Head to Options(1)>Users(2) then select the admin account(3). A window will pop up for you to change the password(4).
Don’t Want to use Rancher?
If you don’t want to use Rancher, then you can certainly use a docker compose yaml file or just run it directly in docker. Check out dlandons README file to view the docker run command template (which you can turn into a docker-compose file):
Now that you’ve got Zoneminder spooled up, let’s get some of those cheap (read: awesome) ESP32-CAMs up and running…
Configure the Cameras
Download and Install Drivers
Now we turn our attention to the humble ESP32. Since this tiny little board doesn’t have a usb interface, we’ll need to make use of that FTDI adapter. often times you’ll need to download drivers for these FTDI adapters to get your virtual COM ports (VCP) working on your development computer. I’ve found this site to be a huge help:
https://ftdichip.com/drivers/vcp-drivers/https://ftdichip.com/drivers/vcp-drivers/
Make sure you download the correct version of the drivers based on your computer operating system.
Hardware Hookup for Programming ESP32-CAMs
The very first thing you’ll need to do is connect the teeny tiny camera into the slot on the topside of the board. The black flap flips up and back toward the logo (pry it with your fingernail). slide the cabling in and snap the black flap back down.
Now you’ll need to hook up the wires from the FTDI to the ESP32 as follows:

Take note of the Brown wire above that goes from input pin 0 to the ground pin just below it. This puts the board into programming mode when it is turned on.
Plug in your FTDI adapter to a USB port on your computer.
NOTE: If your FTDI adapter has an option to provide 3.3v or 5v power, select 5v as this will be needed to power both the board and the camera. The adapter in the image above is not same as the part we’ve recommended in the Bill of Materials list. Also make sure that the “TX” pin on the FTDI goes to the “RX” pin on the ESP32 and “RX” to “TX” (one way communication on each wire).
Download the Code
After a lot of testing, we’ve found what we consider to be one of the best programs for this use case! Big thanks to arkhipenko for this project:
https://github.com/arkhipenko/esp32-cam-mjpeg
NOTE: This library is one of several the arkhipenko has for these ESP32 CAMs. The one we’ve selected is for a single client (zoneminder). It has very low latency and works nearly right out of the box compared to other libraries. If you need to serve multiple clients simultaneously, we recommend using this library instead and use the “esp32-cam-rtos-allframes” project. It adds about a 15-20 second latency to the stream because of the way it caches streams locally to send to multiple client nodes at the same time. If you need reliable streams with no frame drops to many clients, this is the way to go!
Configuring the Code
While this code works nearly out of the box, there are a few things we need to do to get it up and running.
In this tutorial, we’ll be using platformio on VS Code to make these changes. We won’t go into getting this set up but if you need help, check out this article outlining the setup of Platformio on VS Code and this one that shows how to import arduino projects into Platformio.
Just make sure that when you import you select the ESP32 CAM board. You can leave the “use Arduino libraries” option unchecked.
NOTE: The project folder and the .ino (arduino project) file names must match for Platformio to import, otherwise you’ll get an error. Make sure you copy the name of the .ino file and change the folder name to the same.
Once you’ve imported the arduino project, the first thing you’ll need to do is add a couple of lines to the platformio.ini file. Click on the file at the bottom of the explorer(1), add the lines indicated to the bottom of the file(2) and save.

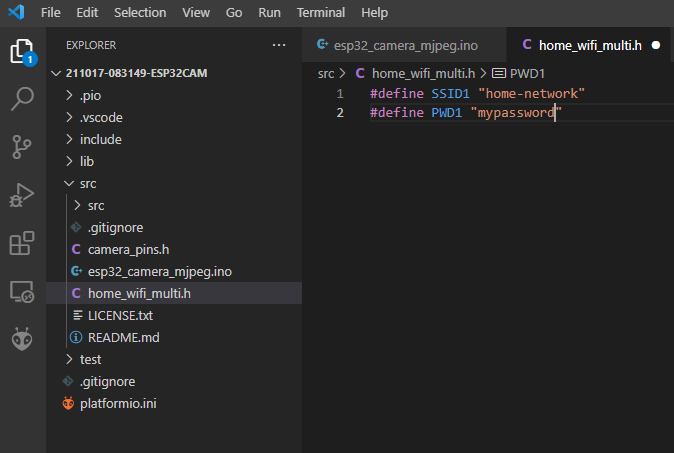
Next, you’ll need to add a file to tell the program your WiFi SSID and password. Under the top level src folder, create a file and name it “home_wifi_multi.h”. Add the information in the following format:
#define SSID1 ["SSID-NAME"]
#define PWD1 ["SSID-PASSWORD"]
So if our SSID was “home-network” and the password was “mypassword” (please don’t do that to yourself) you’d enter the following:
NOTE: If you’re planning on saving this code to github, you’ll want to create a .gitignore file int the same folder and add the name “home_wifi_multi.h” (no qoutes) and save it. This will keep your WiFi name and password out of the repository
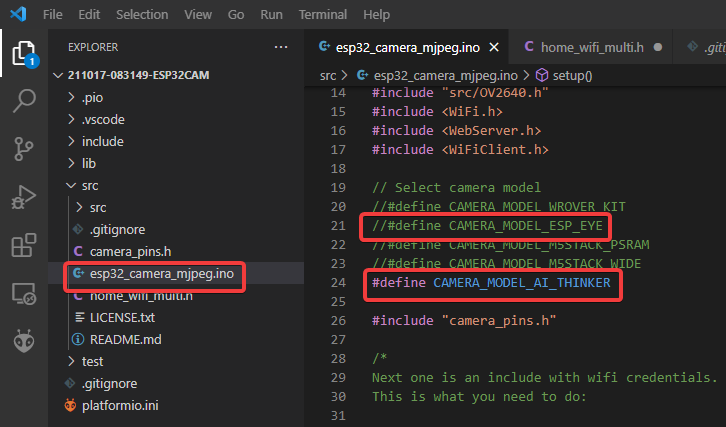
Finally, you’ll want to make 2 changes to the .ino file itself. Navigate to src/esp32_camera_mjpeg.ino and change the board type. The file has ESP-EYE as the default active board type. In our Bill of Materials, we’ve selected the ESP32-CAMs, so you’ll need to comment out the EYE and uncomment the AI-THINKER model:
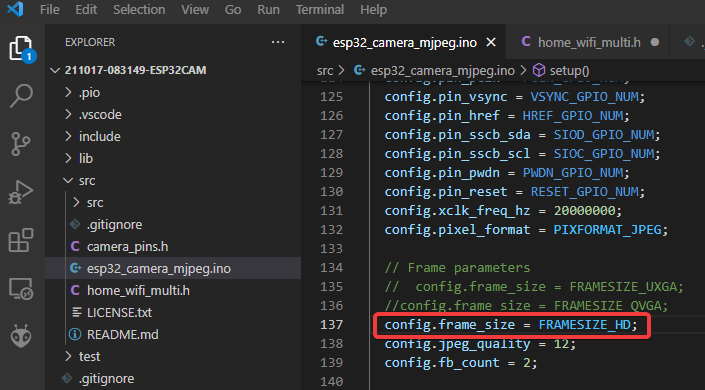
Then you’ll scroll down to the frame parameters. You can leave this as is, but changing the frame size to “FRAMESIZE_HD” seems to improve the quality of the stream without affecting reliability:
Now save all the files and get ready to upload!
In the lower left of the VS Code window you’ll have a few options. With the .ino selected, you’ll want to run these as follows: Clean(1), Build(2) and Upload(3). (Make sure your ESP32 is plugged in via your FTDI USB adapter);

If you get any failures or errors, consult the messages in the terminal, they are pretty good at pointing you in the direction you need to go to fix it, then start the clean, build, upload process again.
Once the upload is complete, you can press the serial monitor icon (see above).
Disconnect the brown wire from the ESP32-CAM and click the tiny reset button on the underside of the board by the power and ground wires. the serial montior should spit out some information, connect to wifi, and then give you the IP address info that the device has connected with along with the http address to connect to the device. The form is:
http://[LOCAL.IP.ADD.RESS]/mjpeg/1If you’d like to verify this is working prior to heading back to ZoneMinder, you can open up VLC (a free and open source media player) and try out the feed. In the top toolbar, go to “Media”, then in the dropdown, select “Open Network Stream…”. Type in the http address of the ESP32-CAM. It should pop right up! If not you’ll want to make sure that your http address is exactly correct and that your upload didn’t fail or have wrong information (like your SSID info) applied to it.
Once you’re satisfied it’s working, head back into your zoneminder web interface and lets get this thing connected!
Connecting the Cameras to ZoneMinder
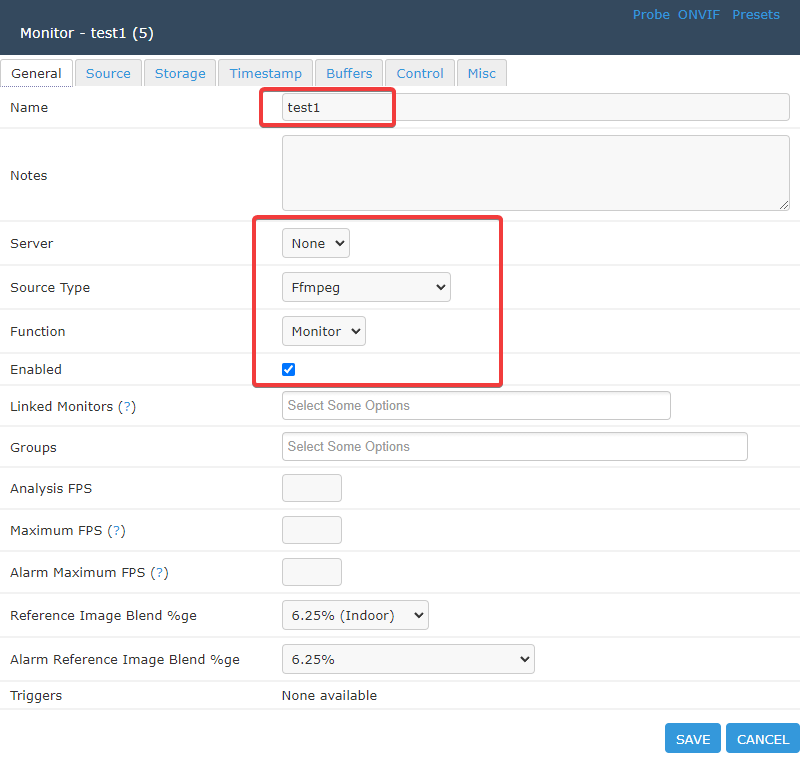
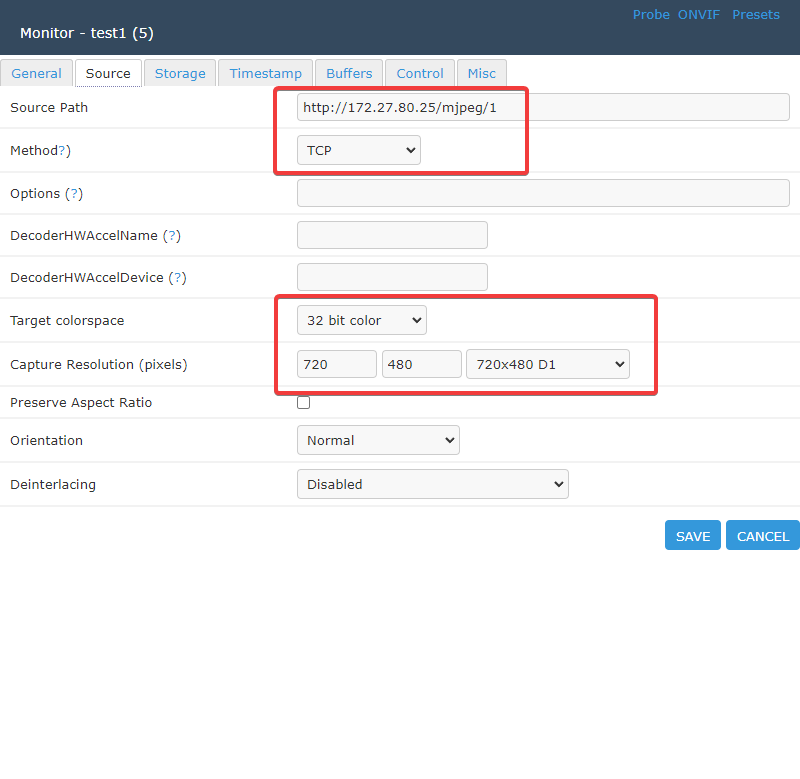
Connecting the camera in ZM is relatively simple. In the inteface, click on “Add” at the top and then fill in the following information in the “General” and “Source” tabs:
Hit save and then in the front page click on the name (test) of the camera and it should bring you to the stream!

Congrats! Now do the other 4 cameras.
Using the Mobile App
NOTE: Again, the mobile app’s future is currently unknown. This section may eventually not work. If not, we’ll have another post about a different security camera system soon!
Configure ZoneMinder Options
Before heading to your phone and downloading the app, there are a few setting that need to be pre-configured on the web page, first. Head over to “Options” in the top navigation area.
There are a ton of options here, so we’ll just list what is relevent here:
Under Sytem:
- OPT_USE_AUTH = enabled
- AUTH_TYPE = builtin
- AUTH_RELAY = hashed
- AUTH_HASH_SECRET = 40+ random characters (whatever you want)
- AUTH_HASH_LOGINS = enabled
- OPT_USE_LEGACY_API_AUTH = enable for first time, test turning it off after.
Under API:
- Make sure the admin and/or any other users that want to access via the app have the “API Enabled” box checked.
That should cover all of the bases in the service. Now grab your phone and warm up your thumbs…
Install and Configure the Mobile App
Download the mobile app from whatever your app store is – the name of the mobile app is ZM Ninja.
Once you’ve got the app, you can try to use the wizard to set up a connection to your zoneminder instance, but in our experience a manual setup, while potentially tedious, has proven much more reliable.
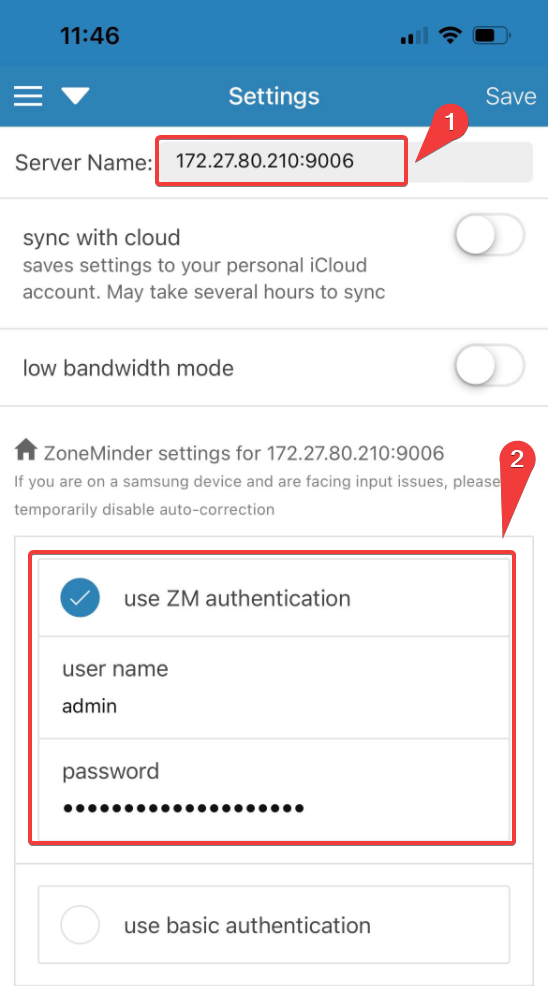
Fill out the manual steps and you’ll likely get an error (if not, congrats, you’re good to go). Head over to settings (swipe left to right on iOS to reveal the menu) and check the following info:
- (1) Server IP address and port
- (2) check “use ZM authentication” and type in your username and password
- (3)manually type in the http addresses for portal url, cgi-bin path and api url, paying special attention to the subdomains (/zm, /zm/cgi-bin/nph-zms and /zm/api). Remember to use your own IP and port.
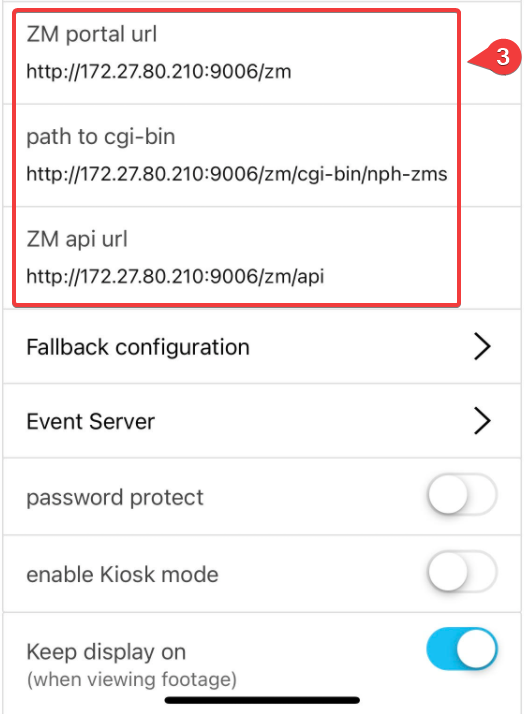
For the cgi-bin path, if the above doesn’t work, you’ll need to head back to the web interface, select a camera, and the open developer tools while you’re viewing the stream (f12 on chrome browser). Right-click on the stream itself and then select “Inspect”. from there in the dev tools, you’ll see the html. look for the line with the cgi-bin path in it like so:

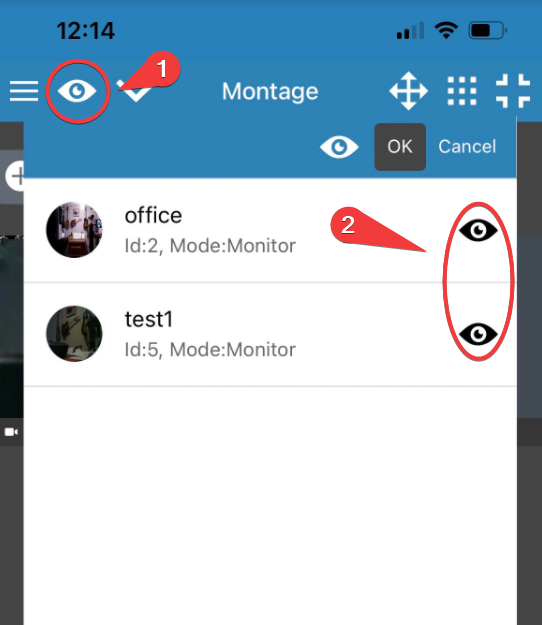
With all of that set up, you should be able to get onto the service from your phone (as long as you’re on the same WiFi/local network as ZoneMinder). In the menu of the mobile app, tap “Montage” near the top. Click on the Eye in the top bar(1), then unhide any monitors you want to see(2):
You should now have ZoneMinder and ZM Ninja talking to one another. Congrats!
Viewing the Feed Remotely
If you’re interested in viewing these cameras remotely, the simplest and safest way to do so would be to set up a VPN like WireGuard on your home network and install the client app on your phone. Check out this other post on Ctrl Alt Develop for how to do just that!
Wrapping Up
In this post, we’ve managed to set up ZoneMinder in a docker container for quick deployment (and redeployment), Loaded some affordable cameras with some great software to stream, connected the cameras to ZoneMinder, and then set up the mobile app (ZM Ninja) to be able to view the streams from your phone! PHEW!
In part 2, we are going to take a look at getting the cameras set up for permanent deployment. We will use antennas to improve WiFi signal strength and, with low price still top of mind, we’ll use some tic tac boxes to create a container for these cameras!
See you in the next one, thanks for reading!