Overview
In our last post, we identified some of the main differences and use cases for Docker and are ready to start experimenting! In order to maximize our resources, we will be taking experimental services, or long term services with a small footprint that do not merit a full VM, and placing them into a virtualized host that is set up to run Docker. The host will be yet another VM in our virtualization server. This sort of encapsulation allows for some simple mitigation of some of the known security and portability issues that arise from container use while still keeping all of the benefits! It also keeps to our conceptual rule of “separation of concerns,” as our Virtualization Server OS stays bare bones and all docker related functions take place in their own environment.
Additionally, it would be nice to have a GUI for Docker container creation and monitoring to interact with much in the same way we have virt-manager to work with for VM creation and observation. For this, we will install Rancher.
As always the general steps are simple, but the devil is in the details:
- Setup the VM
- Install Docker
- Install Rancher
- Add Your First Service
Let’s get to it!
NOTE: Big hats off to Techno Tim for leading the charge on this setup. I relied heavily on his expertise to get this up and running in my own environment and, truth be told, only add a few updated details to his instructions. Check out the specific video I used here. Be sure to check the recent comments for updates to the config or follow along in this post.
VM Setup
As before, SSH into your host virtualization server and setup a VM using virt- manager following the conventions we followed in this post. The parameters for resources will vary depending on how many services you end up running on it, but a good start would be:
- CPU: 4 vCPU (make sure they are all allocated)
- RAM: 4GB (likely would quickly go up to 8 or more)
The good news is you can shutdown the vm and change these settings at any time and perform a reboot and the adjustments will immediately take effect, which makes adding RAM, CPU cores, new file shares, etc. a breeze! Plus one for doing Docker inside of a VM!
NOTE: Make sure you install the openssh server while installing the OS. It will make copying and pasting some of the longer commands much easier down the road.
Dont forget to run updates and upgrades before you continue:
sudo apt update && sudo apt upgradeDocker
To install Docker we are actually going to head to the Rancher documentation page and run the command found here. At the time of writing, the command is:
curl https://releases.rancher.com/install-docker/19.03.sh | shBe sure to use this link to find the latest URL to use in the above command. This single shell script does a lot, so it might be a minute before you have control again. Once you do, note that there is a warning at the end of the script. Take note of it and also the few lines above it:
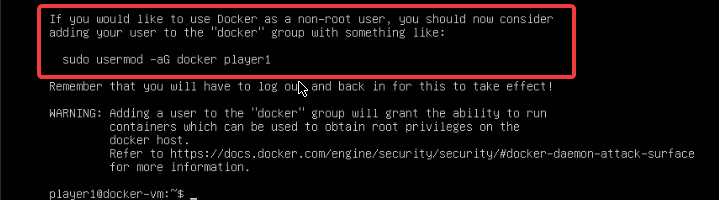
Be sure to punch in the usermod command (player1 above will show your username instead).
sudo usermod -aG docker [USERNAME]Then reboot:
rebootThat’s it! The Rancher script took care of all the details… pretty great, right? Now let’s move on to Rancher…
Rancher
As TechnoTim mentions, there are options to install a “high availability” Rancher version. In a nutshell, you’d basically be running several “nodes” of Rancher so that if one needs to be taken down or breaks down, your services would still be up. This would be an awesome idea! … if we needed it. The purpose of this series, however, is for home use and experimentation. Unless you have a large family of computer nerds and other network redundancies, there is no reason for a high availability setup. That said let’s get our simplified setup going!
Create SSH key!
To avoid the hours of headache I had, you’ll need to create an ssh key. Without it you will end up getting some issues around “etcd”. After finding an looking through the logs, it pointed toward not being able to connect with SSH.
To generate a key, type:
ssh-keygenYou will be asked a few questions; where do you want to save? Do you want to password protect this key? If you do, type it again. Leave them all as default (default save location and no password) by simply hitting “Enter” for each question.
That’s it! Moving on…
Save a Snapshot
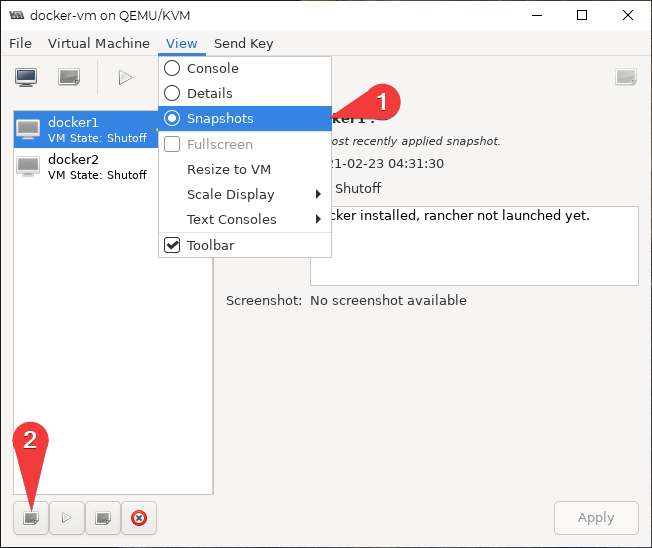
Before moving forward, I would recommend shutting down the VM and creating a snapshot. At the time of writing, there are known issues with the latest Rancher version and cluster creation. Saving a snapshot now will allow you to quickly roll back and try a different version if “rancher/rancher:latest” gives you any issues. In the SSH session type:
sudo shutdown -h nowNext, in the Virtual Machine Manager window, right-click on the docker VM and click “open” in the drop-down to open a window. In that window, select “View” and choose “snapshot” (1). Then, click on the “New snapshot” icon in the lower left of the window (2).
Fill out the info (name and description) in the next window and save it.
Now you’ll be able to get back here and avoid completely starting over should anything go wrong!
Back to Rancher…
Setting up persistent data will enable us to save our configuration file in case something happens and we have to re-install. To enable persistent data you have to type the following command:
docker run -d --restart=unless-stopped \
  -p 80:80 -p 443:443 \
  -v /opt/rancher:/var/lib/rancher \
  --privileged \
  rancher/rancher:latest
A couple of notes here…
- -d: Detached mode. This runs the service in the background as opposed to connecting the terminal to the service and showing output from the container.
- –restart=unless-stopped: This option allows the service to continually attempt to become active unless it is manually stopped.
- -p: These are port assignments. If you run into issues using rancher and rancher-agent (I did not), you may need to adjust these ports per the documentation.
- -v: Defines volume mounts. This allows for configuration data to be persistent even if the container is removed and re-added, as this saves the data locally on the host (outside of the container).
- Make doubly sure you have the “–privileged” in the commands or you’ll run into issues with the container constantly restarting and never opening.
- You can try rancher/rancher:latest first, but if you experience trouble when creating a cluster, just change it to “rancher/rancher:v2.4-head” or some other version.
NOTE: At the time of writing the latest version of rancher works with the above instructions as long as you make sure to create that SSH key. Consult the Rancher documentation for other versions if you need to.
Once everything downloads (again, this will take a minute) you can type the command:
docker psYou should see a single listing of your service:

now you’ll need to go to the web interface by going to your web browser and typing the IP address of your VM. If you cannot remember it, just type:
ip alook for the connection listing that has your home network IP scheme and type that into the web browser URL bar using https:// like so:
https://10.100.5.17 (or whatever your IP address is).
If you’ve done this quickly after starting the service and you get a message stating that the site is unreachable, you may just have to wait another minute or two. Just because the service has started doesn’t mean everything is ready to use. It’s takes a minute to build itself.
Eventually you should see a warning about the site being insecure or a self-signed certificate. Ignore it and proceed to the site.
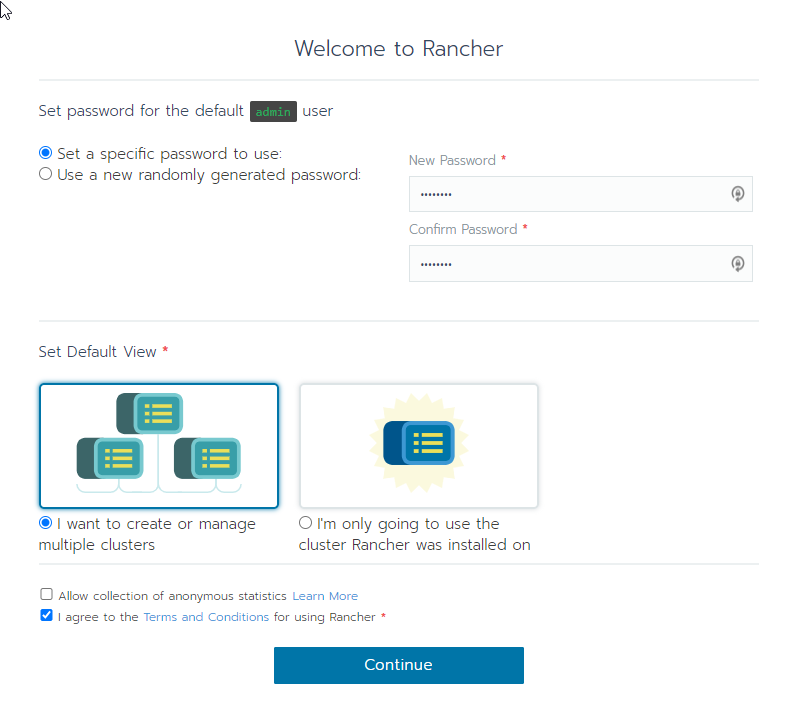
From here you’ll need to enter a new password and then confirm it by entering it a second time. Leaving everything else default (though you may want to uncheck the “allow collection of anonymous statistics”). Then… voila! Rancher is ready! Set your new password and agree to the Terms of Service (check the box) and click “Continue”.
It will show you your host IP and ask you if this is the IP Rancher should use. As long as you either set this IP statically or reserved the IP on your router.
You’ll note that we just used docker to get rancher up and running, so Rancher is in a container itself, but now we can manage the creation and organization of all the rest of your service containers from a web GUI. Pretty fantastic, right?
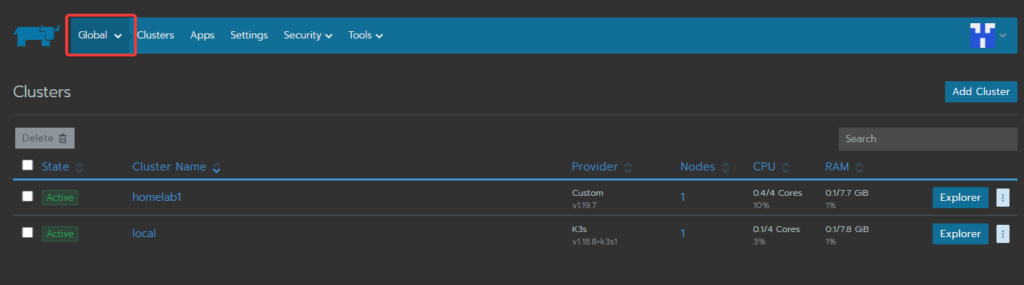
Now we need to set up the environment so we can start adding other containers. Go ahead and log in and get to the main page:

While there is already a “local” cluster created, this is used as a database and, from what I understand, seems to be for use with the high availability model of implementation. It cannot be deleted, so it’s best to simply leave it alone. Select the “Add Cluster” (red rectangle in image above).
From here you will name your new cluster. In this tutorial, we’ve named it “homelab1” but you can name it whatever you want. Leave everything else as default and scroll to the bottom. Click “Next”.
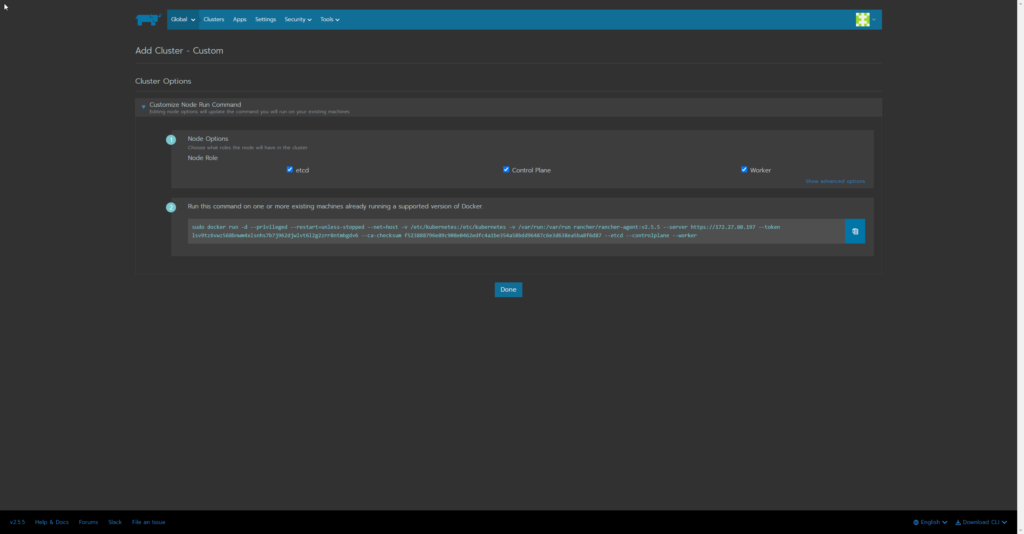
In the next window make sure that all 3 checkboxes are filled (etcd, Control Plane and Worker). After that, copy the command below the checkboxes and then paste it into the terminal of the docker VM (use an SSH session so you can copy/paste). Run the command (press “Enter”). Once completed, head back over to the Rancher web GUI in the browser and click “Done”.
Next… grab a coffee… the provisioning could take some time. The “Provisioning” messages may turn red and seem to say that something wasn’t found or wasn’t configured… don’t panic- yet. The provisioning will typically correct these errors by creating what is missing or configuring it. This process can take well over 15 minutes. Let it do it’s thing. If it’s gone over an hour (and you’ve given the VM decent hardware resources) or it hangs on one step for a very long time, then you might need to check whatever logs the provisioning messages tell you to, roll back and try again. Patience is the watchword, though.
After a while, the new cluster should become active. Switch to the global view and check it out!
Add Your First Service
Let’s take it one step further! So we have a GUI for setting up VMs (virt-manager), and we now have a GUI to set up containers (Rancher) right? How about a GUI that gives you quick access to your services and in some cases even gives you some metrics about your services?
Enter Heimdall! It’s basically a webpage based bookmark system on steroids. You could use it as your browser homepage and have full access not only to your home services, but any other web based sites and applications you frequently use.
NOTE: Another big shout out to TechnoTim on bringing this service to my attention! Really, though, go check out his channel, already!

Deploy a service
To get this up and running we will need to “deploy” a service in Rancher. No matter what service you want to launch, this is the first step.
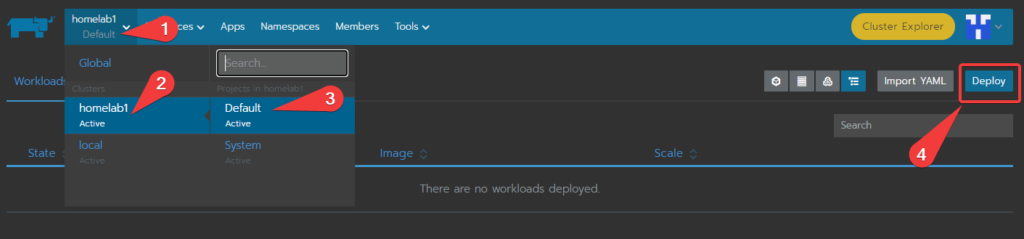
First, navigate to the your cluster(1 & 2), then choose “default” (3). Finally click on “deploy”(4):
Implement the Service
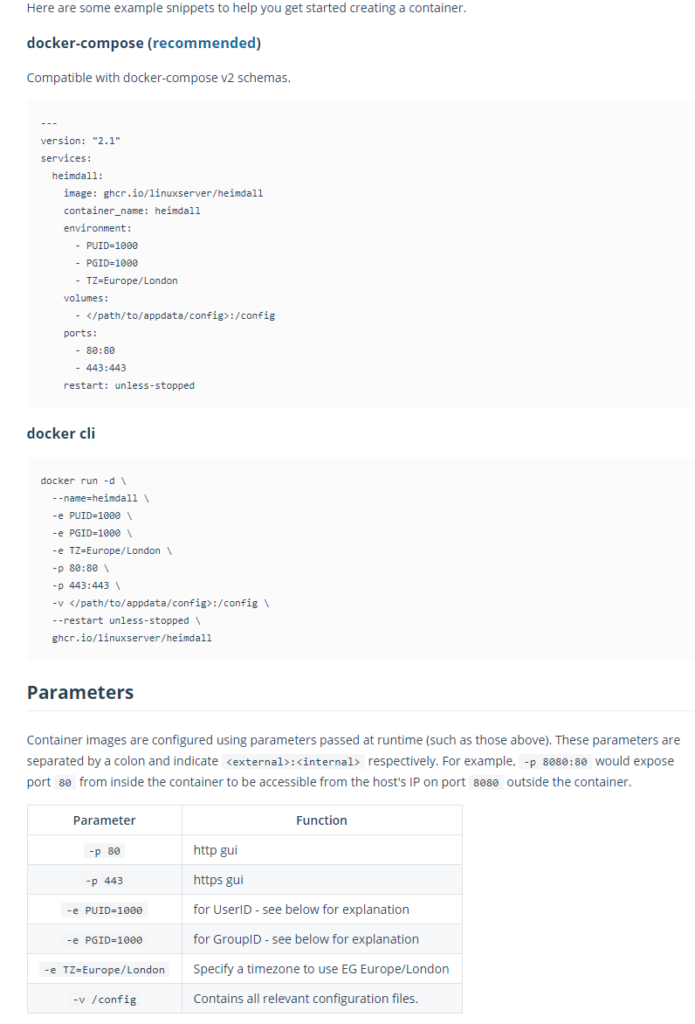
For this Service, we are going to use linuxserver.io. Click on the link and type in “heimdall” in the search bar, select the service and then click on the dockerhub link (or just go here).
linuxserver.io is a great resource for dockerized/container services that are super easy to spin up! Once you go through this tutorial, the process is very similar for all of the services from this site so you’ll have a ton of options to play with! Scroll down the dockerhub page until you see the configuration script…
Back over in your rancher tab, we are going to mirror these permissions. We will specifically we will be adding the port mapping, environment variables and volumes.
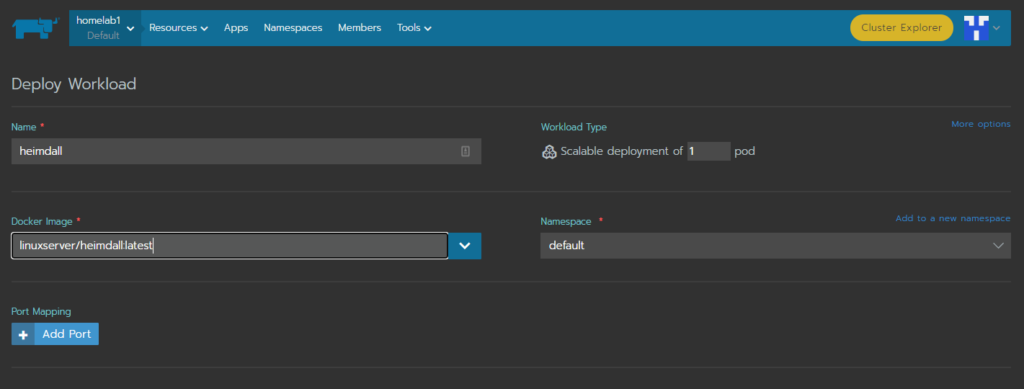
First, we’ll name our workload… It’s a bit “on the nose” but I’ll call it “heimdall”. I’ll also list the docker image we will pull from (linuxserver/heimdall:latest). Leave the namespace default.
Port Mapping
Moving on to port mapping, we are going to map the http (80) and https (443) ports to unique ports on this machine. Since we will have multiple services running and they can’t all be on 80 and 443 at the same time, we will need to map them to unique ports. A full discussion on ports is outside of the scope of this tutorial, but there are a LOT of them, so don’t worry about running out of them. You can look here for a short list of ports to avoid for your services.
At any rate, for our purposes, we will set up 80 to port 8000 and 443 to 8001, just for fun. make sure your nodes are set up for TCP and on the HostPort (creates the port on the host IP)

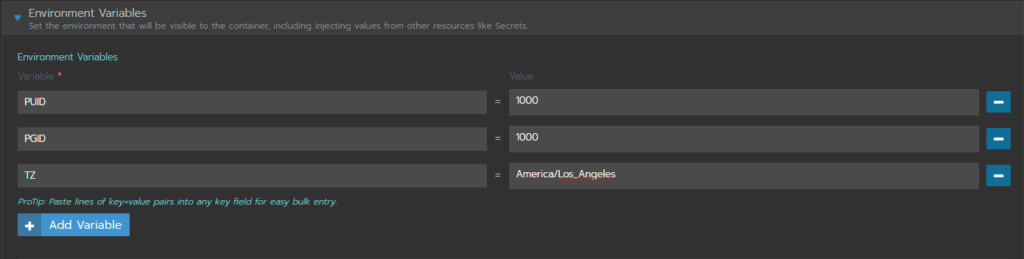
Environment Variables
For this we can refer to the dockerhub page config files. The settings that have a “-e” in front of them or are under the “environment” section in the “docker-compose” example should be copied here. Simply click “Add Variable” and copy the settings. Be sure to change the time zone to your own.
Volumes
Here we will add volumes (dynamic drive partitions) to a chosen mount point. First, let’s head over to your docker VM’s SSH session and create the file path. First make sure your in your home drive and then create a folder for the service:
cd && mkdir heimdallthen move to the new folder and check the path:
cd heimdall && pwdYou should see output on your screen that gives you the path:
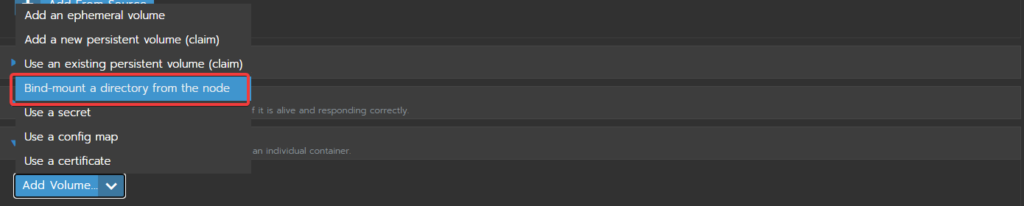
/home/[USERNAME]/heimdallNow back over in the rancher browser window, click “Add Volume” and from the dropdown menu select “Bind-mount a directory from the node”.
Name the volume, and put the path you just got from the “pwd” command, then put “/config” in the “Mount Point” field.

Scaling/Upgrade Policy
One final thing here- we want to set the upgrade policy to “kill all pods, then start new”.
That’s it!
Hit “Save” at the bottom and give it a minute or two to deploy. you can now access the service at the host ip plus the unique port you set (8000 or 8001 in this case) in the format [x.x.x.x:port#]:
10.100.10.210:8001type your IP, then the colon and the port number into a new tab on your web browser. Again, you may have to wait a few minutes for the service to build itself, so be patient and give it some time. Once it’s done, you’ll have a fresh slate on your browser tab to fill with all of your favorite pages and services!

BONUS ROUND: Add your Plex Service and Rancher to Heimdall
Plex
If you’ve follow this series, you already have a Plex server up and running, right? so let’s add it!
First, You’ll need the IP of the VM that plex is running on. If you already know it, skip to the “In your browser” paragraph.
If you cannot remember it, you can always go to you virt-manager, and open a console window (or access it via SSH if you set that up) and type:
ip aFind the line with your home network IP scheme. As discussed in the Plex tutorial, you’ll need to add the port and a “/web” to that IP like so:
[PLEX-SERVER-IP]:32400/web/In your browser, paste or type the above IP format (with your actual plex server IP) into the URL bar. Once Plex full pops up, copy the full address in the URL bar.
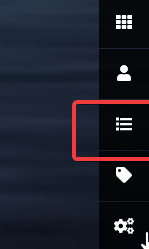
Now head over to your heimdall window ([RANCHER.IP]:8000 in this example). In the lower right of your window, click the “list” icon:
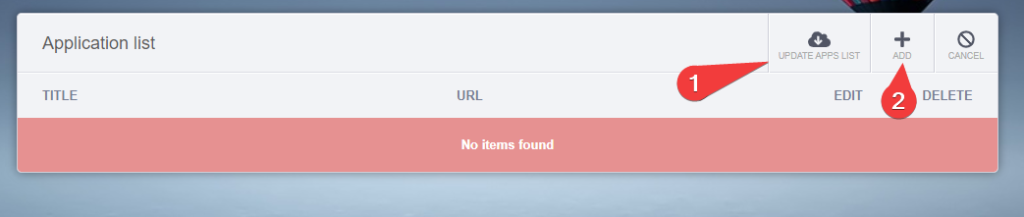
From here, click “update apps”(1) and then “add”(2) in the application apps bar.
now type “plex” into the service name and select “Plex” from the drop-down. Now Paste the URL information you copied into the “URL” field. Finally, make sure the “pinned” switch is enabled and then click “save”.
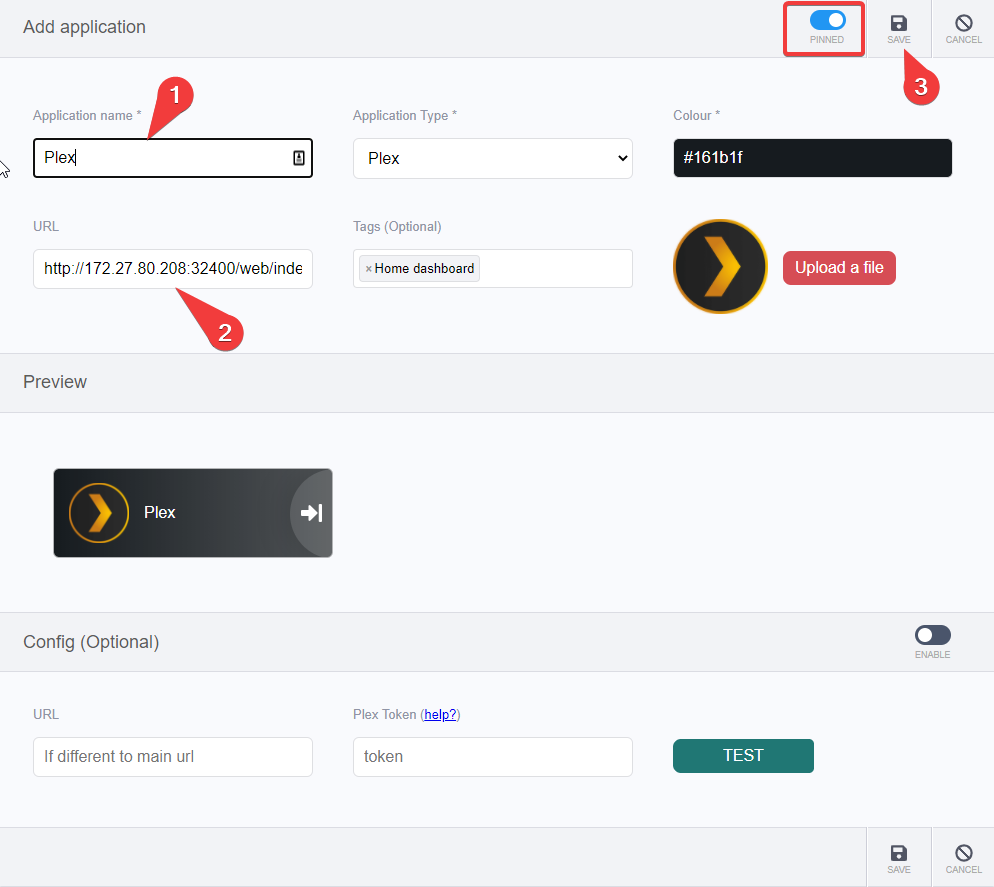
Note the optional config at the bottom. Heimdall can provide additional information by entering the plex token. Click the help link and follow the directions to copy/paste that if you wish. In the case of Plex it’s not that helpful, so we’ll skip it for this tutorial but other services like pi-hole (covered later) are very useful to have the data quickly accessible. Not all services will have this ability. Once you click save, you should see the below:

If you click the Plex button you will be transported to your service! You can set the links to open in a new tab in the settings window (gears icon in the lower right).
Keep in mind that many of your other services will be dockerized and, as such, will have the same IP as your rancher interface (the IP of your docker VM) and will simply have a different port appended to the IP address.
While this isn’t that helpful for just one service, you’ll be glad to have this interface when your services start to grow!
Rancher
The Rancher service is a bit easier, it’s simply the ip of the docker VM that you want to add with a “/login” at the end. Set up another service as before, but as below:
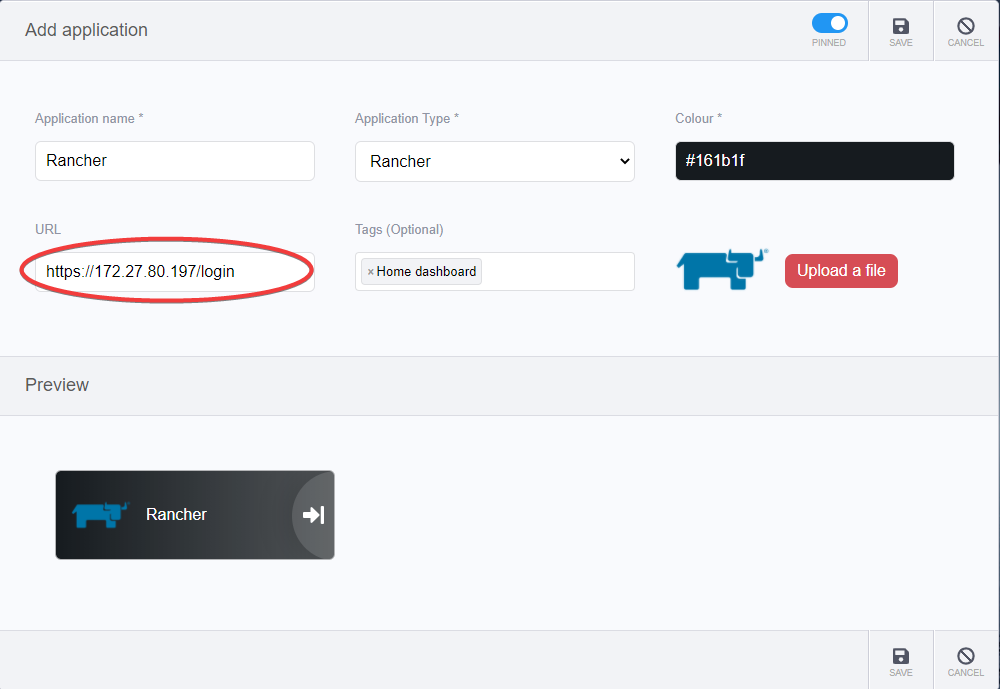
That’s it!
Wrapping Up
Phew… we covered a lot here, but thanks to everything we’ve already set up and familiarized ourselves with, hopefully it wasn’t too difficult.
If you’ve got all of this set up and working, I’d recommend you power down and save a snapshot of it now, so you won’t have to redo anything down the line!
Some purists may say that having all of these GUIs is cheating a bit, but I think having a streamlined way to spin up services and test them out or used them is exactly what we want! Besides, it’s not like we’re completely ignoring the command line, right?
Terms
- Encapsulation – To enclose something (as if in a capsule). In computer science this is meant as a means to group together data and functions while limiting direct access to that set of data and functions.
- Node – In computer science, a node has several meanings. Here we refer to a node in the computer networking sense- is either a waypoint (switch, router, hub, etc) or and endpoint (cell phone, laptop, server, etc) through which data travels. Nodes here apply to virtual machines or containers.
Commands Used
- curl – A command that deals with data transfer. Allows for uploading and downloading information and supports many protocols while maintaining a great deal of control over the transfer.
- usermod – User modification allow for, well, the modification of an existing user.
- reboot – Um… yeah. It reboots.
- shutdown – Guess what this one does…
- update/upgrade – Update(s) the listing of packages to the most current versions available. Upgrade(s) the actual applications running on you machine to said current versions.
- mkdir – Makes a directory (folder). Without additional parameters the directory will be created in the present working directory.
- pwd – Present working directory. This command will show your file path to where your currently are in the filesystem.
- cd – Change directory. a command the moves you around the filesystem.
- docker ps – Lists your containers.
- ip – Used to identify and configure network related settings. Here it is simply used to list the ip address(es) on the host (ip a).


Pingback: The $40 Home Security System (Part 1) – Ctrl Alt Develop