Overview
Welcome back to the blog series!
Now that we’ve set up the virtualization server and our first virtual machine (a file sharing samba server), We are now ready to start getting some use out of the setup. Let’s talk Services! Let’s talk…. Plex!
Plex is like your own personal Netflix. Load up all of your owned content… movies, tv series, family pictures – whatever! And stream them to virtually any device on your local network! You could even setup up a VPN and access your Plex anywhere in the world (decent network connection required). While the VPN will be covered elsewhere, setting up a plex server requires the following actions:
- Create the VM
- Create media share in samba
- Connect to share from plex server
- Install Plex
- Add to repository list (checks for updates)
- Configure Plex
Let’s get to it!
Process
Create the VM
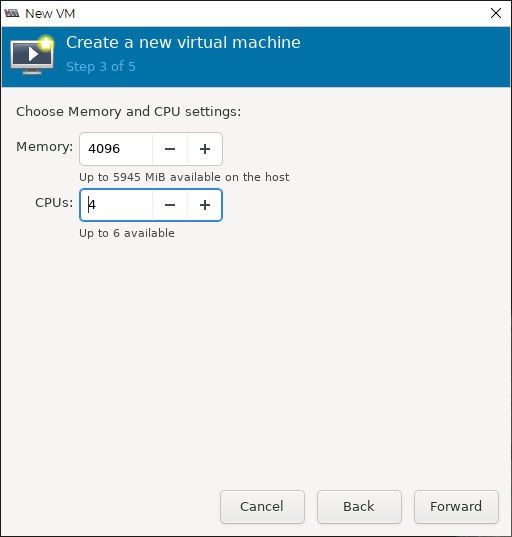
For the process of creating a Virtual Machine that will host the Plex service, check out this post. If you’ve followed the blog series, you should already have the Ubuntu server disk image ready for use in your raid storage so you can skip to the “Start VM Creation” section.
When you get to the CPU and RAM settings, you have a few considerations. Mostly you have to decide how much transcoding you might end up having to do to get your content streamed. This has a lot to do with what you’ll be watching your streams on… Laptop? Cell phone? Desktop? Roku (yes, they have a plex app)? The type of file your are trying to play (.mkv, h.264, WMV, etc., etc.) also plays a big roll here.
Essentially, if the file format of your content isn’t natively supported on the device you are trying to play it on- transcoding will need to happen. If you have the option to save your content in a particular format, MP4/H.264 is the best format to avoid most transcoding for videos that are 1080p (HD) or less.
If you are streaming files like .mkv to a mobile device often, transcoding will likely need to take place. Since Transcoding is a very CPU heavy process, you’ll need more CPU cores assigned to the VM than if you do not need to transcode.
Again, a good starting point is 4 cores and 4GB of RAM. After you play around once you are up and running you’ll be able to adjust these numbers.
When installing the OS, don’t forget to manually set a static IP, as it is easiest to do so during installation. Once you’ve logged in, update and upgrade all the system.
sudo apt update && sudo apt upgrade -yWith the VM created and updated, We will now need to get our content connected. If you are putting your content on the VM/device itself, simply create a folder and begin to load all of your content on it.
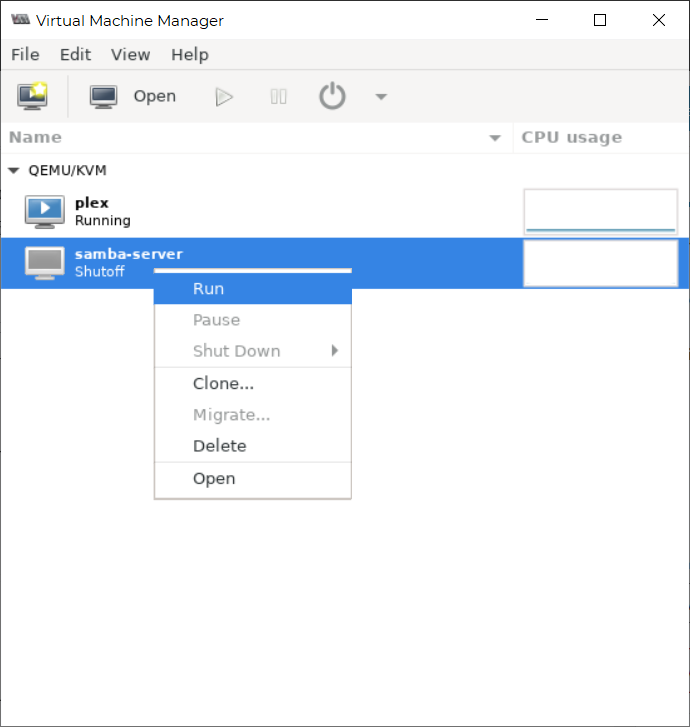
For the purposes of this series, however, we are going to connect to our media via a network share. In the virt-manager window, open up your Samba server and login…
Create Media Share in Samba
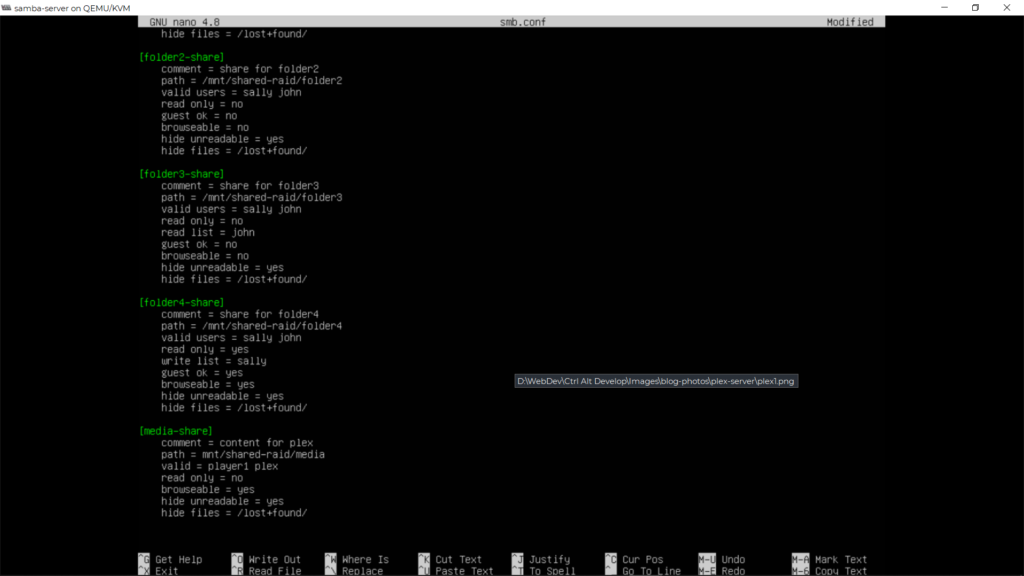
Having logged into your samba server, we are going to create a share that will allow only media to be accessed. In order to do that, let’s first set up a media folder in our shared-raid:
sudo mkdir /mnt/shared-raid/mediaNow we need to edit the samba configuration file, located in /etc/samba, to include this directory as a separate share:
sudo nano /etc/samba/smb.confOnce the editor loads the file, scroll down to the bottom of the file and add the below:
[plex-share]
    comment = content for plex
    path = /mnt/shared-raid/media
    valid users = player1 plex
    read only = no
    browseable = yes
    hide unreadable = yes
    hide files = /lost+found/
NOTE: The “read only = no” option allows removing and modifying media files directly in plex. If you have many users on the system you can modify user permissions inside of the Plex interface so only admins are able to do so.
Then save and exit (“ctrl+x”, “y”, “Enter”).
One note about the config above:
The valid users are the admin (player1/your username) and also a user that we haven’t actually created yet called ‘plex’. As in the examples in the previous post, we will have to create a system user:
sudo useradd -r plexand also create a samba account for the plex user:
sudo smbpasswd -a plexBe sure to record the password created for the account.
Finally, add the users to your samba group. In the last post we named our group “sambaz” (a bit on the nose, I know) so add the plex user to the group by typing:
sudo usermod -a -G sambaz plexSo we’ve created a folder and set it up as a samba share, then created a separate user to be used by the plex server to access. This separate user that only has access to the media folder is a good way to isolate access for individual services and keep things a bit more secure.
Restart the samba service so that it knows about the new share:
sudo service smbd restartWith all of that set up, we can close our Samba window (do not shut down the VM, just the window connection to it) and move back over to the newly created Plex machine.
Connect to Share from Plex Server
Now that we have a share just itching to be used, we are going to permanently mount that share to the Plex server using the autofs library. The process and advantages of this style of share are covered here, but we will cover the commands here as applied to this scenario.
First, let’s download the autofs and cifs utility packages:
sudo apt install autofs cifs-utilsCreate Samba Credentials File
Now let’s become root:
sudo -iand create a credential file:
nano .samba-credentialsOnce in the editor, type a line for your username, and a line for the password – no spaces in each line:
username=plex
password=[YOUR-PASSWORD]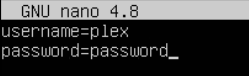
Substitute the [YOUR-PASSWORD] above for whatever you entered as the samba password for plex (not the system account password, if they are different).
Save and exit (“crtl+x”, “y”, “enter”).
Protect the file from accidental (or deliberate) changes:
chmod 400 .samba-credentialsStop running as root:
exitCreate autofs Mount File
Move into the etc directory:
cd /etccreate and edit a file to define the mount. Let’s call it “plexmount”:
sudo nano auto.plexmountNow you’ll need to add a description the mount in the form:
[NAME-OF-DESIRED-LOCAL-DIRECTORY] -fstype=cifs,rw,noperm,credentials=/[PATH-TO]/[CREDENTIALS] ://[SERVER-IP]/[SHARE-NAME]in our example, let’s call the local directory (on the plex server) “shared-media”:
shared-media -fstype=cifs,rw,noperm,credentials=/root/.samba-credentials ://[SAMBA-SERVER-IP]/media-share
Save and exit (“crtl+x”, “y”, “enter”).
Now edit the autofs master file:
sudo nano auto.masterOnce the editor pops up, scroll to the bottom and add a line in the config file in the format:
/[DIRECTORY-IN-WHICH-TO-MOUNT] /[FILEPATH-TO]/[MOUNT-CONFIG-FILE] [OPTIONS]Or, in our example:
/mnt /etc/auto.plexmount --ghostThe “–ghost” option above allows you to see the directory name (shared-media) under the /mnt directory even when it is not actively being used.
Save and exit (“crtl+x”, “y”, “enter”).
Restart the autofs service:
sudo service autofs restartInstall Plex
We’ve gotten a lot of setup out of the way, now it’s time to actually install plex.
You can find the latest Plex distribution here.
You can either download from the above site or run the ‘wget’ command with the latest distrubution at the end. The command will look similar to:
wget https://downloads.plex.tv/plex-media-server-new/[CURRENT-DISTRIBUTION-NUMBER]/debian/plexmediaserver_[CURRENT-DISTRIBUTION-NUMBER]_[ARCHITECTURE].debTo get the exact address, click on the link above, then click the “choose your distribution” button. Right click the appropriate version and select “open in new window”. the URL bar will have exactly what you need:
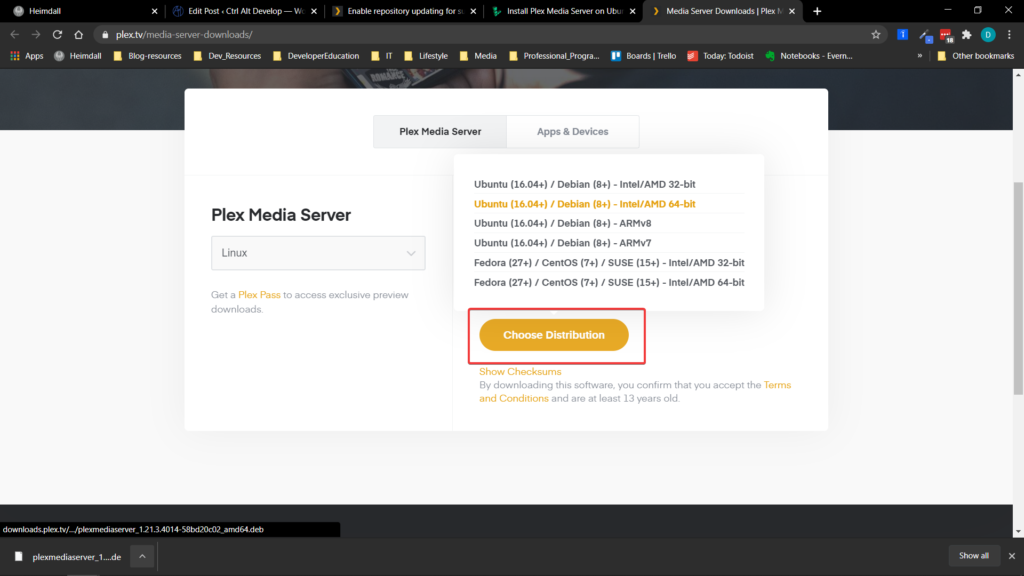

Alternately, you could right click on the download and select “copy link address” and paste it.
If you decided to install SSH on the plex server, you’ll be able to simply copy/paste the entire address right into the terminal. Otherwise, you’ll have to type it out.
Next enter the command:
sudo dpkg -i plexmediaserver*.debThe version of plex you downloaded will be unpacked. Type “y” to install.
Add to Repository (Check for Updates)
To make sure you don’t have to update your Plex separately from the rest of your OS, we’ll have to add the repository to our list. To do this, you’ll have to run two commands:
echo deb https://downloads.plex.tv/repo/deb public main | sudo tee /etc/apt/sources.list.d/plexmediaserver.listand then:
curl https://downloads.plex.tv/plex-keys/PlexSign.key | sudo apt-key add -The two above commands were taken directly from the Plex website.
Now we can turn on the service:
sudo systemctl enable plexmediaserver.serviceAnd start it:
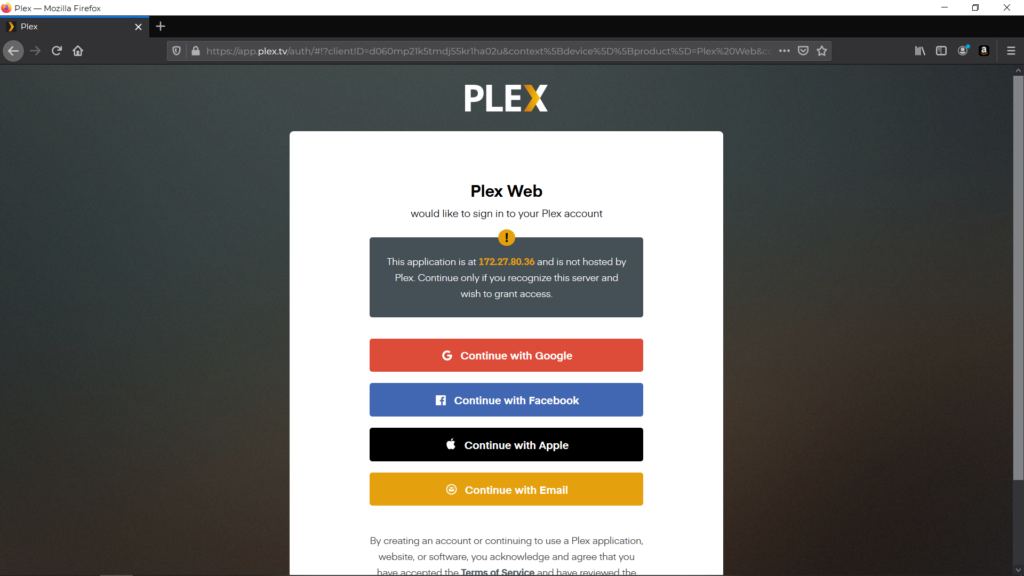
sudo systemctl start plexmediaserver.serviceNow you can open a web browser on some other device on your network and in the URL, type:
[PLEX-SERVER-IP]:32400/web/Use whatever your server IP is (use the command “ip a” if you don’t know it). the “:32400” is the default port that plex runs on. If you don’t put the “/web/”… you may not see the page below, but an xml file instead.
Configure Plex
From here you’ll need to create an account, and link up the folder(s) in your media share. I won’t go into depth here, as the Plex site does a great job of showing you how to get up and running once the service is installed and running on your linux OS. I will, however leave you with a few thoughts and ideas;
- Once your Media folder is up and running, you can transfer all of your digital media there. I would recommend creating sub-directories like “movies”, “television”, “pictures”, “documentaries”… you get the idea. From there you can share each folder as it’s own section in Plex
- If you’re like me and you had a lot of your digital media on a windows device, it’s not a problem, just connect to the samba-server from the windows client (steps are here under the “Test on Windows Client” section) and drag and drop into the appropriate directories. Easy peasy. If you have a lot of content, it may take a while- you’ve been warned!
Wrapping Up
Compared to the samba server setup, as you can see, setting up plex is a breeze! But in reality it had a very similar process, we’re just getting better as the series progresses. The steps involved in getting services set up (in a general sense) are already known to us:
- Create a VM with a small storage amount
- Connect to the file-server and create storage for it there.
- Install the service or applications
Hopefully you see how all of the previous work has paid off and created a system which we can build out however we choose with whatever services we find useful!
Eventually, though, we will run out of resources (CPU and RAM) to keep adding virtual machines to hold our services. VMs are fantastic and are a great way to isolate processes and services in a secure, independent environment, but it can be overkill for some services to devote an entire machine to… virtual or otherwise. But we have one more trick up our sleeve…
Docker…
See you in the next post!
Terms
- Transcoding – The process by which video formats that are not compatible with a client device are made playable. This is a CPU heavy process.

Pingback: Facebook Outage, Now Azure is down… What’s Next??? – Ctrl Alt Develop
Pingback: Plex virtual machine – Answers Library