
Overview
Looking for a secure way to access your home network on the cheap? Look no further! For a one-time cost of about $30-$40 you can set up a VPN connection using Wireguard and a Raspberry Pi Zero! This project was created with the aim of providing a secure remote connection into your home network with the cheapest possible, lowest power equipment available while still being reliable.
This project is useful if it’s just you remoting into your network. I’ve had success watching a movie on my Plex app over my phone while on a hike over cellular data! (No I didn’t watch the whole thing, I was just testing it out, okay!?!?). I cannot speak to the efficacy of multiple users attempting a remote login and using multiple local programs, but I’ve also testing streaming 2 1080p movies to 2 different devices at once and had no issues!
The Steps are as follows:
- Load OS on SD card and start pi zero
- Reserve IP on router & port forward
- SSH into the pi
- Setup the pi
- Secure the pi
- Install No-IP
- Add clients
Let’s dive in!
Requirements and Parts List
First, you’ll need an account at No-IP.com. This is a free dynamic DNS service… the magic that allows you to always connect home no matter what your ISP might change you public IP to. Create an account and give your home network a “friendly” name.
As far as parts, You’ll need just a few cheap items.
NOTE: Ctrl Alt Devleop makes a small profit from any purchases from the affiliate links below. If you enjoy the content and would like to help out the site, please use the links! If you find it cheaper elsewhere, more power to you!
The easiest purchasing combo would be about $42:
- Raspberry Pi Zero (wireless) with case and power supply
- SMAYS micro USB to Ethernet LAN adapter
- Micro SD card
You can purchase the just the Pi zero (not wireless) for cheaper elsewhere (about $5), buy the power supply separately and do without the case to reduce cost even more if you’re on a tight budget, but the essentials are going to be the Pi, the power supply, and the ethernet adapter:
- SMAYS micro USB to Ethernet LAN adapter
- Raspberry Pi power supply
- Pi Zero (non-affiliate link)
- Micro SD card
That will run you about $37. That’s really it!
Load OS on SD Card and Start the Pi Zero
For this project, we’ve chosen the downright anemic diet-pi OS. The lightweight debian-based OS can be downloaded here. Make sure you choose the 32 bit version for the Pi Zero. Once downloaded, unzip the file so you see the Disc Image (.img) file.
From here, you can grab your 32GB microSD (in the SD size adapter) and plug it into your laptop. For sheer ease of use, I’d recommend loading the diet-pi image using balena-etcher. Use these instructions if you are unfamiliar with creating bootable SD cards for Raspberry Pi (just use the SD card instead of a USB like the instructions mention, it’s the same process).
Now, Plug in the micro SD card, ethernet adapter (connected to the network), and power supply:
[INSERT PIC OF THE ZERO HERE]
Depending on your power supply, the device may start as soon as you plug it in, so make sure the SD card and Ethernet are connected first.
Reserve the IP on the Router & Port Forward
You are going to have to do you own homework, here, since there are so many different routers out there. Essentially you’ll have to log into your router and find two functions, the “Reserve IP” and “Port Forwarding” Options. Often these can be found under advanced settings. Google is your best friend here!
NOTE: If you rent your modem/router from your ISP, double check that these functions are available to you.
Reserving the IP
Whatever the IP scheme your home network has, the router is pretty my universally set up as #.#.#.1. For instance if your devices all have a 192.168.1.# IP scheme, each of your devices on the network will all have a different last number, but the first three will all be the same. For the above IP scheme (192.168.1.#) Your router would be: 192.168.1.1
On your computer, open a web browser and type in the router IP in the URL bar. You’ll be prompted for the password. Once you’re in, locate the IP reservation function. On my router (Netgear) it was in the Advanced tab under Setup>LAN Setup. When you’re searching for the device, it should show up on your network as “raspberry pi” or “dietpi”. Once you find it, add it to the IP reservation list. You can change the IP to whatever you want (something memorable maybe?) and rename it. Then save. You’ll just need to reboot the device for these changes to take effect. You can do that now.
Port Forwarding
Next, you’ll need to find the Port Forwarding option. Again, google is your best friend. I found mine on the Advanced again under Advanced Settings>Port Forwarding/Port Triggering.
Set it up so that the IP you’ve set aside for the Pi Zero is selected, make sure the protocol is UDP, and set the port number to 51820. This is the default port for WireGuard. If you have issues down the road, I’d recommend looking here. I’ve found that if I type in my IP and set up the connection as above it won’t work! I have to click and select the device instead of manually typing in the same IP address for the connection to work (again I have a Netgear if you’re using the same router). And one more time… Make sure the protocol is UDP!
Save all of your changes, reboot the pi and move on to the next step!
SSH into the Pi
Luckily, even before the device is set up, the DietPi image loads up Dropbear, a lightweight SSH tool, so you can set the entire device up without a keyboard, mouse, or display hooked up at all! Use the SSH client to access the device via it’s IP. Login with the username of “root” and the password “dietpi”. I use PuTTY. Check out this article for an SSH how-to (skip to the “Accessing Host using PuTTY” section).
Setup the Pi
Now that we’re into the actual device, the rubber is about to meet the road…
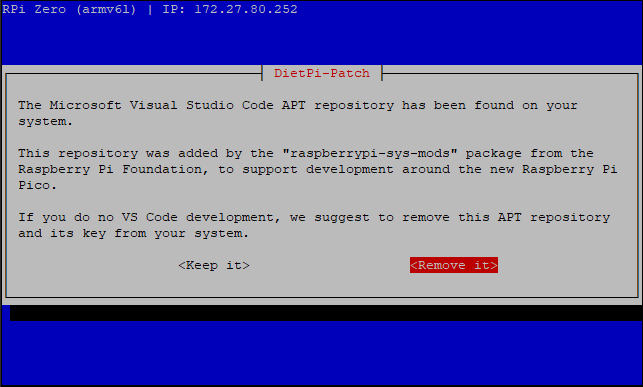
The device itself hasn’t actually been set up/installed yet, so let’s take care of that first. When you first SSH in you’ll see that some things start to run and you’ll eventually get to a license screen. Make sure “Ok” is highlighted red and hit the “ENTER” key. Next, you’ll be notified that Visual Studio Code has been added. It will ask if you want to continue. Since we wont need it and we are trying to keep this image super small, remove it and hit “ENTER”.
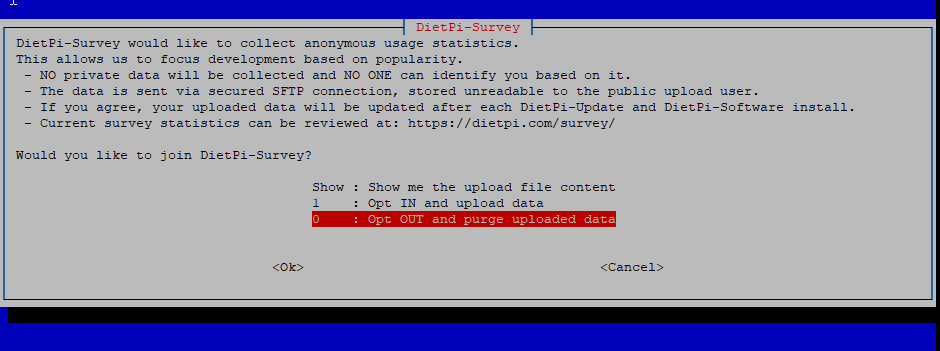
Next, you’ll be asked if you want to Opt into a Survey. That is entirely up to you, but in the spirit of impatience, I opted out:
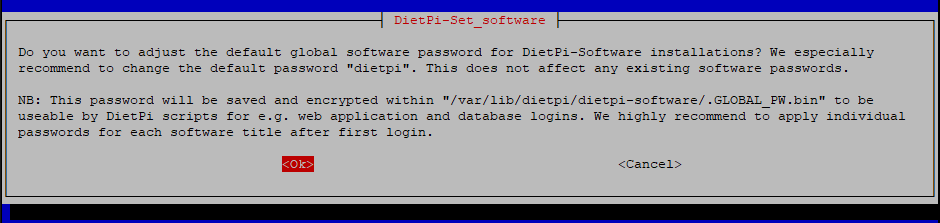
Next up we really should change any and all default passwords to something more secure. You’ll be asked to change the global software password and the root/dietpi password back to back. Change them both to something you’ll remember.
Next you’ll be prompted to turn off the serial console. select “Ok” and hit “ENTER”. You’ll now be presented with the Dietpi-Software menu:
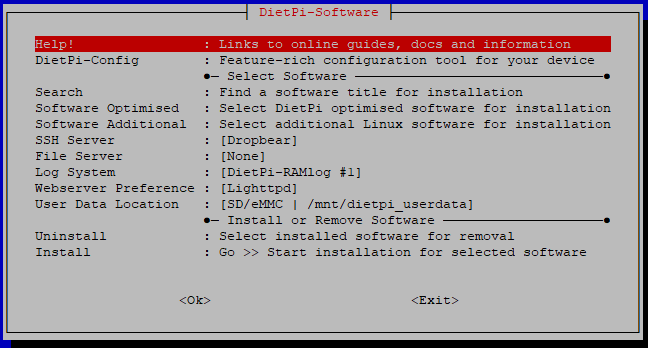
Move down to the “DietPi-Config” option and press “ENTER”. Move down to the “Language/Regional Options” and select it (hit ENTER). change your Timezone options. Since you’ve SSHed into the machine, you can’t really change the keyboard (one has to be connected). You can change the Locale to en_US.UTF-8 or whatever you like, but there’s really no need. Once changed, highlight “Back” and hit ENTER.
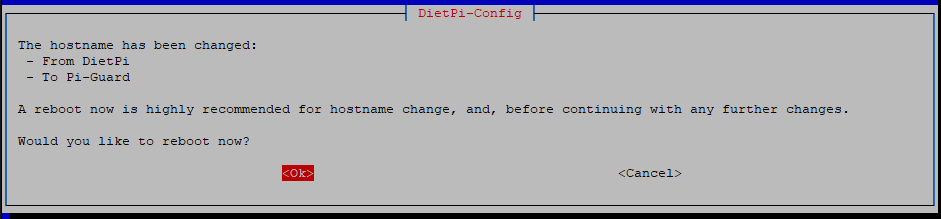
Next, move to the 6th section (Security) and enter it. You’ll have the option to change your passwords (again) or your hostname. If you choose to rename or reset passwords you’ll be prompted to reboot. I would recommend it. Your SSH session will be terminated, but give it a minute and just SSH back in and skip the global and user password resets if it pops back up (you’ve already done that).

Once you’re back into the DietPi-Config menu, you can turn off IPv6 under the “Network Options: Adapters” section.
Next, Under “Network Option: Misc” you might be able to set up No-IP. If you are able, just follow the prompts on screen and you’ll be good to go! I had issues, so I’ll show you how I installed this manually later.
Leave the rest of the Config alone and Exit the menu.
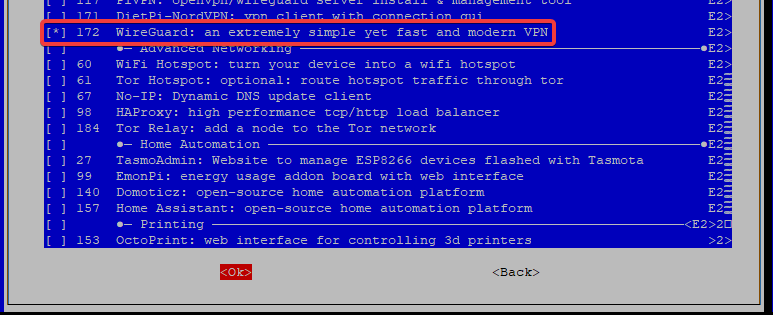
Back in the DietPi-Software menu, select “Software Optimised”. Move all the way down the app list and near the bottom you’ll see “WireGuard”. Hit the spacebar to select it, then hit tab to highlight the “Ok” at the bottom and hit “ENTER”.
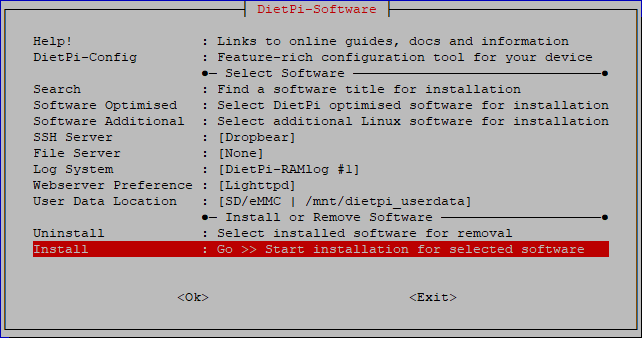
After that, head down to “Install” and hit “ENTER” and select “Begin” at the next prompt. You’ll have to wait a few minutes.
After a while, you’ll be met with the choice to set up the machine as a wireguard client or server. Select server.

Next, you’ll be asked to enter the IP or domain for WireGuard client access. The is where you should enter the No-IP name you’ve selected for your network:

On the next screen, you’ll be given the option to change the default port (51820). For this tutorial we will leave it alone:

Once this is complete you’ll be dropped back into the command line. Next we will secure the Pi.
Securing the Pi
User Management
Having remote access to root is a terrible idea. Lets shut that down, shall we? Let’s create a new user with the command format:
adduser [USERNAME]So if your username is “ctrlaltdevelop” you would type:
adduser ctrlaltdevelopYou’ll be prompted to answer a few questions, which could be left blank, and then verify with a “y” and hit “ENTER”.
Let’s add the user to the sudo group with the command of the format:
usermod -aG [GROUPNAME] [USERNAME]the -a means to ‘append’ (add to rather than replace) and the -G means to add the user to more groups (rather than replace the main group they belong to). So in our instance it would be:
usermod -aG sudo ctrlaltdevelopnow let’s switch users by typing:
su - ctrlaltdevelopsu is for ‘switch user’.
Next we want to delete the user ‘dietpi’, but first we need to download a package:
sudo apt install perlNow can delete the dietpi user- completely, with the command format:
sudo deluser --remove-home [USERNAME]the ‘remove-home’ also removes their home directory from the file system, keeping things neat and tidy. So type out:
sudo deluser --remove-home dietpiSecuring SSH
Alright, now we’ll need to secure the SSH connection by using a password protected key and also removing all other remote password and root access. For an in-depth how-to on this process, please refer to this article. Skip to the “Configure Key Access and Security Settings” section. Follow it all the way to the command
sudo chmod 400 authorized_keysThen skip again down to where you finish adding the connection info in the PuTTY program. Once you finish adding the key file, close your remote connection to the Pi and open it in PuTTY using the saved session. It should ask you for the keyfile password. Enter it and if it logs you in, you’re good to continue closing other access.
The rest of the config in the other post is for openSSH, but we are using dropbear here. Here’s how we configure dropbear…
In the command line, type:
sudo nano /etc/default/dropbearmove down to the line that says “DROPBEAR_EXTRA_ARGS=” and add the below options:
DROPBEAR_EXTRA_ARGS="-w -s -g"Now we have disallowed root logins (-w), disabled password logins(-s) and disabled password logins for root (-g) just for good measure, though disabling password logins should’ve covered that.
Now restart the service:
sudo systemctl restart dropbearGreat! Now you can only remote into the server with a password protected key! And no root access! Take that L33t H@xors!
Install No-IP
Alright, we’re in the home stretch as far as setup goes… if you ran into issues auto-installing it earlier like I did, now it’s time to install No-IP. You’ll have to first install another package in order to get the gcc compiler running.:
sudo apt install build-essential -yFrom here, you can follow the instructions here on the No-IP site, or your can copy/paste the commands below:
mkdir ~/noip \
&& cd noip \
&& wget https://www.noip.com/client/linux/noip-duc-linux.tar.gz \
&& tar vzxf noip-duc-linux.tar.gz \
&& cd noip-2.1.9-1 \
&& sudo make \
&& sudo make install
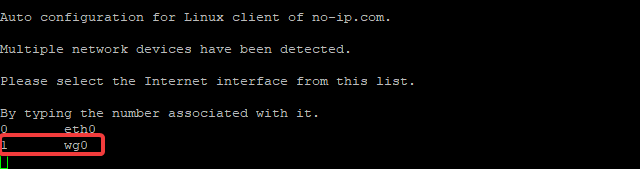
Once it’s run, type the number associated with the “wg0” network device. In the case of this tutorial, it’s 1:
Next you’ll type in the email associated with your No-IP account and hit “ENTER”. Then you’ll be prompted for the password. Type that and hit “ENTER” again. You can leave the update interval at 30 and you don’t need to run anything at a successful update. Or you can. Up to you.
Congratulations. The setup in complete.
Adding Clients
Adding More Client Configurations to the Server
Your first client should already be set up and you can use one of the methods below to set that up on a client device. Let’s say you’ve set up your phone already- great! But what about your laptop? You’ll want to access your files from there on the go, too, won’t you? Well, you’ll have to add a few configuration files for that.
For this, you may have to change to root. Be very mindful when you do this:
sudo -iThis will change you to root. Do not mess around here and don’t type in commands outside of this tutorial unless you’re sure of what they do. Heck, double-check these commands too, if you’re so inclined!
First you’ll need to set the server’s public key that it will present to that specific client when it tries to connect:
wg pubkey < server_privatekey > server_public_client2.keyThis command takes the output from the wg pubkey command (left chevron) that matches the server_privatekey and saves it to a file called “server_public_client2.key”. The file name is just an attempt to match the existing syntax on the dietpi wireguard default client implementation. Obviously if you already have 2 or more clients, then anywhere you see a ‘2’ in the code in this section you’d use whatever the next available increment is.
Next we’ll run the “genkey” command and pipe the results into 2 separate files:
wg genkey | tee client2_private.key | wg pubkey > client2_public.keyWith our keys all generated, now we’ll need to edit and create a few config files. First, let’s add the client2 (or whatever client number you’re on) public key to the wg0.conf file. Make sure you are in the /etc/wireguard directory. If not type:
cd /etc/wireguardNow type:
nano wg0.confThis will open the config file for the wireguard server. Go down to the bottom of the config file. Now, start a new line and type (or copy/paste from here):
# Client 2
[Peer]
PublicKey = [PASTED CODE GOES HERE]
AllowedIPs = 10.9.0.3/32
Again, if you’re on the 3rd client, make sure you change it to “# Client 3” AND make sure the AllowedIPs line matched the IP of the first client except for the last number before the “/32” (that number you increment by one). Now save and exit with “Ctrl+x”, “y”, “Enter”.
If you’re SSH’ed in, this next step is going to be easier, just FYI. First type:
cat client2_public.keyHighlight the key that prints to the screen and go back into the wg0.conf file:
nano wg0.confmove the cursor down to the “[PASTED CODE GOES HERE]” line and right-click. The code should print to that line. (Make sure you delete the “[PASTED CODE GOES HERE]” part of the line if you copy/pasted the lines from this tutorial).
Now let’s add a new config file for client2. We can do this by copying the first client’s file:
cp wg0-client.conf wg0-client2.confLet’s print the private key to the screen.
cat client2_private.keyAgain, we’ll highlight the key, then without removing the highlight, type:
nano wg0-client2.confYou’ll need to edit both lines under the “[Interface]” section. Increment the Address to whatever you set the client’s “allowedIPs” to in the wg0.conf file. Then on the “PrivateKey” line, delete the existing key and then right-click to paste the key you previously highlighted. Everything else should be left the same. Save and exit.
now you’ll need to stop and start the service with the following commands:
wg-quick down wg0 && wg-quick up wg0Congratulations, you’ve added a new client to the configuration!
Adding Mobile Clients
For mobile clients, you’ll need to download the mobile app on your device. I have an iPhone and I found the process very easy, as you can you a QR code to pass the configuration to your phone. Simply type (or copy/paste the below) the command:
grep -v '^#' /etc/wireguard/wg0-client.conf | qrencode -t ansiutf8A QR code should appear on screen. Open the WireGuard app on your phone and add a tunnel. Select the “Create from QR code” option and let your camera do the rest.
Once it’s done, turn off your wifi and then try to connect to your router (remember, the #.#.#.1?). Can’t do it, right? That’s because your router is only reachable from inside your network. Now, connect to your WireGuard VPN tunnel. Now try to connecting to your router… voila! You are now set up for mobile VPN connection to your home. Watch your plex or download books from your calibre web server anywhere, any time!.
Adding Laptops and Other Devices
This is a bit trickier, as we will need to create this connection from scratch, but it’s nothing we can’t handle. It’s really a game of “what goes where” that you have to remember. Once you get it, you’ll realize how easy setting up these connections are!
Essentially, we are dealing with 2 files, the wg0.conf and the wg0-client(#).conf files. Between those two files, you’ll have all of the information you need.
One of the main keys to setting up the tunnel correctly is understanding the difference between the “[Interface]” and “[Peer]” sections of configuration. Remember that it is a matter of perspective. When you are setting up the wireguard server, the interface is itself and the peers are the clients trying to connect to it. When you are setting up things on the client end, the interface is it self and the peer is the server it is trying to connect with.
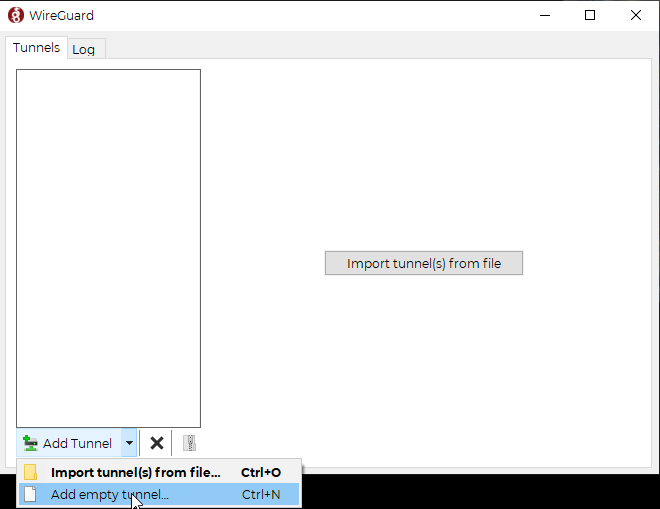
For instance, on a windows laptop, after you download the wireguard app and open the app, you’ll have to add an empty tunnel:
From here you’ll be presented with a barebones configuration file. It will just be an interface with a random public key. In the SSH window bring up the wg0-client#.conf (# = whatever client you’re on) file:
cat wg0-client2.confhighlight the private key under the interface section and then paste it into the “Private Key” section of the window’s client config file:
You’ll also need to add the DNS from the wg0-client2.conf file (from the “[Interface]” section). The address is gotten from the wg0.conf file, however, so let’s take a look at that:
cat wg0.confSpecifically you’ll want to look at the appropriate peer/client number and check out the AllowedIPs line and plug that into the Address on the windows client:
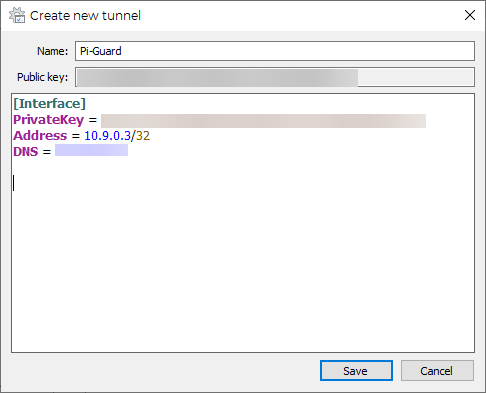
For the [Peer] section you’ll need the public key under the [Peer] section of the wg0-client2.conf file, since the peer to the client is the server. Allowed IPs can be 0.0.0.0/0, which allows all traffic through the tunnel and the Endpoint is the no-ip friendly domain name you set up plus the wireguard port:

Save the file and connect! You should be good to go!
Wrapping Up
That’s it, people! You now have a secure connection to all of your files and services from anywhere in the world! Are you vacationing in Italy and just finished your mystery novel, only to realize you didn’t load the next one? No problem, Start the WireGuard connection, access your Calibra-Web interface and download it! Done. Need an important doc immediately… it’s a non-issue.
As affordable as this setup is, that is because we are using a $5 computer. So how powerful is it really? is the connection stable? Well, I tested streaming 2 1080p movies from my plex server to my mobile phone over cell data and my laptop on a guest network while running htop on the server iva SSH. It never went over 50% CPU usage and RAM never broke 30% usage even though it’s only got 512MB of RAM. So there’s room for more streams or connections as well. I can comfortably say this will more than suffice for a single user.
Have you gotten WireGuard running another way? Have any additional tips? Leave a comment below!
Terms Used
No new terms were used in this post.
Commands Used
- adduser: Adds a user.
- usermod: Alters a users permissions, groups, etc.
- su [OTHER-USERNAME]: Switches users
- deluser: Deletes a User
- chmod: Modifies a file or folders permissions.
- nano: Calls nano- a simple text editor.
- systemctl [OPTIONS]:
- mkdir: Creates a directory (folder) in the present one. You create a sub-directory elsewhere but including the path to where you’d like to create it (mkdir /home/player1/path/to/[NEW-DIRECTORY]).
- wg [OPTIONS]: the WireGuard Command set. For more info see this post.
- cd: Change Directories. Used to navigate the filesystem.
- cat: Concatenate. Has multiple uses, but in this tutorial is used to print file contents to the screen.
- cp: Copy. Used to copy the contents of a file into another new file.
- grep: A robust tool for searching through text files and locating matching “regular expressions”.


Pingback: The $40 Home Security System (Part 1) – Ctrl Alt Develop