Overview
So… We’ve covered a lot of ground so far in this series and have quite a few things on our home network. The most interesting of them are a Plex server, Calibre-Web server and a file server. In each case, we can access these services from nearly any device… while we are on our home network.
Wouldn’t it be nice to be able to access these services while you’re on the go? Wouldn’t it be even nicer to do this without a complicated and (possibly) less secure network configuration?
Enter WireGuard!!!
WireGuard is a modern, fast, simple VPN service. While the setup is relatively simple there are a few sticky spots when connecting devices, but that’s why we’re doing this tutorial! The general setup is relatively simple.
While prepping for this tutorial, however, I ran into problems with Rancher. So I’m going to break this into 2 parts; the first is a direct command line creation of a docker instance of wireguard, which is works. The Second part will be creating the WireGuard instance inside of Rancher, which is currently not working. I will outline the entire process, identify the issue, and then update this post when either a patch or a solution is found. So this post will look a bit different:
- Option 1: Create a WireGuard Container in Docker only
- Option 2: Configure Container in Rancher
- Open port on Router
- Get QR and config pages to connect devices
- Connect devices
Let’s dive in!
Option 1: Create a WireGuard Container Directly in Docker
Create Folders in Docker VM
If you’ve been following the series, you will have a Docker VM in your virtualization server. If this is your first post you’ve checked out, but you have a Docker device or virtual machine, just use that!
We need to create a file directory- directories, actually- a location to save WireGuard’s configuration on the Docker host VM. This will save the information that creates the container… outside of the container. This way, if something happens to said container, all you have to do is create another one and point it to the locally saved configuration and it will quickly and easily re-create itself just as it was before. To do this, open an SSH session to the Docker VM and log in.
Once you log in you should be dropped into your user’s home directory. Create the directories here with the command(s):
mkdir wireguard && mkdir wireguard/configGet the Image
As we’ve done in previous posts, we will head over to linuxserver.io and check out the wireguard image. We are going to copy the entire “docker cli” command set. At the time of writing it appears as below.
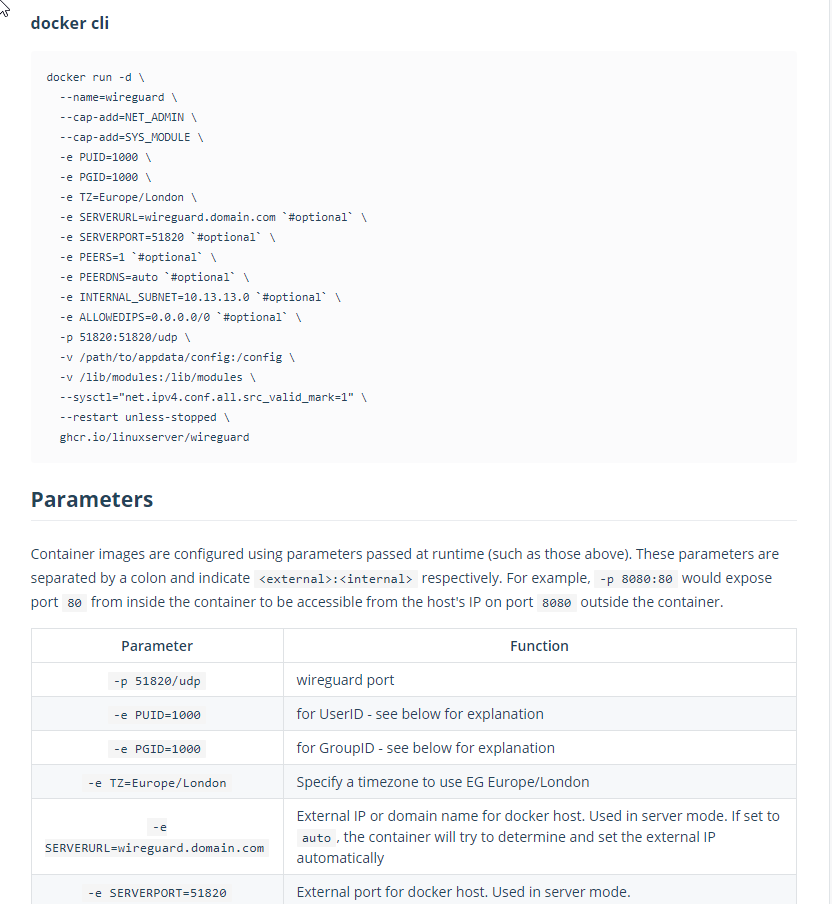
As I said, copy the entire “docker cli” section from “docker run -d” to “ghcr.io/linuxserver/wireguard”. The backslashes in this means that even though these are separate lines (for visiblility and organization of commands), they are run together. Each line after “docker run -d” are simply options, just like the “-d” that are assigned and help to configure the container.
Now head over to the command line in your SSH window and right-click. You should have the entire command in there. Double check that you do… and hit enter.
That’s… it. Really. Well, not everything. You’ll still need to set up clients, but the container that runs the server should be created and active.
Option 2: Configuring the Container in Rancher
NOTE: If you are not interested in reading through a non-working option and just want to get up and running, skip to the “Open Port on Router” section.
Deploy a New Pod
Access your Rancher interface by plugging in the IP of your docker VM in the URL bar of your browser- or if you installed heimdall and added Rancher, you can access it from there as well!
Once you’re in, head to the default namespace of the cluster you created:

Then deploy a new service with the “deploy” button in the upper right of your screen.
Name and Port Mapping
Fill out the first few fields as below:
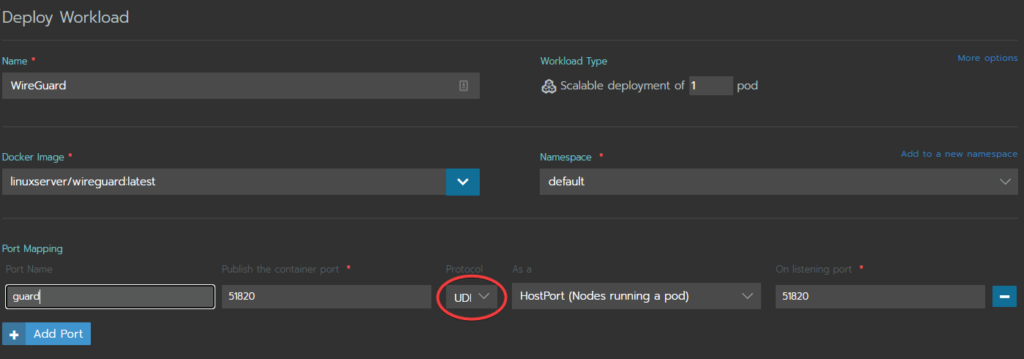
- Name: You can name this whatever you want (but it helps to be descriptive of what the workload is doing)
- Docker Image: Put the Dockerhub image “linuxserver/wireguard:latest” we are using to configure this service
- Namespace: Leave as default.
- Port Mapping: The only port we’ll need to open is 51820. This is the default port wireguard uses, but could be changed. We will leave it alone in this tutorial.
Environment Variables
Next are the Environment Variables.
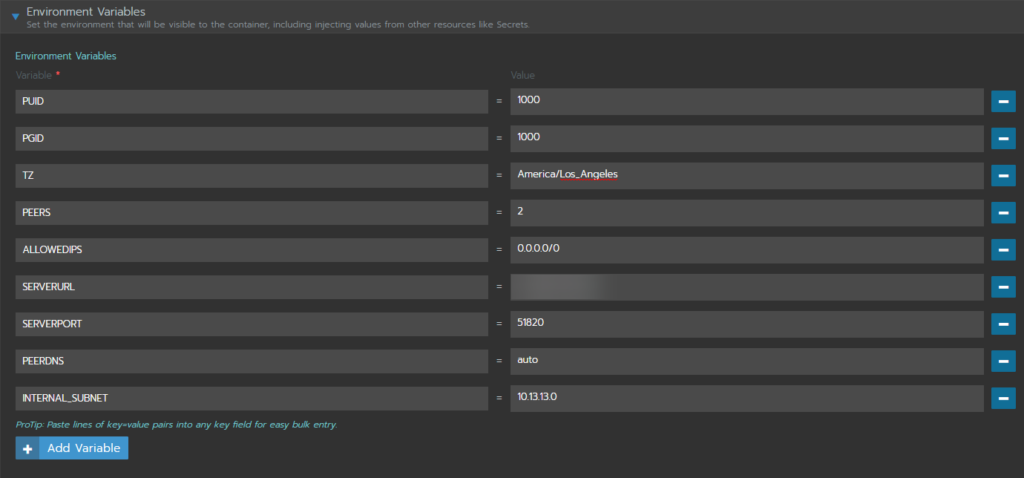
We won’t go through each variable here, as they are largely the default values you’ll find on the linuxserver.io page. There are a few exceptions:
- PEERS: This variable tells the service how many different config files need to be created in order to accomodate each device that will use the tunnel. In this example we are setting up 2 – one for my phone and one for my laptop.
- ALLOWEDIPS: There are a couple of ways this can be set up, including only sending traffic related to your home network through the VPN, but for now, let’s just set up all of the traffic from our remote devices to be routed through the tunnel with “0.0.0.0/0”
- SERVERURL: In our homelab case, you can use your external facing IP, but it is best to use a DDNS (dynamic DNS) service to create a friendly name that will always keep your public IP up to date.
NOTE: Most of the time your PUID and PGID are “1000”, but you can double-check by running the “id” command on the docker VM (you must be logged in as the docker user).
Volume(s)
Next we will mount volumes. Click on “Add Volume” and then select “Bind-mount a directory form the node”. This option is used because we set up the directory on the Docker VM/host (node).
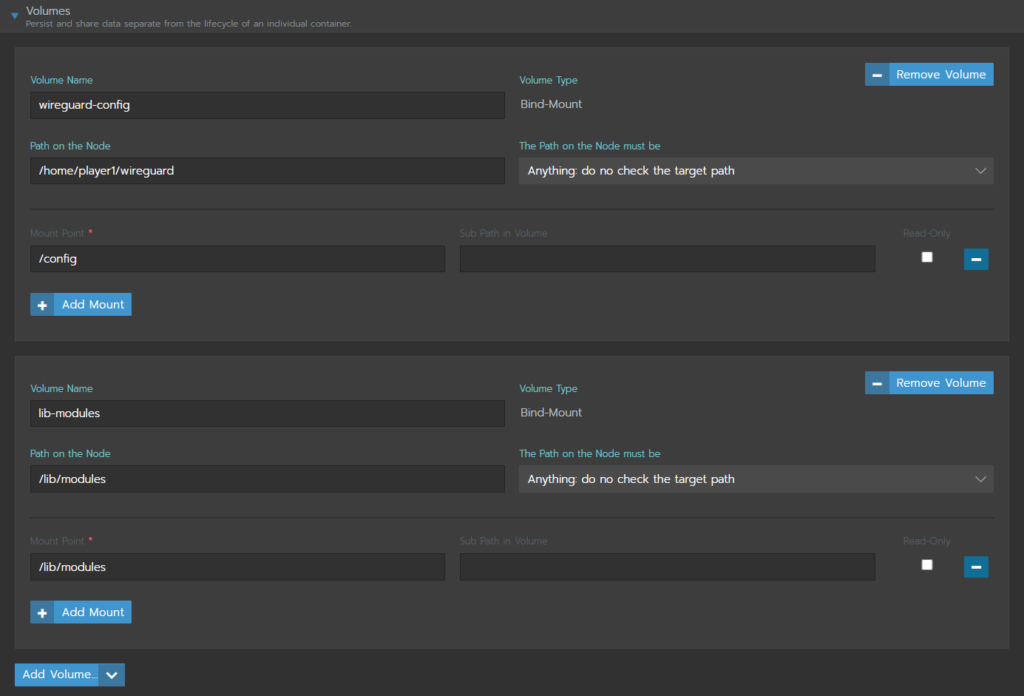
Note that we are binding 2 mounts, one for the config and one for the library modules. WireGuard is built into the linux kernel. Because of this, it cannot be containerized in the conventional way so a few extra considerations have to be made with this container to get it working.
Scaling/Upgrade Policy and Advanced Options
Here we will make a quick pitstop at the “Scaling/Upgrade Policy” dropdown and select “Kill ALL pods, then start new” and then click on “Show advanced options” in the lower right hand corner:
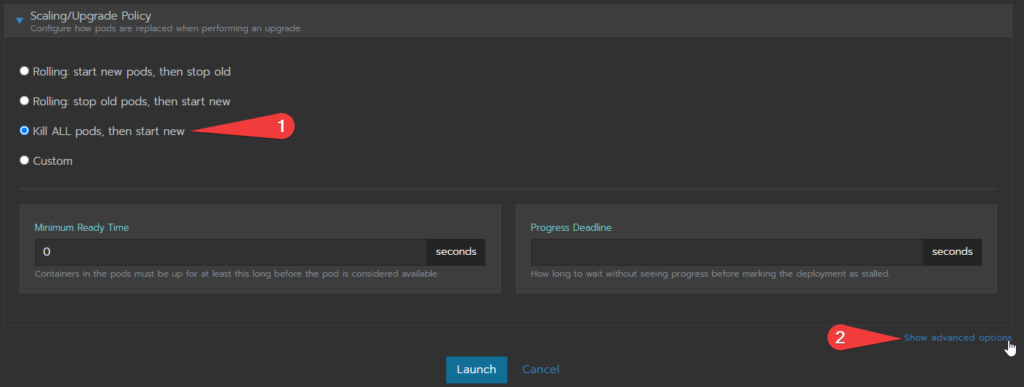
Under the Advance options, open the “Security and Host Config” fields. near the bottom there is a list of “Add Capabilities” option. Scroll to and click on “NET_ADMIN”, then scroll to the “SYS_MODULE” option – PRESS AND HOLD CONTROL and click on it. This will select both of those capabilities.
That’s all for this… go ahead an launch it by pressing the “Launch” button at the bottom of the page!
What Went Wrong in Rancher
The issue lies in one single line from the docker cli command…
--sysctl="net.ipv4.conf.all.src_valid_mark=1" This line allows for the ipv4 port forwarding option to be set to “1”, or true. This is required for WireGuard to work properly. While this can be manually set to true inside of the container shell by running:
sysctl -w net.ipv4.ip_forward=1Once you set that, your tunnel will instantly start working. Any time the container is restarted, however, you have to go back into the container’s shell and use the command again to get it up and running. It’s not reliable and unfortunately for all of the options the Ranch interface allows for, setting sysctl-s are not amongst them… yet.
I’ve tried a dozen other things to permanently set the net.ipv4.ip_forward to 1. I’ve tried editing the yaml file (it doesn’t stick and always recreates itself without my changes), setting the variable in the host VM (no effect), the list goes on. I’m sure there’s an answer and as soon as I find it I’ll update this post, but for now this is where we stand with it.
That is why option 1 is simply running it in docker- and it works flawlessly.
Open Port on Router
If you’ve been looking for a way online to access your home network, you’ll likely have come across the idea of “opening ports”. You will also probably have seen the numerous warnings against this type of thing and, to be honest, if you’re a novice at networking this is absolutely correct. Just don’t open any ports.
Having said that…
VPNs are a bit of an exception to this rule, as they are sort of like a bouncer at an exclusive speakeasy. If you don’t know the pass phrase (or in the digital sense, if you don’t have the encryption key) then you’re not allowed in (the network packets just get ignored/dropped). Because of this, so long as the port is set correctly, it is considered safe to open a port for VPN access.
There are so many routers out there that it would be impossible to tell you how to open a port for your specific router in this tutorial. However, there are plenty of great tutorials out there and google will be your best friend in finding them. Just type the make and model of your router and add “open a port” or “port forwarding”.
Whatever the exact method to open the port, there are just a couple of things to note when setting this up:
- When setting the port forward, make sure you use the IP of your DOCKER VM. This is where you want to forward anything that comes in on that port to.
- Make sure you are using the correct port number. In our case we left it as the default port 51820. If you decided to change it for some reason, make sure that is reflected in the forwarding rule.
- Make sure you set the protocol to UDP!!! This was in an inconspicuous area in my setup and I missed it the first time I tried this. I’m almost ashamed to admin it took me hours to figure out why I wasn’t able to connect.
Once your done, we are ready to try to connect a device and test the connection!
Viewing Configurations for Clients and Adding Peers
Option 1 Commands
Get QR
For a mobile device that you can scan a QR code with, the command to show the QR code is:
docker exec -it wireguard /app/show-peer [PEER-NUMBER]Where [PEER-NUMBER] is the number client you’d like to see. So if my phone was the very first client, the command would be:
docker exec -it wireguard /app/show-peer 1This is by far the easiest way to set up a tunnel on the client end.
View Config Files
If you’re using a laptop or other device that won’t take a QR code to automatically set the configuration, you can find the config files under:
cd ~/wireguard/config && lsWith the above commands, you’ll be moved into the config directory and shown the list of config files. Between the client config file and the server (wg0.conf) file you’ll have all of the info you’ll need to define a tunnel on the client end without a QR code. The process for doing that Will be defined in a future post but to view the information, you can simply type the command:
cat [CONF-FILE-YOU-WANT-TO-SEE]So if you wanted to see the server configuration (wg0.conf), while in the /wireguard/config directory, you’d type:
cat wg0.confAdding Peers
Adding Peers in the docker command line requires several steps. First, you’ll need to stop the running container:
docker stop wireguardThen you’ll need to delete the container:
docker rm wireguardBecause we saved the configurations outside of the container itself, we are able to save any existing peer configurations. To add more clients, you’ll need to recreate the container using the same long command, except you’ll need to increment the number of peers in the “PEERS” environment variable.
docker run -d \
  --name=wireguard \
  --cap-add=NET_ADMIN \
  --cap-add=SYS_MODULE \
  -e PUID=1000 \
  -e PGID=1000 \
  -e TZ=Europe/London \
  -e SERVERURL=wireguard.domain.com `#optional` \
  -e SERVERPORT=51820 `#optional` \
  -e PEERS=2 `#optional` \
  -e PEERDNS=auto `#optional` \
  -e INTERNAL_SUBNET=10.13.13.0 `#optional` \
  -e ALLOWEDIPS=0.0.0.0/0 `#optional` \
  -p 51820:51820/udp \
  -v /path/to/appdata/config:/config \
  -v /lib/modules:/lib/modules \
  --sysctl="net.ipv4.conf.all.src_valid_mark=1" \
  --restart unless-stopped \
  ghcr.io/linuxserver/wireguard
Note the “2” instead of “1” in the “PEERS” variable. When you run this command, the container will be recreated using all of the configurations it can find in the config folder. Any files not found there (the 2nd peer in the above example) will be generated.
Option 2 Commands
Get QR
QR codes are generated at the first launch of the pod in Rancher or when there are changes to environment variables between launches (like adding a peer). If you do not grab them at that time, you’ll have to execute a shell in the pod by clicking on the wireguard pod, then clicking the 3 vertical dots on the far right of the listing (more/settings icon) and selecting “Execute shell”. You can make the QR show again with the command:
grep -v '^#' /config/peer[NUMBER]/peer[NUMBER].conf | qrencode -t ansiutf8So if you wanted to see the 2nd peer’s QR code again, you’d type:
grep -v '^#' /config/peer2/peer2.conf | qrencode -t ansiutf8View Config Files
This Process is the same as in option 1, but the directory structure and names are a bit different. everything you need is in the config folder:
cd /configYou may use the “cat” command as before to view the contents of the files.
Adding Peers
In order to add peers in Rancher, you’ll need to stop the pod. To do this, you’ll need to click the arrow next to the “Active” icon to drop down the instance count (scale) and then hit the minus sign until the counter is 0. Once stopped, click on the “more/settings” icon (three vertical dots) and select “Edit”.

On the next page, select the “Environment Variables” drop down and increment (or reduce) the number of “PEERS”.

Then click “Save” at the bottom of the page. You’ll be dropped back off on the cluster page and you can increase the number of instances (scale) again to 1 ( or whatever it was before you killed the pods). This will restart the pod, keeping the configuration for the old peers but adding a new unused one. All QR codes will be available again in the Logs (click on wireguard, then in the next window click the “more/settings” – three vertical dots – and select “View Logs).
Wrapping Up
As I said before I’ll be updating this as soon as I find a resolution for the Rancher side of things. In the meantime, since there isn’t much to do once your connections are defined, running wireguard in plain old docker isn’t the worst thing in the world. Just remember to update.
Stay tuned! Next week we will explore another option with wireguard. A separate, cheap solution involving a Raspberry Pi Zero, a USB to Ethernet adapter and an teeny tiny OS image called DietPi!
Do you have a resolution for this Rancher issue? Have it working just fine? Please tell us how!!! Leave a comment below.
Terms
- VPN – Virtual Private Network. This allows for your data to be encrypted from endpoint to endpoint across insecure networks. Think of it as a personal tunnel through the internet, keeping your data protected.
- DDNS – Dynamic DNS service. A service that creates a simple way to keep your IP synced with a friendly name. Your internet provider may change your public facing IP without notifying you. While not incredibly frequent, this service automatically checks to see if your IP changed and updates DNS records appropriately, ensuring you will always be able to remotely connect to your home network.
Commands Used
- mkdir: Creates a directory (folder) in the present one. You create a sub-directory elsewhere but including the path to where you’d like to create it (mkdir /home/player1/path/to/[NEW-DIRECTORY]).
- docker run [OPTIONS]: Creates a container with the configuration options defined in the [OPTIONS] section.
- cd: Change Directories. Used to navigate the filesystem.
- cat: Concatenate. Has multiple uses, but in this tutorial is used to print file contents to the screen.
- grep: A robust tool for searching through text files and locating matching “regular expressions”.