
To create a usb flash drive that can install a linux distribution, there are several software options. For this guide, we will be looking at two of the most popular; balenaEtcher and Rufus for it’s broad compatibility and ease of use.
Before we do that, we’ll need an OS image (operating system), aka an ISO image (don’t worry about it, ISO is just a shortened version of the ISO standard (9660) that defines how information is stored on certain media).
For this example we will be downloading the server version ISO image for Ubuntu 20.04 (as many of my tutorials use this operating system) but you can use any system that you can get an ISO image for. The server version is command line only (also known as headless ) but again, feel free to download the desktop version- or any other operating system- you’d like.
You can download the server version here (switch to option 3 to download directly to your machine).
With that out of the way, make sure you know where your file is downloaded (typically the default is in your downloads folder). Let’s get to it…
Requirements:
- USB drive large enough for your needs (16GB will work just fine in this case).
- A computer with a USB port.
balenaEtcher – Option 1
- Download the balenaEtcher application from here. Be sure to select your proper operating system version.
2. Install the software from the downloaded file and open the application.
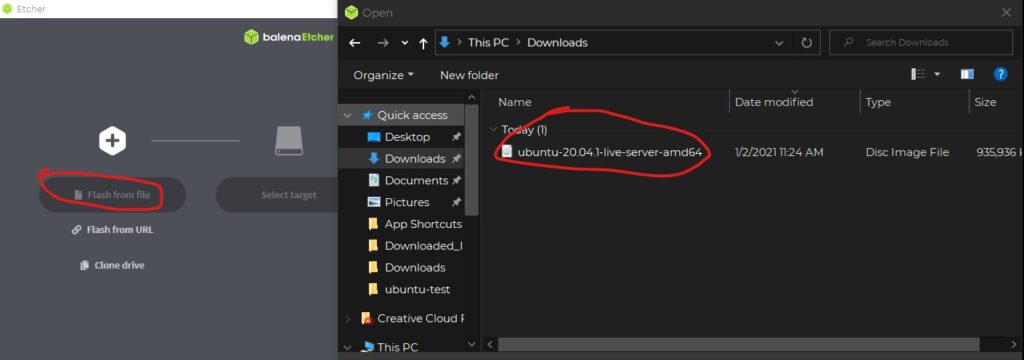
3. Click on “Flash from file” and select the ISO image you’ve previously downloaded.
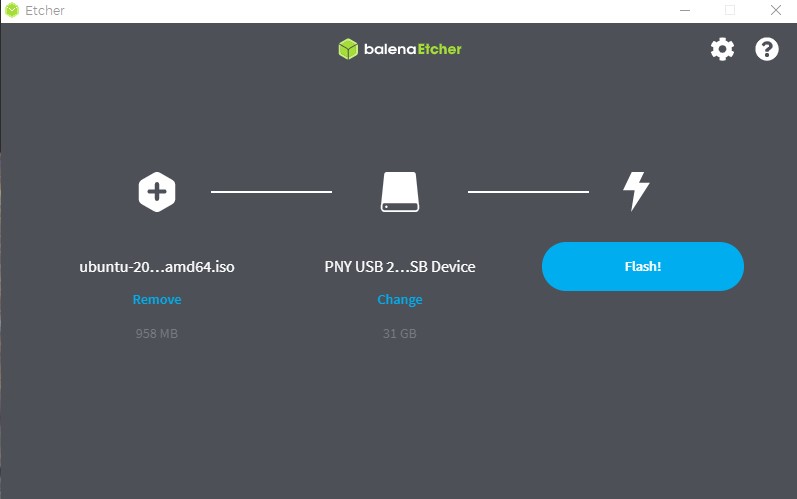
3. Plug in a sufficiently large usb (16GB will be fine). The drive should appear on the application and the option “Flash!” should become enabled. If not click where the usb drive should be and select “Change” or “Select target” if you see that option. If you still don’t see it, make sure your USB is recognized in your system.
4. Click “Flash!”… and that’s it! From there just wait for the process to finish and safely eject your USB.
Rufus – Option 2
- Download the Rufus Software here. Download the standard version and install.
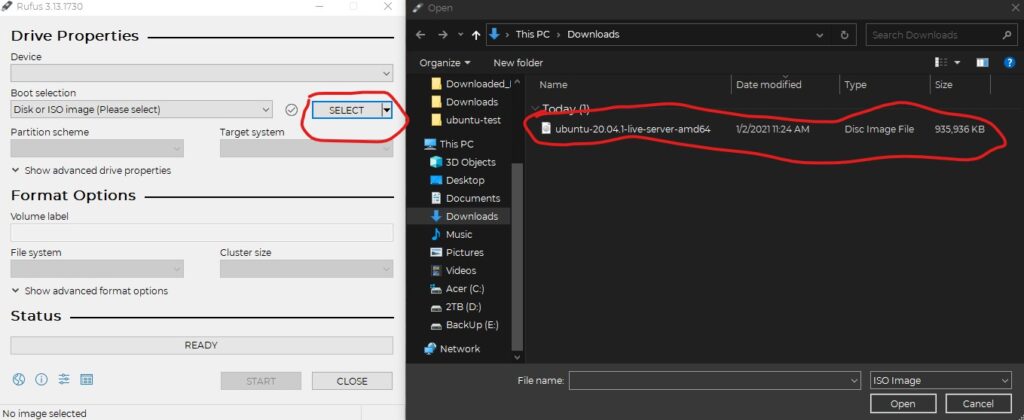
2. From here, Rufus should pop up. Click on “Select” button and choose your downloaded image…
3. Plug in your USB. Again, the “Device” section should auto-fill with your USB drive you plugged in. If not, make sure your device is recognized.
4. Leave the rest of the settings default and click “Start” and let it run. Voila! You now have a bootable USB drive ready to install Ubuntu!
So What’s the Difference?
For our purposes these two pieces of software are functionally identical, but there are a few pros and cons for each.
balenaEtcher
Pros
- Very clean and polished user interface
- Cross-platform (Windows/Mac/Linux)
- Very user friendly
Cons
- Larger program
- Lacks extra settings
- Sends data to balena (can be turned off if settings)
Rufus
Pros
- Fastest of the two
- small program size
- More options
Cons
- Windows only
- User interface isn’t clean
At the end of the day, I’d say balenaEtcher wins for ease of use and if you’re just starting out this would be the preferred choice. If you’re an advanced user (and have Windows) then Rufus would be the better bet.
Wrapping Up
There you have it, folks… OS installation drives, done two ways.
Do you have a preference? Perhaps another application you prefer over balenaEtcher or Rufus? Any tips or tricks you’ve learned? Leave a comment and let everyone know your preferences.
Terms
- ISO image: a complete instruction set for installing an operating system that can be put on a USB drive (as well as other media, like CDs, DVDs and BluRay)
- OS: abbreviation for operating system (i.e. Windows, Mac, Linux, etc.)
- Headless: a version of an operating system that does not have a graphical user interface. These systems are command line only and have the benefit of being smaller/lighter images of operating systems but are less user-friendly.


Pingback: So You Want to Build a Linux Virtualization Server: Part 4 – Configuration – Ctrl Alt Develop
Pingback: Cheapest Access to your Home Network from Anywhere! – Ctrl Alt Develop