
Bios Configuration
Prior to diving into the mix here, make sure you have a read parts 1, 2 and 3, and also have a USB drive ready to load your image of Ubuntu onto your machine as well as have a hardwired (ethernet) connection to your router. For instructions on creating a USB boot drive, please check out this post.
Overview
Before we go through what will look like a lot of detail, you should know that it’s actually a simple set of steps:
- Power on and tap key to enter BIOS
- Configure BIOS changes
- plug in bootable USB
- Restart PC
- Tap key to enter boot device selection
- Set up operating system details
- Install and reboot
That’s really it! The problem is we can tend to get hung up or fearful about some of the minute details during this simple process. Fear not! That’s what this post is for!
With that out of the way, let’s dive in… Minutiae, here we come!!!
BIOS
Okay, folks, so we’ve prepared ourselves and our hardware… now it’s time to boot up and get to work… but wait! Before we get that OS installed, there are a few things we have to take care of… in BIOS.
BIOS is short for Basic Input/Output System and is the instruction set that tells all of the computer components you’ve put together how to work with one another. It is the foundation upon which the actual operating system is able to use all of the computer’s resources. If your computer is a city, the buidlings are the hardware and the people are data, moving about with their duties and orders to carry out between them. The BIOS, then, would be the roads, sidewalks and supporting infrastructure that interconnects the buildings. This includes the street lights, stop signs, and traffic laws that restrict the people (data) to moving in ways that limit the chance of collisions and injury (computer crashes). Notice I said limit – not eliminate!
If we don’t set up our streets and traffic laws correctly, our city will function poorly. Given that we are setting up a single physical computer that will house multiple cities, a virtualization server could be considered more of a greater metropolitan area like “the Bay Area” or “Greater Los Angeles”. So it is perhaps even more vital that we set up our infrastructure properly from the start! With that in mind let’s take a look at the BIOS settings needed for a virtualization server…
Getting into BIOS
Getting into BIOS can sometimes be a bit finicky, as different manufacturers have different shortcut buttons (also called hotkeys) associated with accessing this system.
Begin with your computer powered off. Turn it on and begin tapping either the F2 or the DEL keys (one of the other). Typically one of these will boot you into the BIOS. If it doesn’t work, power back down and try the other. If neither works, then kick it and swear at it… just kidding. You can google “how to enter bios on” and then type the make of your motherboard and you’ll likely find the correct key within a few clicks
NOTE: When booting to BIOS, make sure that you start tapping the assigned key before the computer finishes booting up.
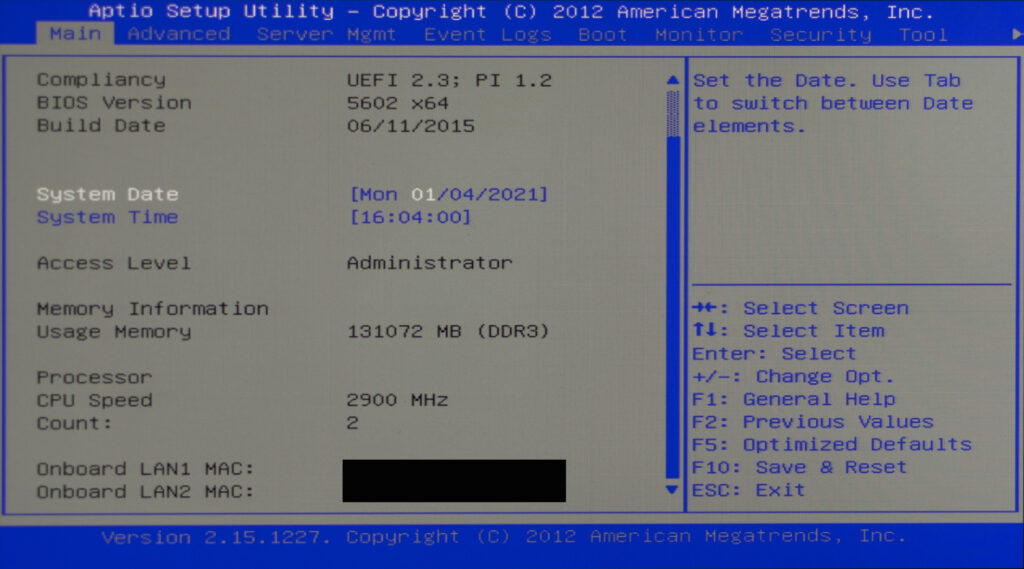
If you’ve followed the previous posts in this series, you know we are using an ASUS motherboard, which demands that we use the DEL key to boot to BIOS:
General Settings
There are a few settings that have to be turned on in every computer in order for virtualization to be possible. Before getting to the particulars of our example motherboard, let’s look at those general settings for the two main types of chips… Intel and AMD.
Intel
For Intel chips, the two settings that need to be turned on are:
- Intel Virtualization Technology (to allow virtualization)
- Intel VTd (to allow PCI passthrough… covered later)
AMD
AMD has two settings that do that exact same things, but have different names:
- AMD-V (to allow virtualization)
- AMD IOMMU (to allow PCI passthrough… still covered later)
NOTE: Due to the numerous BIOS variations, these settings can be located in several areas. Check for menus with the names Chipset, Advanced CPU Configuration or Northbridge as these are typically where these settings are found.
Server Settings
The motherboard used in our example, the ASUS Z9PA-D8, is a server motherboard and because of this it has a few additional options that we need to set. I would highly encourage you to look into your motherboard model and see what the best configuration would be for your setup. In our case, after quite a lot of research and a couple of trial runs, the configuration below is serving us quite well (pun intended). Keep in mind there may be different options for different server boards. In no way can I guarantee that the below is the perfect configuration – only that it has been very stable and reliable for our setup. Any settings not mentioned were left as default.
It should also be noted that you do not need a server motherboard to create a home server- pretty much any computer can be turned into a server. Our decision to go with a server motherboard was based on the fact that we wanted to maximize resources (this board has room for 2 CPUs and 8 RAM slots) while increasing the longevity and reliability of the physical computer.
Advanced> CPU Configuration>
- Execute Disable Bit [DISABLED] – No Ubuntu support and may degrade system performance.
- Server Class [High Performance (HPC)] – Can be customized if you wish.
- Intel Virtualization [ENABLED] – To allow for virtualization (creating VMs).
Advanced> CPU Power Management Configuration>
- EIST [DISABLED] – Possible performance reduction if enabled.
Advanced>Chipset Configuration> CPIIO Bridge>
- Intel (R) I/OAT [DISABLED] – Although supported by the linux kernel, the feature has been since disabled for lack of performance and possible data corruption.
Advanced> Chipset Configuration> Intel(R) VT for Directed I/O Configuration>
- Intel(R) VT-d [Enabled] – For PCI passthrough.
- Coherency Support [Enabled] – Helps with system stability, but may reduce performance (I have not noticed a measurable difference).
- ATS Support [ENABLED] – Address Translation Service allows some hardware to communicate more efficiently in a virtualized environment.
Advanced> WHEA Configuration>
- WHEA Support [DISABLED] – Windows based tool. Disabled since we are using Linux.
Boot>
- Full Screen Logo [DISABLED] – A personal choice. I feel it saves a few seconds off the load time but I’m probably imagining it.
- Boot Device Seeking [NORMAL] – Endless PXE gave me some issues when I first started testing this.
- Boot Option Priorities – You’ll need to make sure that the OS hard drive is 1st on the ordered list once you load the operating system via the USB boot drive we created.
Boot> CSM Parameters>
- Launch CSM [ALWAYS] – Default.
- Boot option Filter [UEFI and LEGACY] – Default.
- Launch PXE OpROM policy [DO NOT LAUNCH] – Again, since we are installing locally, we turn this feature off.
- Launch Storage OpROM policy [UEFI first] – Seems to work fine.
- Launch Video OpROM policy [LEGACY] – Legacy showed the info full screen instead of smaller and centered. Since we are running headless, it doesn’t really matter.
NOTE: If you’d like to dive deeper into BIOS, here is a link to the online manual for the Z9PA-D8 motherboard. I’d recommend you look up your BIOS manual if you are using a different motherboard.
With all of that out of the way, we are ready for the next big step.
Installing Linux From USB
Finally, while still in BIOS, after finishing your changes, plug in your USB boot drive that we’d previously created here.
Head to the “Exit” menu and select the “Save Changes and Reset” option and confirm by selecting “yes”. (Alternately, you could hit the F10 button and then select “yes”).
Language and Keyboard Setup
As soon as the system restarts, We now have to tap another key to get to the boot selection screen. In the case of the ASUS motherboard we’re using, it’s the F8 key, but your motherboard may vary- again, check online for your particular key.
At any rate, tap away until the boot selection menu appears and choose your USB boot drive.
Once completed you will be greeted with this screen:
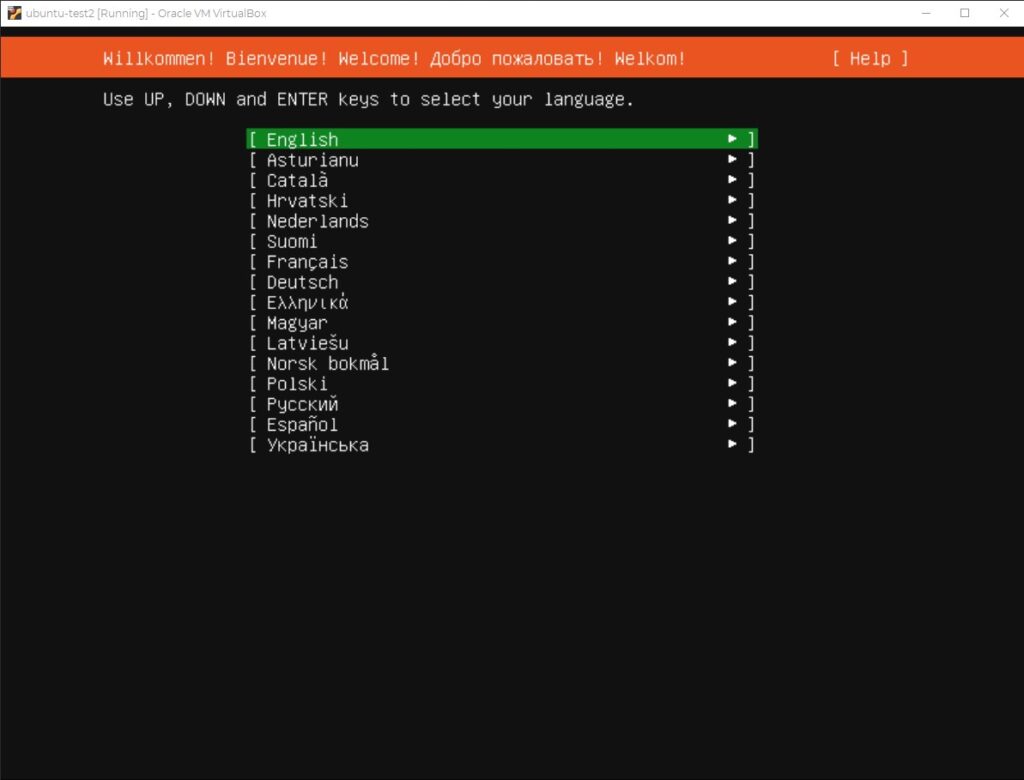
Since you do not have a mouse available, you’ll be navigating the choices with the arrow keys. Mostly you can hit “Enter” when your choice is highlighted, but there are some “checkboxes” you might come across in some of the configuration steps. You’ll need to highlight the box and hit the SPACE bar to fill it with and “X” in those instances.
Select your language preference. From there, depending on how long ago you downloaded your ISO file, you may be offered to update to a newer installer. If the option is available I’d recommend choosing it and allowing the update to happen.
From there, select your keyboard layout/s and select “Done” at the bottom of the screen
Bonded Network Setup (but not yet)
Next you’ll be greeted with your network connections setup. If you only have one network connection then you can set up a static IP address for your server. This will make it so that your computer can always be reached at the same address on your home network- a very important detail.
In our example, the Motherboard we use has two network interfaces and both can be bonded together in order to support load balancing and better network speeds. A full breakdown of the various bonding modes and their uses is outside of the scope of this tutorial, and there are a few known bugs related to the creation of bonds. Because of this, we are going to leave this step incomplete for now. We’ll come back and configure this once the OS is up and running.
When you are on the “Network connections” section if you have both NICs connected via ethernet cable they will both show up similar to the below image:
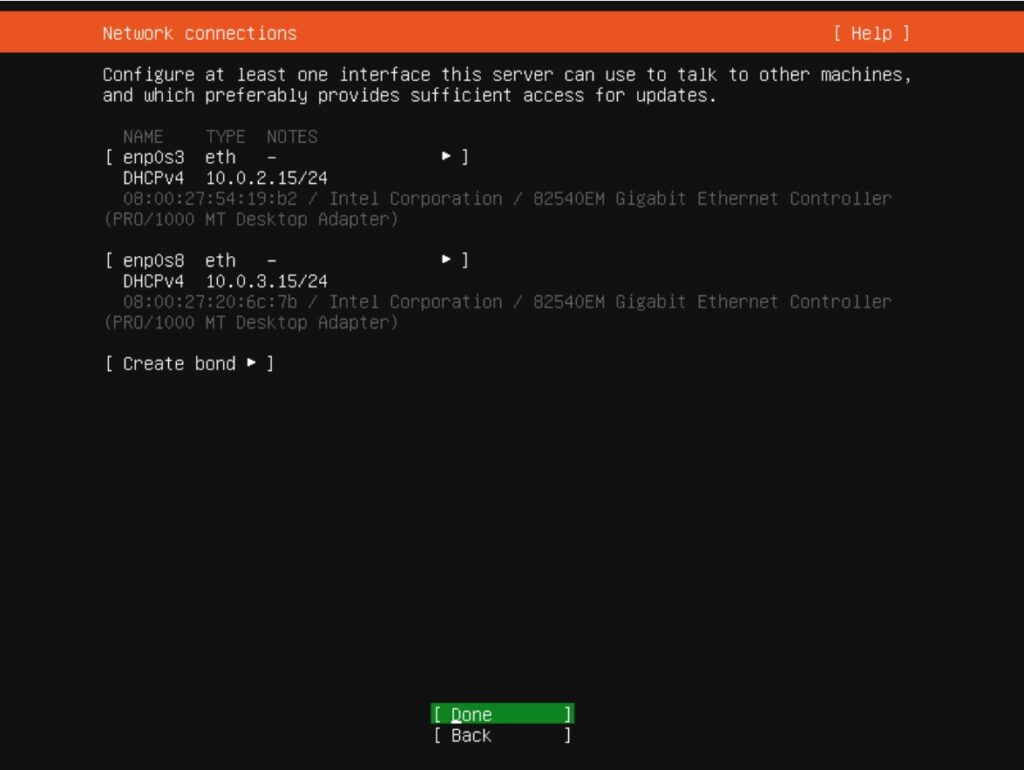
Remember we said that we should set up a static IP address for your machine? The DHCP (dynamic host control protocol) shown above is the exact opposite of static as it dynamically assigns any free IP address and can change that assignment without notice. However it’s fine to leave these alone for now, and in fact that’s what we’ll do. Simply hit “Done” for now and move along…
In this tutorial we will also skip the next two screens (Configure Proxy and Configure Ubuntu archive mirror) as they are not required for our purposes. Hit Done for each of these screens and move on.
OS Drive Setup
In the next screen, “Guided storage configuration” I make sure the drive I chose for my operating disk is selected, then make sure “Use an entire disk” is selected. You may see your other disks for vm-pool storage and your intended RAID disks in this screen. Don’t worry about them for now.
I then De-select “Set up this disk as an LVM group”. I will likely get some flak for this, but I ran into too many issues with LVM and chose to forego the option for the following reasons:
- I used a 500GB SSD for the OS and it will have very few packages actually loaded onto it (timeshift, ssh, qemu/kvm, and a handful of others) so I don’t see a need to extend the memory before the server’s end of life.
- The benefit of creating live snapshots wasn’t a huge concern to me, and timeshift does virtually the same thing with no down time.
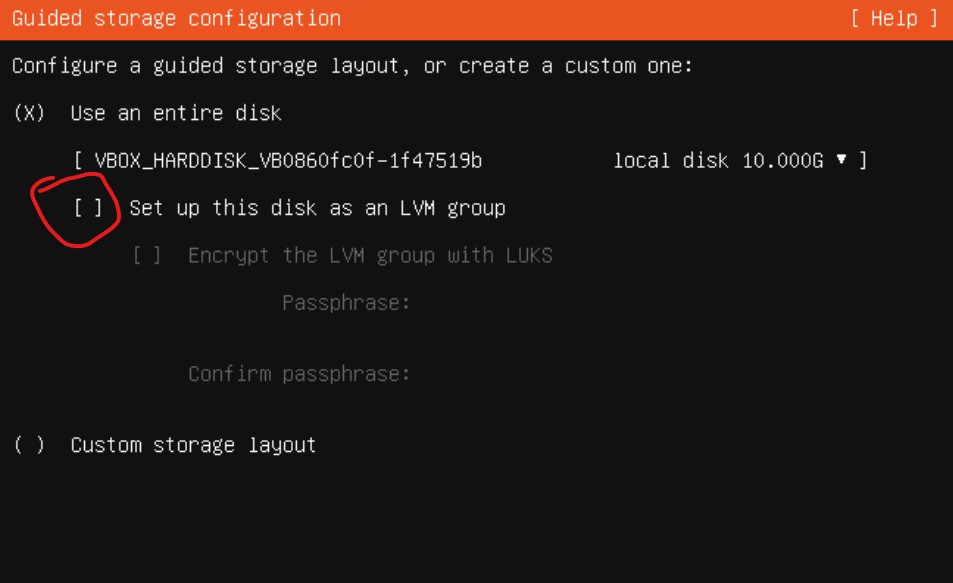
Feel free to decry my choices- tell me why you think I should’ve gone a different way in the comments and let’s learn together!
At any rate, With that completed, select “Done”.
RAID and Virtual Machine Drive Setup
RAID Array
next we will set up a software RAID array. I know that the motherboard we are using has a hardware RAID option, and I did try it out. It was easy to set up, but after conferring with others and doing some additional research, I was convinced that a linux software RAID would perform as good or better and be more reliable. So that is what we will walk through next.
In the next screen, You should see the rest of your devices. Let’s start with setting up the RAID configuration.
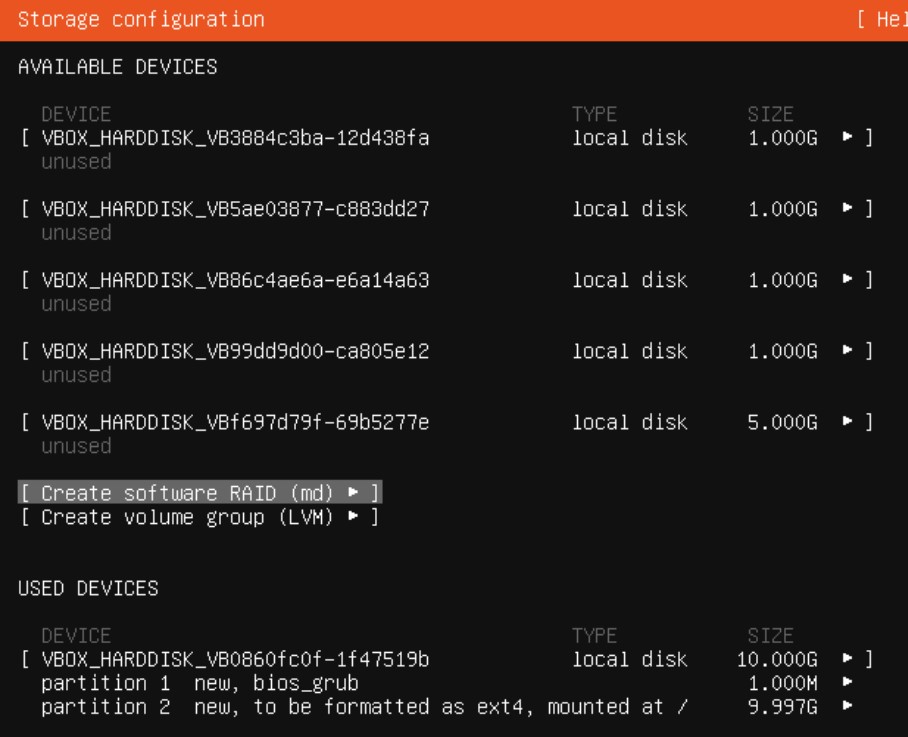
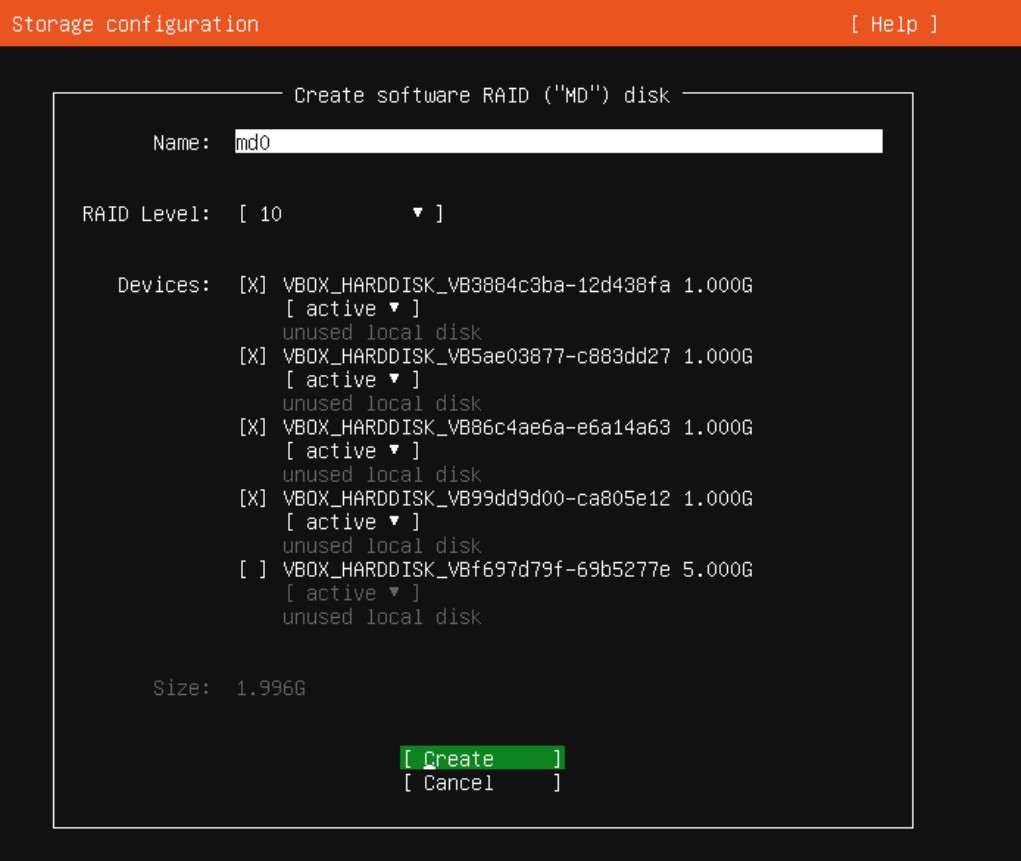
Identify the disks you plan on using for RAID (in the above image they are virtual disks, so yours will look different. Remember in the last post I asked you to write down each drive’s info? this is why!). Once you’re sure, select the “Create software RAID (md)” option. From there, leave the Name as default, select your RAID type (10 in our example) and the disks you’d like to include in that RAID and Create it.
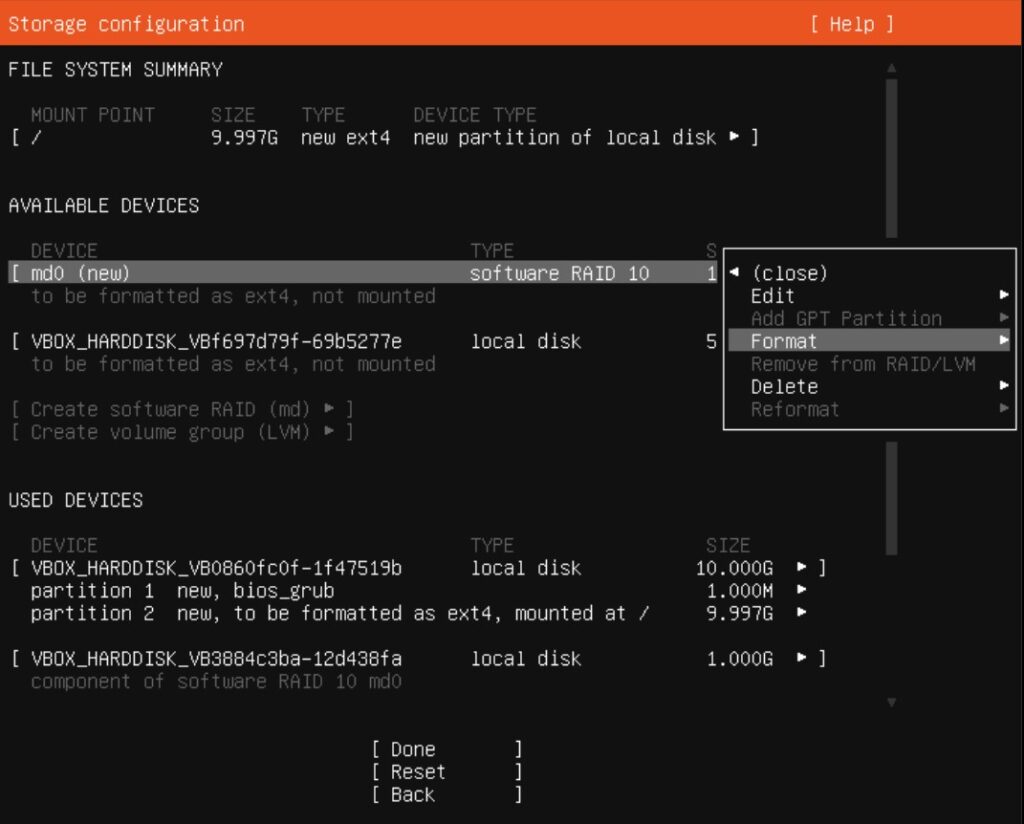
Once created, you’ll be dumped back to the main screen. Highlight your md0 array and hit enter, then select “Format” from the dropdown menu.
On the next pop-up screen, select the “ext4” format. then set the place you’ll “mount” your drive onto the system. For me, I like having all additional drives as a subdirectory of the “mnt” (mount) directory, so we will have to select “Other” and then type in the directory path. in this example, I’ve named the mount point “raid-array”:
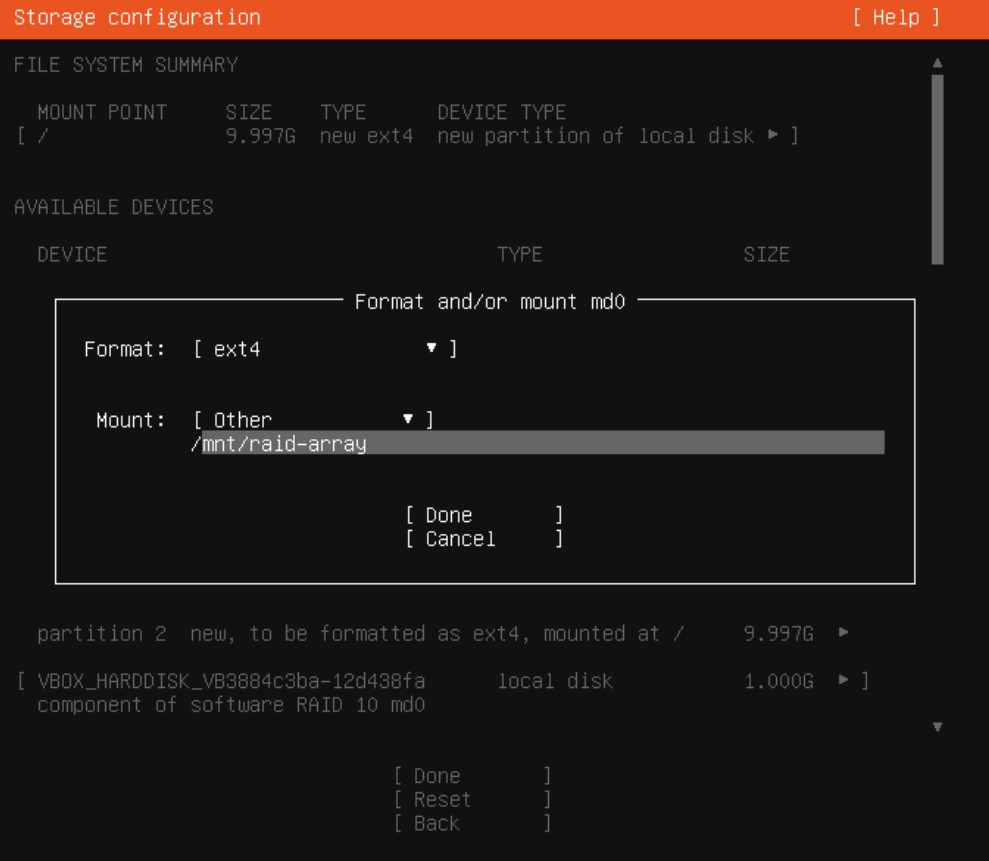
Select “Done” and move on.
NOTE: There are various RAID array types from which you can choose. RAID 10 is very performant while having good redundancy, but is expensive in the sense that you lose half of the total space of the drives you’re using. Do some research and decide for yourself what you’d like to implement. Just remember- RAID is not a backup! But we’ll talk backups later…
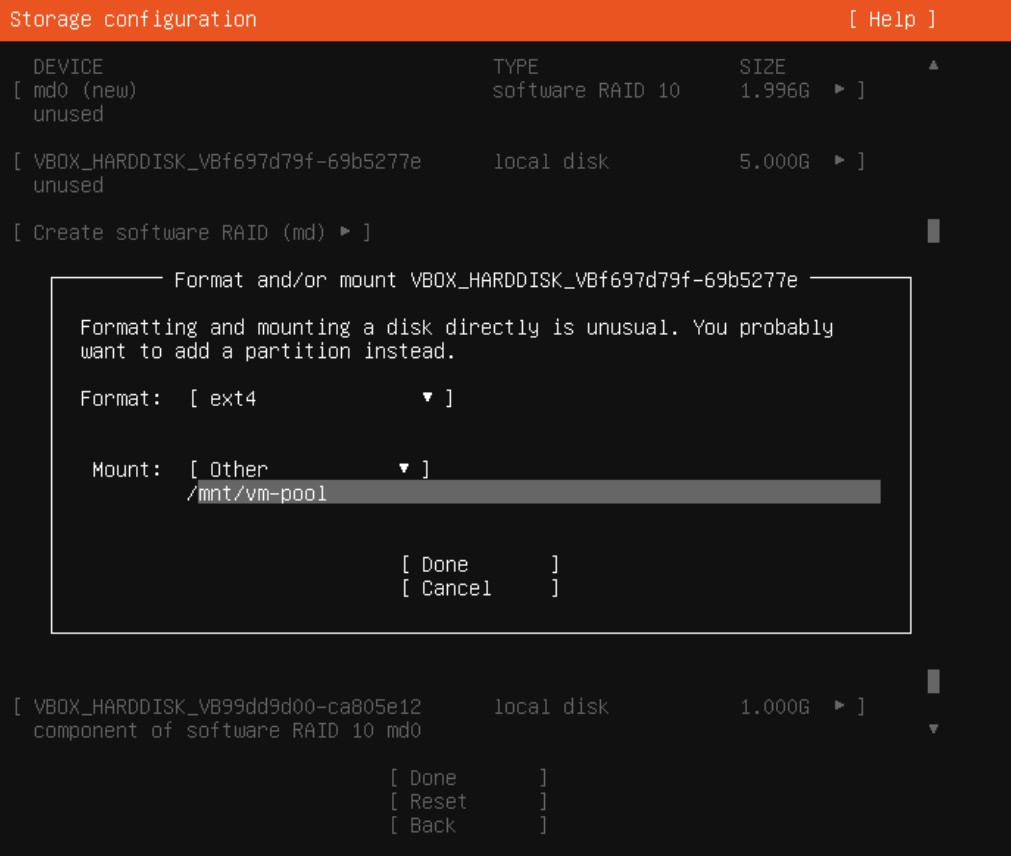
Virtual Machine Disk
Now we’ll format the remaining drive- the virtual machine pool drive. I chose to have a separate drive for the vms to keep the OS drive clean and everything in the system fairly modular and swappable. While there is the risk of having more parts that could break, SSDs are very stable (usually) and we will also be backing up the vms to the RAID.
Select the drive and Format it to “ext4” and mount it to “Other” and type in “/mnt/vm-pool” or whatever you’d like to name it.
Finishing Up
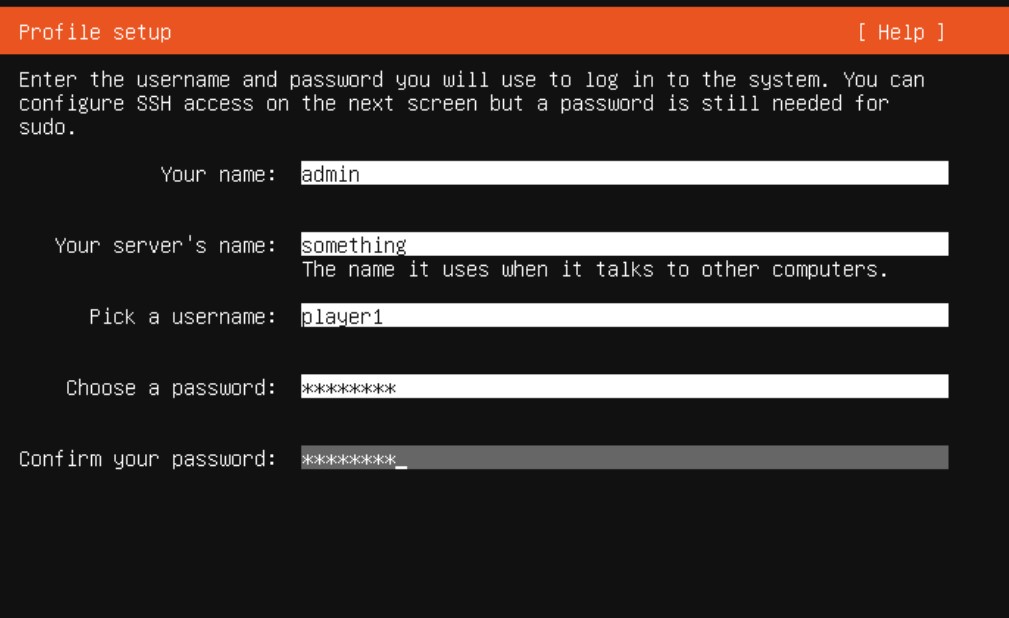
You’re nearing the end! Next, you will be presented with the screen below. Fill in your information.
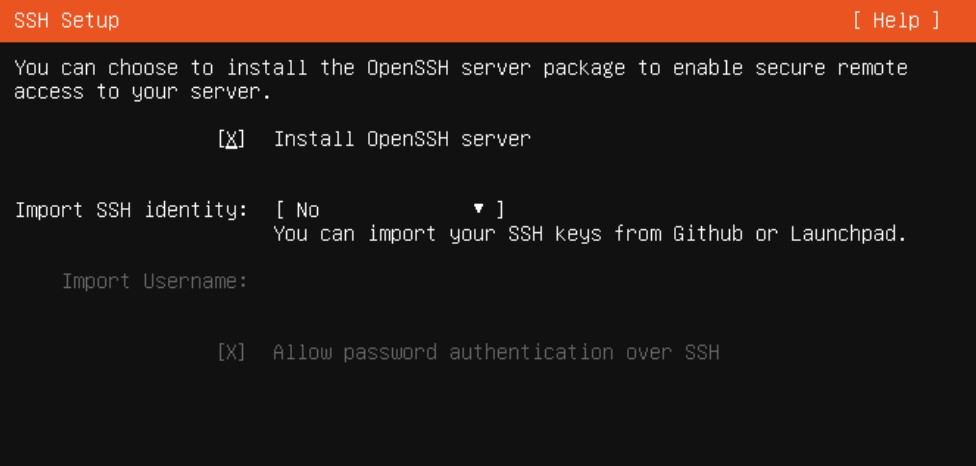
Lastly, go ahead and make sure you select “SSH” install:
On the last page you’ll be asked if you want to download some common add-on “snap” packages. For the purposes of this tutorial we can skip this completely but you might be interested in some of this functionality. I’d recommend adding this stuff to the VMs we will create later and keep the virtualization server OS nice and clean, though.
Start the install and wait a while it works its magic. When it’s completed go ahead and reboot.
Final Test
Once you’ve rebooted, you should get a login prompt. Enter the name and password you type into the previous screen.
To make sure you’ve loaded the drives correctly, type the command:
df -hIn the list that prints to screen you should see all of the drives you assigned. Specifically the raid-array and vm-pool drives mounted in the /mnt directory.
If you’d like to triple check that all is well, type in:
cd /mntyou should be brought to that directory, then type:
ls -laYou should see both “raid-array” and “vm-pool” in the list that prints to the screen. If you do… you’re good to go!

Wrapping Up
If you’ve made it to the end – congratulations!
This was a lot of configuration, but if you’ve successfully set this up, you won’t have to worry about it again for a long time… hopefully.
Don’t worry- We’ll cover the network setup in an upcoming post!
Did we leave anything out? Is there an additional setting or configuration detail you recommend? Leave a comment and let everyone benefit from your experience!
Terms
- BIOS – Basic Input/Output System. Tells computer components how to work together.
- OS – Operating System.
- Hotkeys – buttons on the keyboard that are pre-programmed to perform extra functions.
- Static IP – A manually assigned network address that never changes.
- DHCP – Dynamic Host Control Protocol. A method of automatically assigning IP addresses to devices. Fast and easy, but the IPs are only leased, and can be reclaimed and changed without notice.


Pingback: So You Want to Build a Linux Virtualization Server? Part 5 – SSH Setup with a Windows Client – Ctrl Alt Develop
Pingback: Creating Virtual Machines in virt-manager – Home Virtualization Server Part 7 – Ctrl Alt Develop
Pingback: Super Simple Samba Server! – Home Virtualization Server Part 8 – Ctrl Alt Develop