Hopefully Part 1 of this series has piqued your interest and Part 2 gave you some basic tools once this beast is built. For now, get ready to get into the real nuts and bolts of a virtualization server…
Before We Begin
Before you get excited, let me tell you that while this endeavor is considerably cheaper than buying several servers and rack mounting them, there is still a decently sized up front cost for a build like this. The reason for this is that, as we explained in part 1, a virtualization server is used as a host to create guest virtual machines. Those VMs borrow some of the computing power from the host in order to be useful. These include CPU cores/threads, RAM, and disk space for the OS and storage.
Therefore, the more CPU cores, RAM and storage, the better. The rig I built (and am about to describe) weighs in at 16 cores (32 threads), 128GB RAM, and nearly 8TB of general storage space, with an additional 500GB for the host OS and another 500GB for the virtual machines.
At the time of my build (which I will outline below) everything ended up costing a little over $1400.
List of Components
Below are the components that I used to build my own tower server.
NOTE: Some of the below are affiliate links. If you purchase through these links the site will receive a small profit without costing you anything extra. If you are able to purchase via these links, we thank you! If you’d rather not or if you are able to find a better deal elsewhere, then more power to you!
- Phanteks Enthoo Pro Full Tower Chassis with Window Cases PH-ES614P_BK,Black
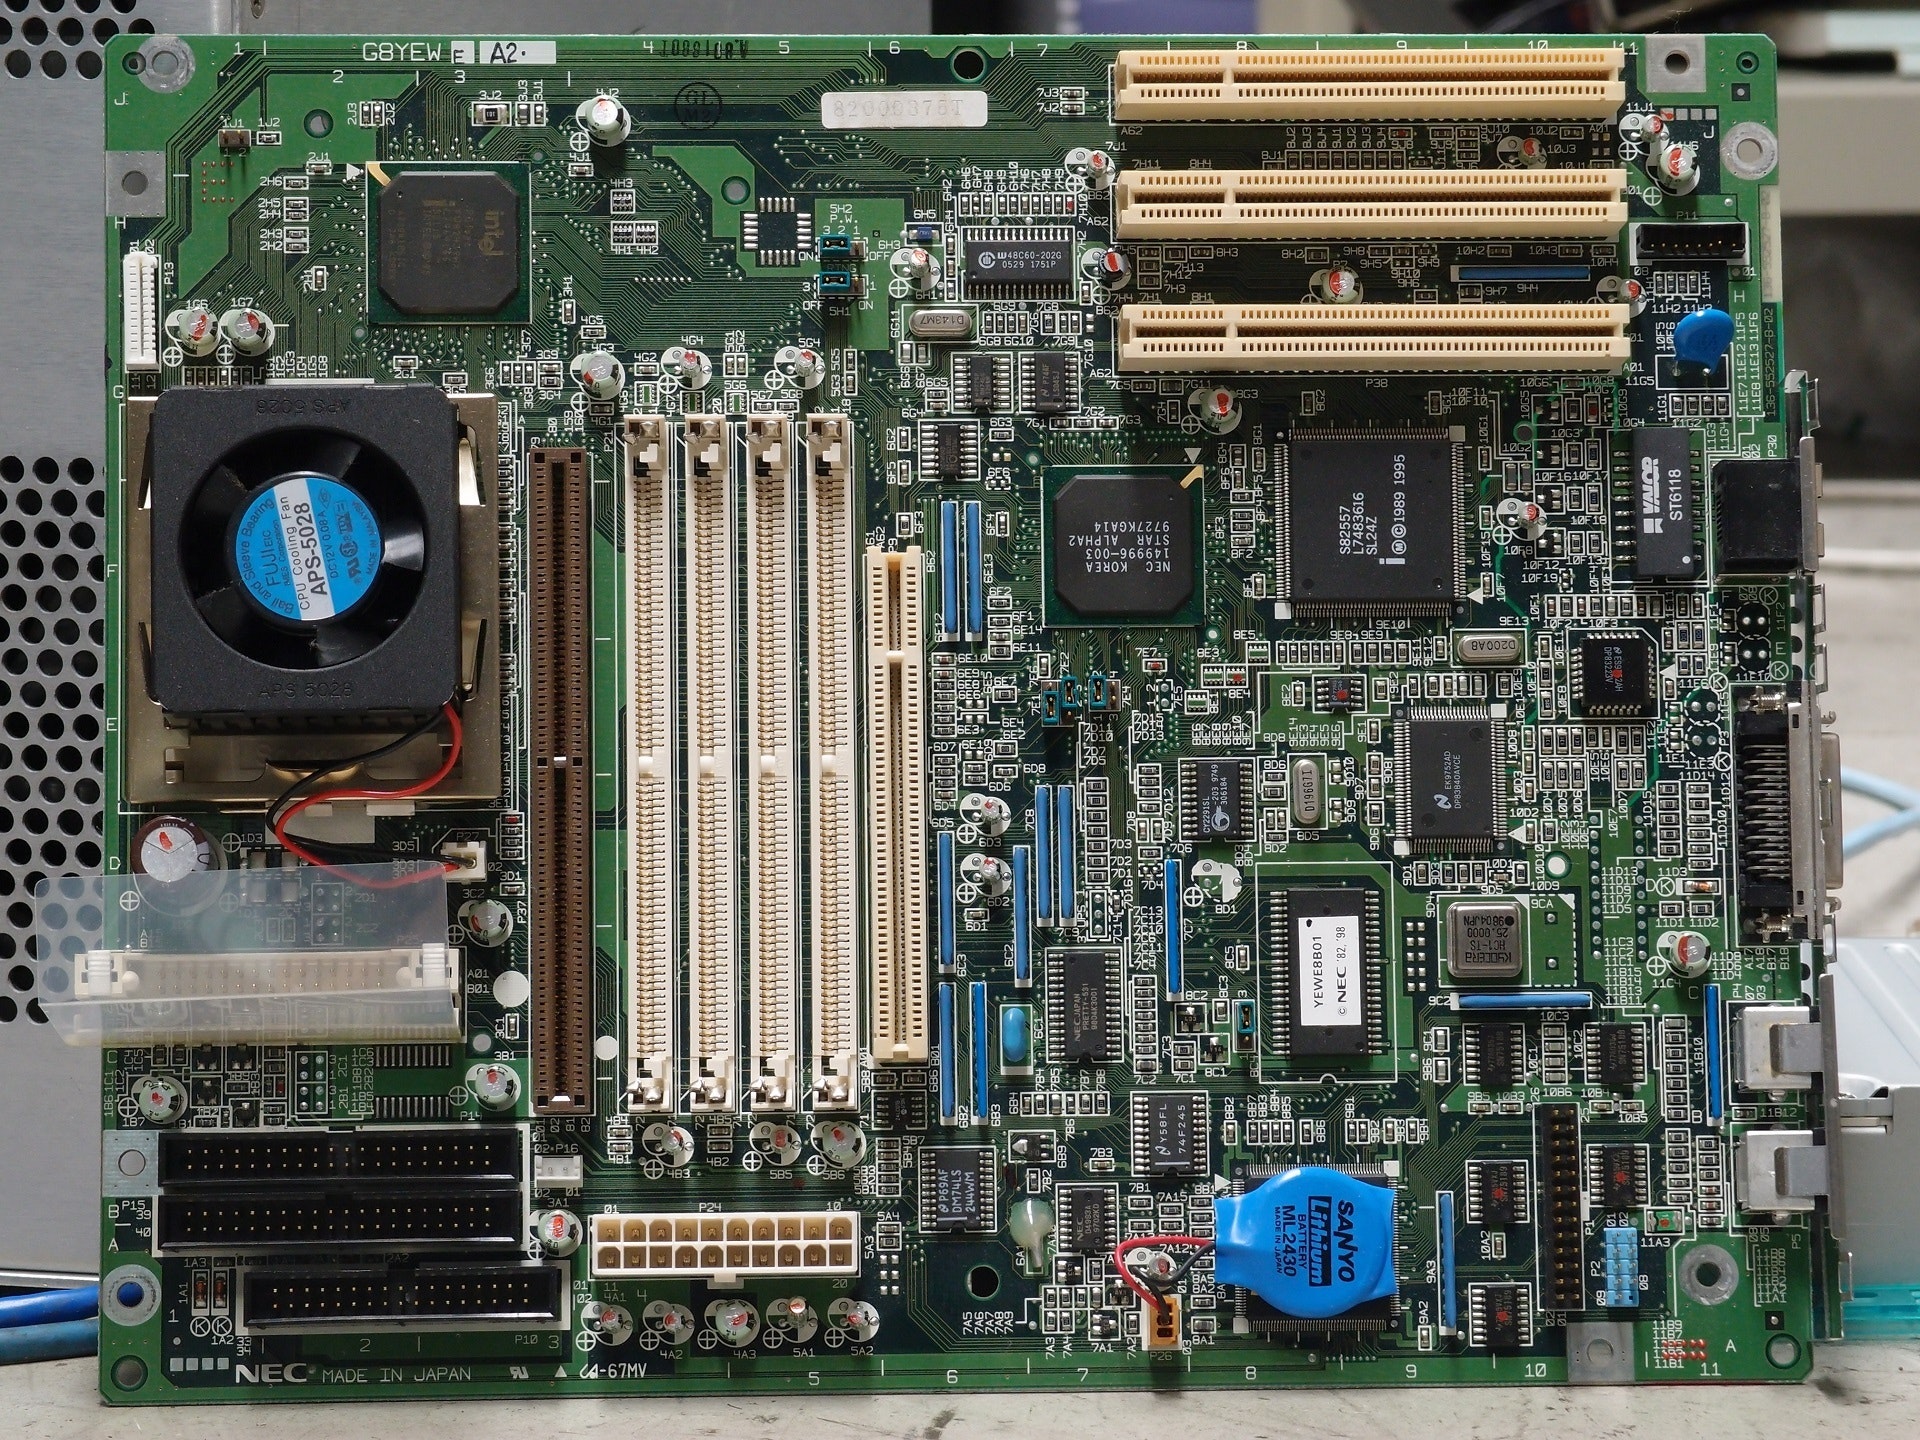
- ASUS Z9PA-D8 LGA2011 dual-CPU Motherboard
- 128GB (16GB x 8) DDR3 RDIMM ECC RAM (Samsung – found on EBay)
- Xeon E5-2690 (v1) 2.9GHz 8core, 16 thread CPU (x2) (EBay)
- Noctua NH-U12S CPU Coolers (x2)
- WD Blue 500GB SSD (OS drive)
- 4TB Seagate 5900rpm Internal HDD (X4 – for RAID 10)
- Corsair RM850x Power Supply
- Phoneix PCIe card (for USB 3.0 front connectors on case)
- Replacement I/O shield (found on EBay)
- SP 500GB SSD (for virtual machine memory storage)
The above are the components that I selected for my build after careful consideration. The balance between functionality and cost is always a tough decision. Allow me to justify (and critique) some of my choices below.
The Good
- The Phanteks case is a full sized tower, which allows for plenty of space for expansion, cable management, and air flow ended up being a great choice in my opinion even though some of the features (rgb lighting) went unused in favor of spending more on function rather than fashion.
- The motherboard, CPUs and RAM were all used items. Second hand server hardware is a vastly more affordable resource and still, if well researched, can punch above its weight. While I would love to buy more current hardware, the price gap is a bridge too far for me and I have not noticed any significant performance issues on any of my systems or services running on this rig.
- In my experience, thermals can be a silent killer of a system. You may not realize the damage you are doing until it is too late. No need to get the most expensive water cooling you can find, but don’t skimp here, either. For this reason I recommend a brand of CPU fan with a solid reputation. Noctuas are amazing for their price- silent and efficient.
- Power supply- I went a bit overkill, here, but I’m glad I did since I’ll be (or rather have been) running the server 24/7. I don’t have a backup power supply (a benefit of many rackmount ex-enterprise servers), so I want to make sure that it can handle the constant workload very easily.
The Bad (Needs Improvement)
- The one area that, in hind sight, I would have done differently is storage. The SSDs for the server operating system and the virtual machines perform very admirably. I would, however have gotten a larger SSD for the VMs to live on, as I have now run out of space for more and am going to be upgrading to a 1TB SSD soon.
- Additionally, if I could have afforded it, I would not have skimped as much on the 4 HDDs I used for the RAID 10 configuration and gone with a higher (7200) rpm. They are more expensive, but the performance gains I received from a RAID 10 configuration were completely negated by the slower (5900) speeds of the disks themselves. It’s not a deal breaker, but it is a huge bummer and another item I’d like to upgrade soon!
- I have already installed a graphics card for passthrough to a gaming VM. More on that in another post. Huge thanks to Shawn over at Coolnation.com for helping to make that possible!
- In future posts, I’ll be installing an additional NIC (network interface card) in order to be able to run pfsense software in a virtual machine that will act as my router. This will give me the ability to have much more control over my network in a range of areas. Not least of all- security.
The Build
Universal Tips
There are many great build instruction sets on the internet, both video and written, so I will not go into minutiae here. Rather, I will summarize what I think are the most universal and helpful tips as well as provide you a few links to what I consider to be very solid build guides. These are guides that I personally reviewed prior to my build. Hopefully this will save you the hours of research I put in!
1.) Check for compatibility: before ordering your parts, one of the most important things you must do is ensure that everything is compatible! For this, the site PC Part Picker is essentially a one-stop shop! Just click on the link and head to the “System Builder” page and start plugging in the parts you are planning to purchase. At the bottom of the page, warnings and comments will pop up as you build to notify you about potential incompatibilities or other issues like space requirements!
2.) Ground yourself: When working with sensitive (and expensive) electronics components, it is always a good idea to ground yourself to avoid static electricity buildup. There are many options from standing barefoot on a hard surface and touching unpainted metal before handling any components to wearing an anti-static wrist strap. Whatever method you choose, make it a habit. You might get away with not doing this for a while, but if you’re going to be playing with hardware from here on out, it’s only a matter of time before you fry a stick of RAM, or worse yet, a motherboard in this fashion. Ground yourself!
3.) Test your major components before fully installing: Before putting everything in place, it is recommended to test the major components. How much would it suck for you to put everything together and find out your motherboard was faulty upon delivery? Not common, but it happens. Here is a link that shows how to test before installing and here is a link that shows how to “jump start” the PC without the power button.
4.) Build in phases: For instance… the I/O shield goes in before the motherboard, but make sure you put your CPU and RAM into your motherboard before putting that into the case. To a seasoned builder that is about as plain as the nose on your face, but to a first timer, this could be easily overlooked and time consuming to fix. Here is a great guide I watched. Not only does it show each step in a logical order, but it does so in the first person view, so it’s easily translatable to doing the actual build!
Build Specific Tips
If you’ve gone with similar components to my build, I’ve got a couple of things specific to that configuration that you might find helpful.
1.)Note which drives go where: If you’re doing a RAID configuration with multiple drives, it is best to note the serial number of each drive, then note where they are in the drive bays (top? bottom? second from top?). Also note where you will be running the SATA cable from each drive and to which port they get plugged into on the motherboard. If you ever need to “hot swap” (change a bad drive while everything is still running) this information will prove invaluable. Take a look at your motherboard’s manual to see how the SATA ports are numbered, too. That can take some of the guesswork out of the whole ordeal!
2.) 2 Ethernet cables at least: If at all possible, make sure you have two ethernet cables available; one for the network connection and the other for the Z9PA motherboard’s ASMB6 connection. This connection allows you to remotely monitor and control the server without it even being turned on! Learn more about it here. You can always get a network switch to make this happen. a 5 port switch will make it possible for further upgrades down the road (like adding a pfsense router VM as mentioned earlier).
Wrapping Up
Once you’ve assembled the PC, stand back and marvel at your accomplishment and get excited about the prospect of what is possible.
How’d we do? did we miss any great tips or details you’d like to add? leave a comment and drop some knowledge!
Stay tuned… next time we will configure this beast!
Thanks for reading!

Pingback: So You Want to Build a Linux Virtualization Server? Part 2 – Prepare. – Ctrl Alt Develop
Pingback: So You Want to Build a Linux Virtualization Server: Part 4 – Configuration – Ctrl Alt Develop