Welcome back to the blog series! After reading this, you’ll have the power to start creating virtual machines of your own on your virtualization server! We’ll be making heavy use of the SSH connection that we’ve set up in the previous post.
While there are several different options for hypervisors, KVM is the one I chose to use for a number of reasons. If you’d like to know more about the history and implementation of KVM, check out this site, as I think it is a fair and accurate assessment of the software.
In a nutshell a “hypervisor” is like a rental center. An order comes in (in the form of a configuration file) that lists all of the resouces requested (memory, storage, computing power, network access, etc). The rental center then gathers the requested order, bundles it together, and ships it out to it’s destination (the virtual machine) for use.
Upon completion (when the virtual machine is powered down) those resources are then sent back to the rental center to be redistributed upon request. A new request can be made by either the same virtual machine or by a different one.
I hope you’re starting to see why we crammed our virtualization server full of memory, CPU cores and storage! We want plenty of room to grow!
It’s been a lot of detail oriented work, but it’s about to pay off! They say “write what you know” so I’ll be keeping the remote client as windows since that’s what I currently use.
Overview
At a high level, the steps involved are as follows:
- Install Xming on the windows client
- Install kvm libraries on the server
- Change SSH connection settings in PuTTY
- Start Xming
- Start Virtual Machine Manager
Process
Install Xming on the Windows Client
First, well need to install xming on the windows client. You can download the xming software here.
Install kvm Libraries on the Server
Next we will open an SSH connection to your server as described in our last post. Basically, open PuTTY and double click on your saved session, then type in your password for the key.
We will now being adding some packages to get KVM up and running. First, we update and upgrade since we haven’t yet:
sudo apt updateThen upgrade:
sudo apt upgradeThe first command checks to see what the latest packages are for the operating system while the upgrade command actually installs them. you will have to type “y” to start the actual upgrade.
Once the upgrade has finished, you can clean up your screen with the command:
clearNow let’s install the required packages for kvm virtualization:
sudo apt install -y qemu qemu-kvm libvirt-daemon libvirt-clients bridge-utils virt-managerNOTE: Because you are using SSH, you can copy the above command from your browser to your clipboard and paste it into the command line of your server with a simple right-click!
Change SSH connection settings in PuTTY
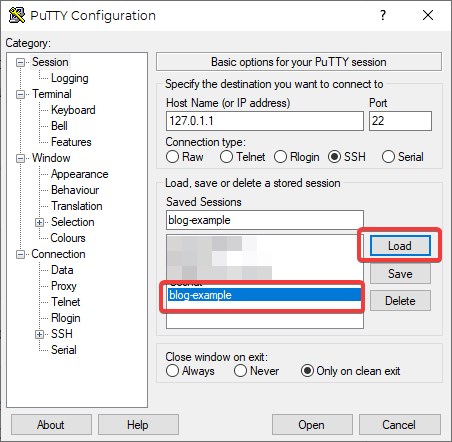
Once the download and installation are complete, we have to make a change to the session configuration in PuTTY to allow the virt-manager GUI (graphical user interface) to be sent to the windows client from the server. Launch PuTTY, click on your saved session only once and then click the “Load” button. This will bring up your settings for the connection.
NOTE: If you noticed the odd IP address above, I am running a virtualbox VM to connect to inside of my windows client. Please disregard. You should have your own server’s IP address to put in there anyway!
Navigate to the SSH>X11 menu option and enable X11 forwarding:
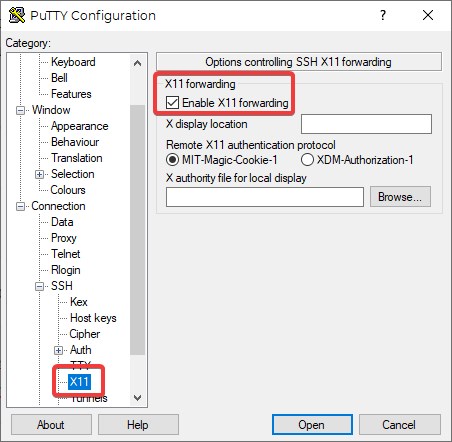
Go back to the top of the menu, and select “Session” then re-save the settings in order to keep X11 forwarding on each time you attempt to connect:

Now, let’s double-click on the session (or click the “Open” button) and remote into the server. log in and run the command:
virt-managerStart Xming
Wait… what’s this? An Error?
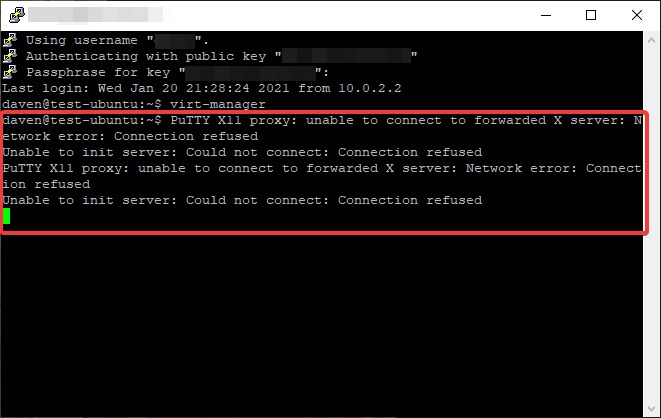
Remember that Xming app I had you download at the beginning? It’s a way to send the GUI from the server to the client and we need it to be able to use virt-manager in order to create our VMs.
Either click the windows icon in the lower left of your screen or hit the windows key on the keyboard and start typing “Xming”. Select the program and it will start. It won’t be obvious that is starts since it runs in the background, but it will start.

Start Virtual Machine Manager
Now in the SSH session’s command line, enter the command:
virt-managerAfter just a couple of seconds the Virtual Machine Manager should pop up on your screen:
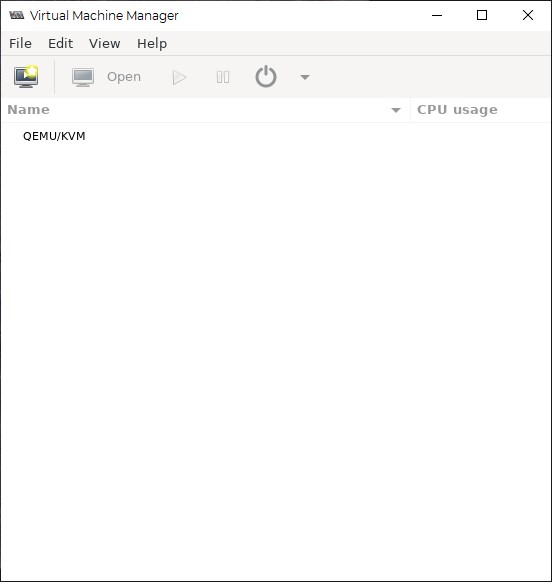
There it is! A blank canvas for you to start creating virtual Machines!!!
Wrapping Up
There you have it! Not too difficult, right? Now that you have KVM installed as well as the virt-manager package, creating virtual machines will be incredibly easy! Not that it’s all rainbows and butterflies- There are always a few “gotchas” along the way.
But then, that’s why we are here! To help walk you through to the other side with not only working tech, but a better understanding and control of it!
See ya in the next post!
Important Terms
- GUI – Graphical User Interface. This is what most people are used to seeing when working on a computer. Icons, backgrounds, application windows, etc.
Commands Used
- sudo apt update – Checks online for the most recently available versions of all packages on the system.
- sudo apt upgrade – Installs the updated packages that were noted during the update command.
- clear – clears the screen.
- sudo apt install [NAME-OF-PACKAGE(S)] – installs packages/applications. If you need more than one package, simply put a space between each package name.
- virt-manager – Calls the Virtual Machine Manager Program.


Pingback: So You Want to Build a Linux Virtualization? Part 7 – Creating Virtual Machines in virt-manager – Ctrl Alt Develop