
Overview
Well. It’s come to this. The end of the road. We’ve come a long way. I’ve shown you everything I’ve learned so far and it culminates into this last machine. A virtual machine that is a gaming rig. Buckle up, it’s going to be an in-depth ride!
We are going to build off of a lot of the systems and procedures we’ve put into effect already, but with an added twist: hardware passthrough… specifically GPU passthrough. In the original post where I outlined the parts that I bought in order to make my home virtualization server, I excluded a GPU. I did so because it was an expensive part and not something I was immediately going to do. So I put off the purchase.
A few months after starting this project, the stars aligned and a generous donation of an NVIDIA 1080Ti was made by Shawn Sanders over at coolnation.com!
Thanks, Coolnation, for making this last bit of the series possible!!!
From there it turned into a lot of hours of research and poking around to get the system up and running. Hopefully this tutorial will save you a few of the extra hours of poking around and testing that I had to undergo. The general steps are as follows:
- Add the GPU to the Server
- Setup Passthrough on Host Server
- Create the VM
- Install Windows OS on VM
- Setup Passthrough on VM
Add GPU to the Server
First things first; let’s add the hardware. Connecting the PCIe should be fairly straightforward, but I’d like to forewarn you of a couple of “gotchas”…
Once you plug the GPU into the system, you can connect this to an external monitor, but beware! Once you pass this through to the VM, it will show up as a secondary screen, not the primary, so it will appear to not be working. This will need to be changed at some point for the primary screen to be the physical screen you’ve plugged into and not the virtual screen. More on that later.
It should also be noted that once the GPU is passed to the VM, the host will not be able to use it while the VM is on, so you should make sure your integrated GPU is working.
Setup Passthrough on Host Server
Before anything else, I’d like to give a big thanks to Pavol Elsig for his guide on GPU passthrough on Ubuntu 20.04. I could not have gotten this to work without this instruction set as a foundation. Thank you, Pavol! What you see below is a summarization of the steps, but I would refer to the above video if you have any issues.
Double Check BIOS Settings
Before Getting things set up, we’ll need to double check BIOS settings. If you’ve been following this blog series you should be good, but if not you’ll want to enter your BIOS settings and check the following are set:
- VT-d (intel) or IOMMU (amd) enabled
Configure OS to Allow Passthrough
Once the card is in the machine, we’ll need to see ID of the device. On the host server, SSH in and type the command:
lspci -nnThe above is a command that lists pci devices (lspci) by vendor and device codes as both numbers and names (-nn).
From here you’ll need to search through the listing to find your graphics card as well as the audio output on the graphics card (listed separately):

Take note of the rightmost numbers and save them somewhere. In the image above they are 10de:1b06 and 10de:10ef respectively, but your results will vary.
Next we will edit the grub file to allow iommu for our device. But first we will make a backup of the grub file before messing with it! Navigate to the default folder:
cd /etc/defaultAnd then copy the grub file to a backup:
sudo cp grub grub.bakwith the default grub file saved, let’s get into the nano (or whatever text editor you prefer) editor:
sudo nano grubIn the file, navigate down to the “GRUB_CMDLINE_LINUX_DEFAULT” add the following to it:
GRUB_CMDLINE_LINUX_DEFAULT="intel_iommu=on kvm.ignore_msrs=1 vfio-pci.ids=[ID:NUMBER], [OTHER:ID#]"There are no spaces between the ids and the commas. In our case above, the ids would be:
GRUB_CMDLINE_LINUX_DEFAULT="intel_iommu=on kvm.ignore_msrs=1 vfio-pci.ids=10de:1b06,10de:10ef"Save the file (CTRL+X, ‘Y’, ENTER) then update grub:
sudo update-grubThen reboot:
rebootOnce you are logged back in, you can double check that the changes took effect by running:
lspci -kFind your graphics card and its audio device and ensure that the kernel driver being used is:
Kernel driver in use: vfio-pciAll set, let’s start preparing the virtual machine…
Create the VM
As before (see this post), we are going to create a virtual machine in virt-manager. Since we are going to be installing windows, however, and it will be a gaming machine, there are a few special considerations. For one, we will need a lot more CPU and RAM than our servers that we’ve previously implemented. Thankfully, this machine will only be “on” when we are gaming, and the rest of the time those resources will be available for other tasks. Also, Windows is not as easy a VM to install, and requires some additional drivers in order to function properly. But let’s attack one thing at a time.
Get the Windows ISO (and virtio drivers)
NOTE: Ctrl Alt Develop does not condone piracy. The below shows how to download the Windows ISO, but you’ll still need to pay for an activation key.
To get the windows ISO, you’ll need the media creation tool, which can be found here. Follow the directions under the section “Using the tool to create installation media”. Follow the instructions for creating an ISO file. This file should be saved with the rest of your ISO files in your host server. You can use the samba network share to move the file there once you’ve created it.
You’ll also need to get the proper virtio drivers to get windows to function properly as a virtual machine. These can be found here. Select the latest stable ISO and move it to the same directory as your windows image.
Now that we have those ready, let’s move on to virt-manager…
Virtual Machine Manager Configuration
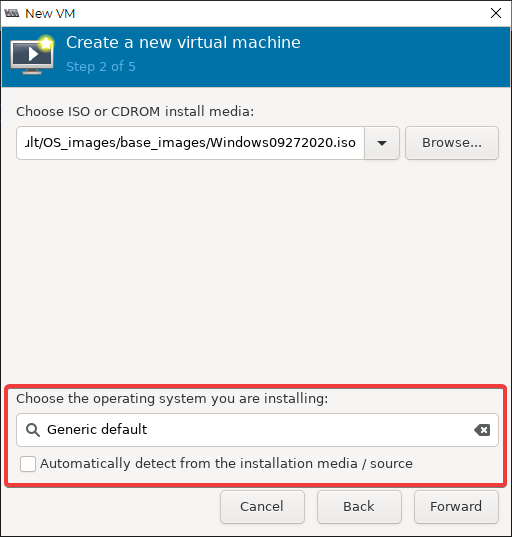
Open virt-manager and go to “File -> New Virtual Machine” like we have in previous posts. Browse for the ISO media and select your windows ISO. You may have to “Browse Local” and navigate to where you saved the ISO and drivers. Again, this process is covered in the post here. If you are prompted to select an OS image, unselect the “Automatically detect form the installation media / source” and type in “generic”. Then select the “Generic default” option.
If you have the RAM and CPUs to do so, I would recommend that you give the VM a hefty amount. For the specs on the machine that we built for this series, we put 10 cores and 32GB RAM into it. We also configured the CPU topology manually (more on that later). As per our standard, you’ll want to create a custom storage for this VM from the same drive you put all of your other VM storage:
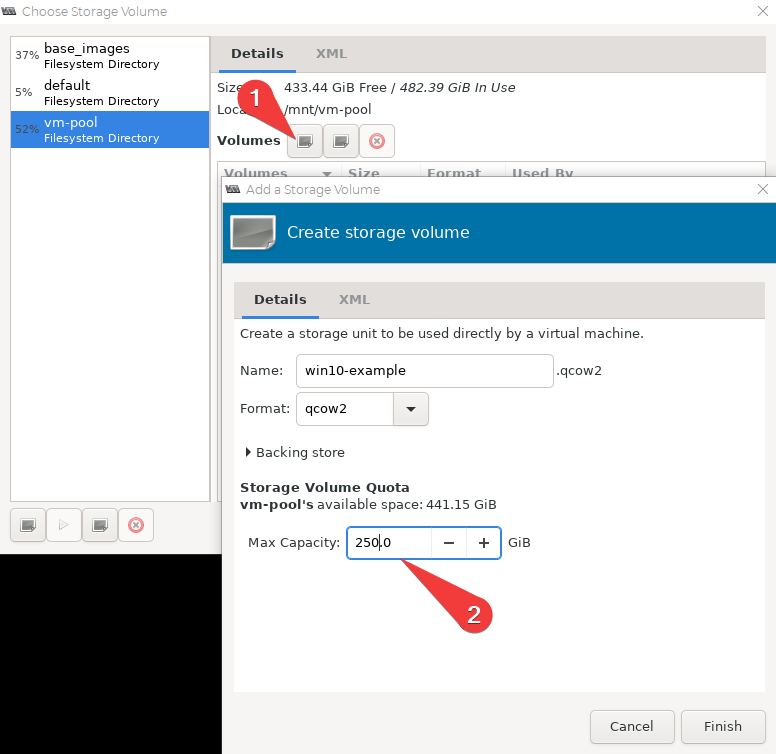
Please note in the above image that the storage volume I’ve assigned (250GB) is probably bare minimum for a gaming rig. In order to store a few games locally and run steam I’d recommend a minimum of 250GB… but definitely more if you can spare it.
Make sure the “Customize configuration before install” box is checked and click “Finish”. In the overview, swap the chipset to “Q35” and set the Firmware option to “UEFI X86_64” as below.

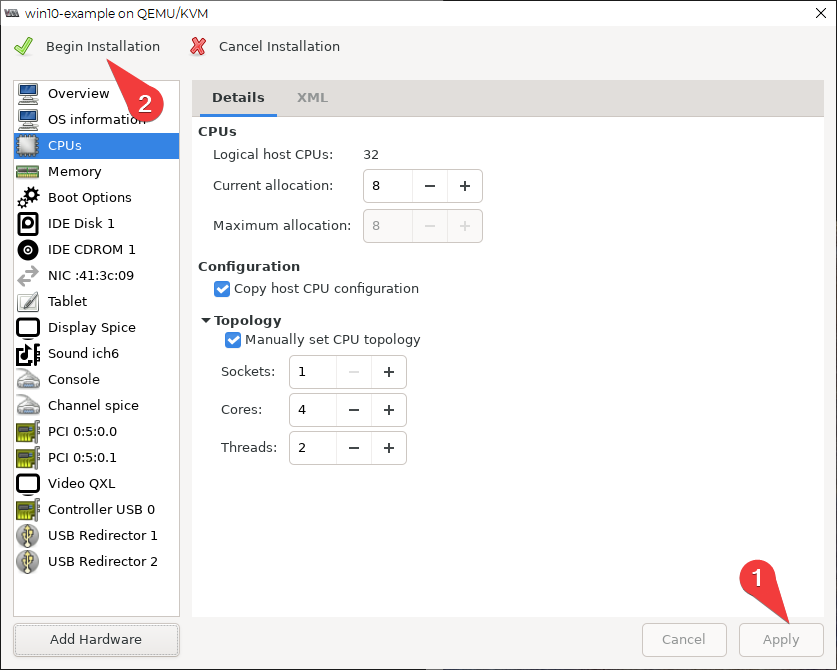
Next, move to the CPUs section and set the topology as you see below:
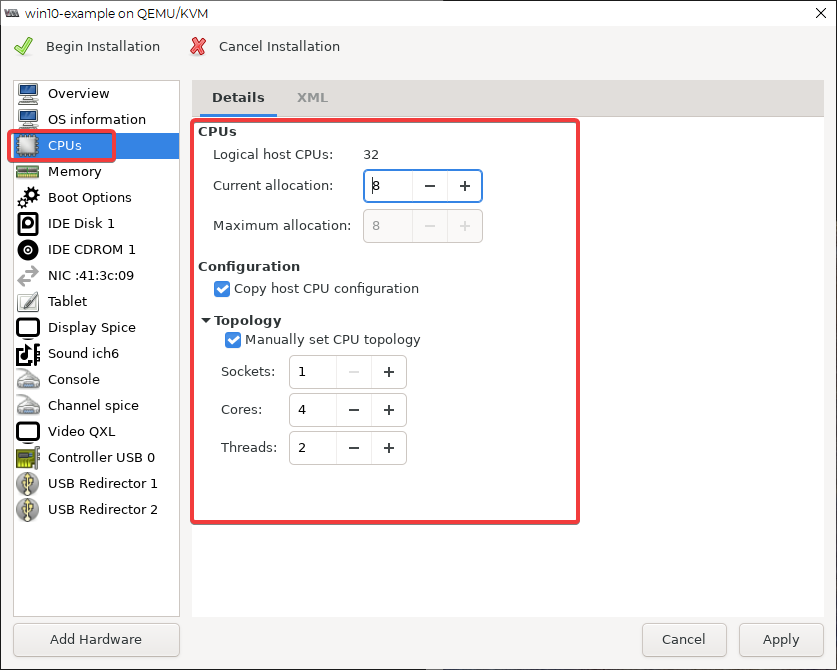
Note that this is technically an optional step. You can always adjust later, also. If you choose to do this, just make sure you have 1 socket, however many cores and 2 threads per core, and then set your current allocation to your maximum possible allocation to make sure you’re getting all of the available compute power. Click apply.
Now you’ll click “Add Hardware” and add two PCI Host Devices: the GPU and the GPU’s audio controller:
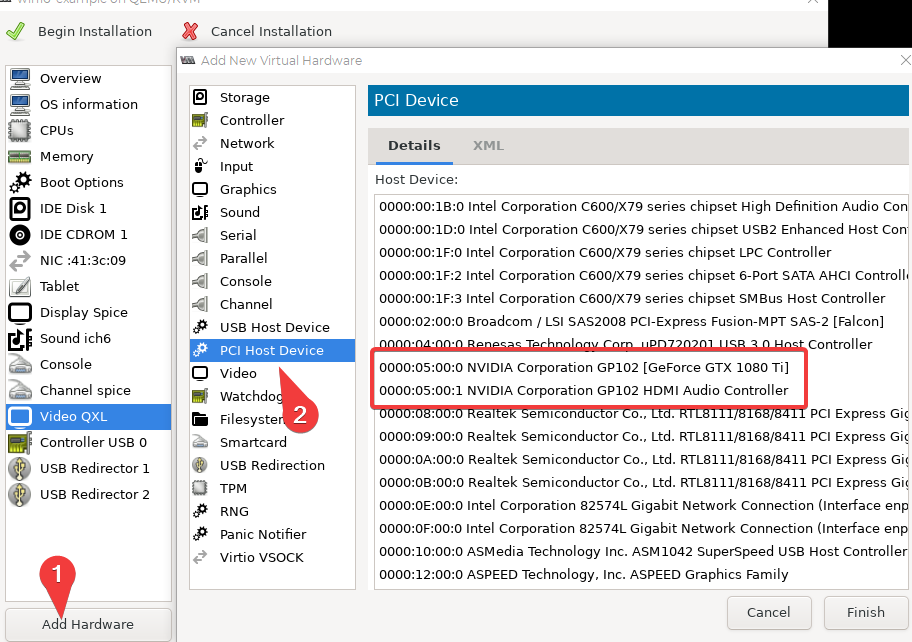
You’ll have to add each as a separate device (just FYI).
While you’re at it, you may want to connect a second mouse/keyboard to the host server and pass those through as well using the “USB Host Device” option as seen in the image above (it’s right above the PCI Host Device option).
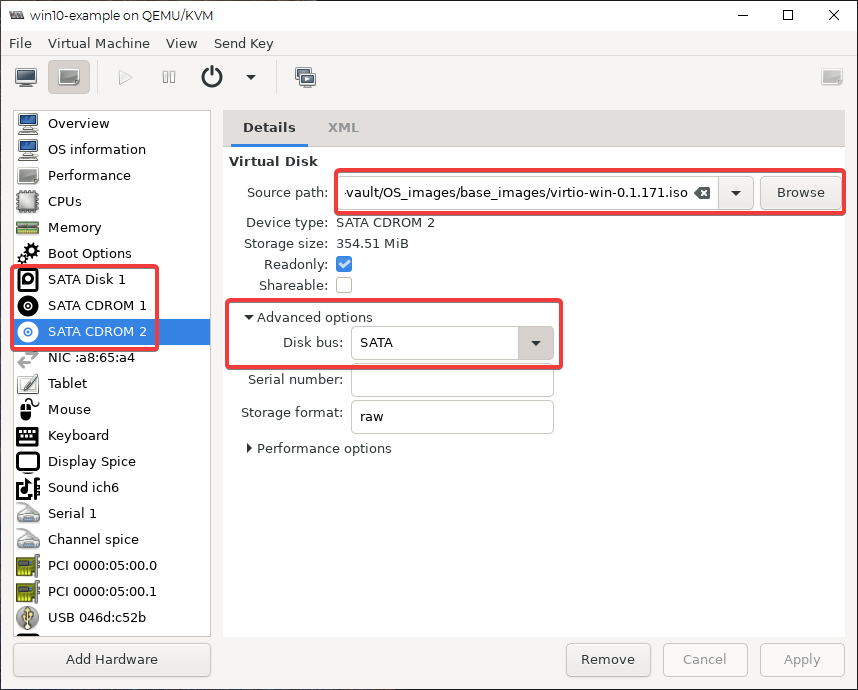
Additionally, let’s change the disk and CDROM types from IDE to SATA (under “Advanced options”), and add a second CDROM (also SATA) and put the virtio “disk” in that drive:
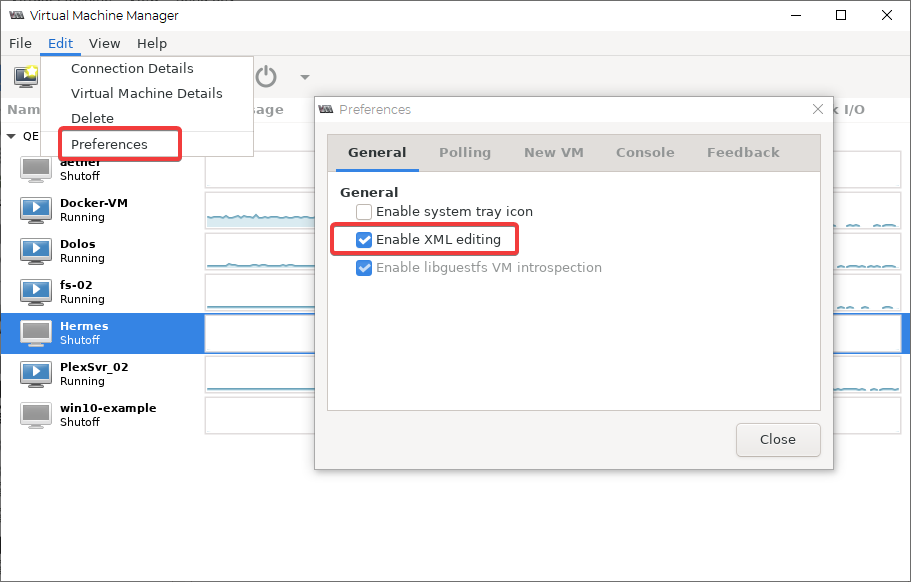
Next, we’ll need to edit a couple of lines in the XML configuration file. To do that, click on “Edit” in the main Virtual Machine Manager window and select “Preferences” and enable XML editing:
Back in the configuration window for your gaming VM, Click on the “XML” tab and add the lines below:
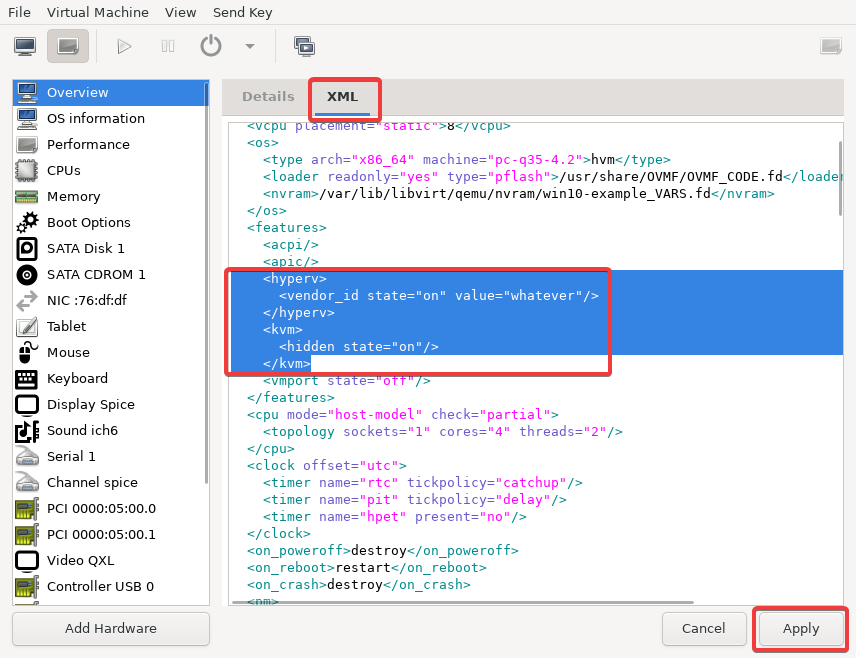
With that completed, click on “Apply” to apply the changes and then “Begin Installation”:
Installing Windows (plus virtio drivers)
It will take a moment to start, but you should be greeted with the standard Windows Setup screen inside of the virt-manager window. If you’ve plugged in a separate screen from the GPU it will not be working just yet. Click to start the installation and run through the installation steps.
Once the setup is completed, run updates in order for the graphics and audio drivers to be recognized and updated. Your second monitor should be working now. If you didn’t set up the second keyboard/mouse, things could get a bit tricky here- use the passed through keyboard/mouse if you have it. You’ll want to make sure you setup the screens to duplicate (not extend), so what you see in the virt-manager console window is what you’ll see in the monitor that you’ve plugged your graphics card into, it just makes things easier. If you’re using the passed through mouse and keyboard you can minimize (or completely close) the virt-manager window of the VM.
Now, in the search bar, type “Device Manager” and select the device manager option:
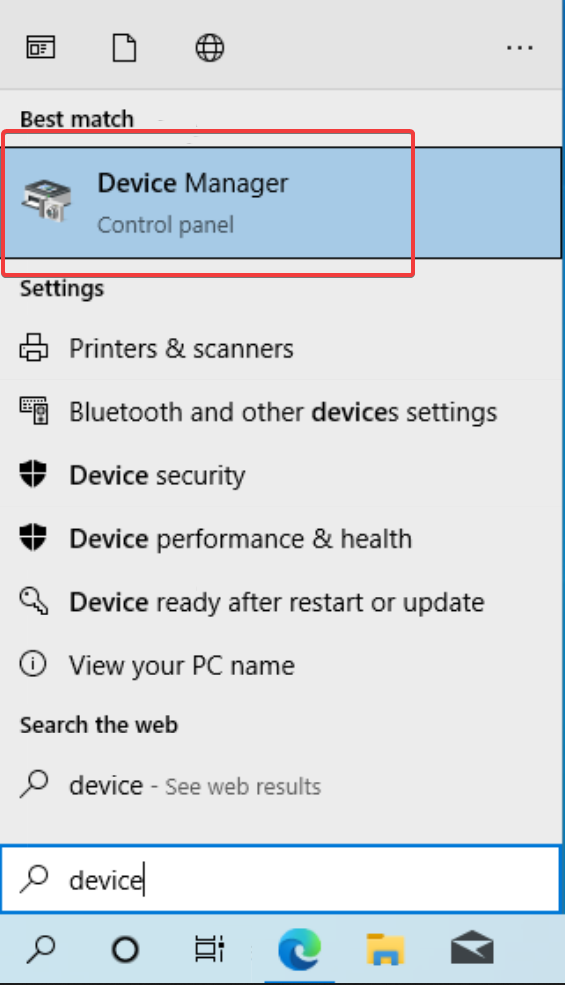
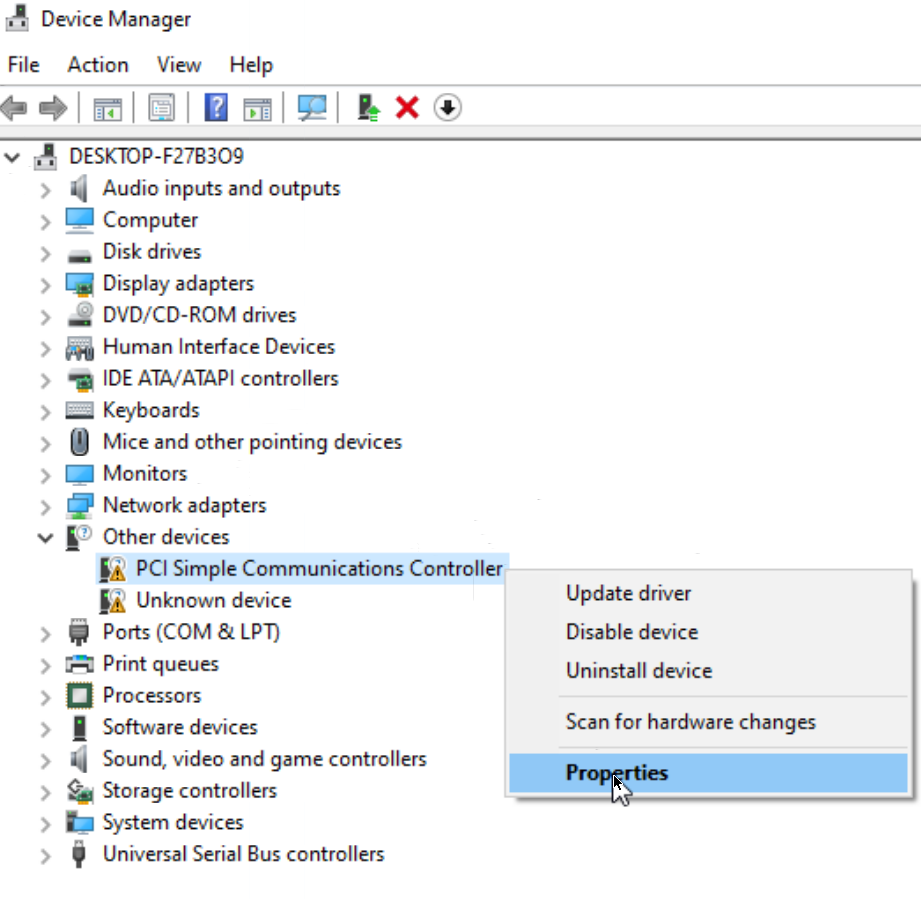
Once in the device manager, you’ll see a few unknown devices in the list (they have a yellow triangle with an exclamation point in the middle). Right click on the device and select “Properties”.
Here you’ll click the “Update Driver…” button, then select “Browse my computer for drivers”. Click the “Browse” button in the next popup. In the next search window that pops up, find the CDROM drive you added and placed the virtio-win drivers. Select that drive and then click “OK”:

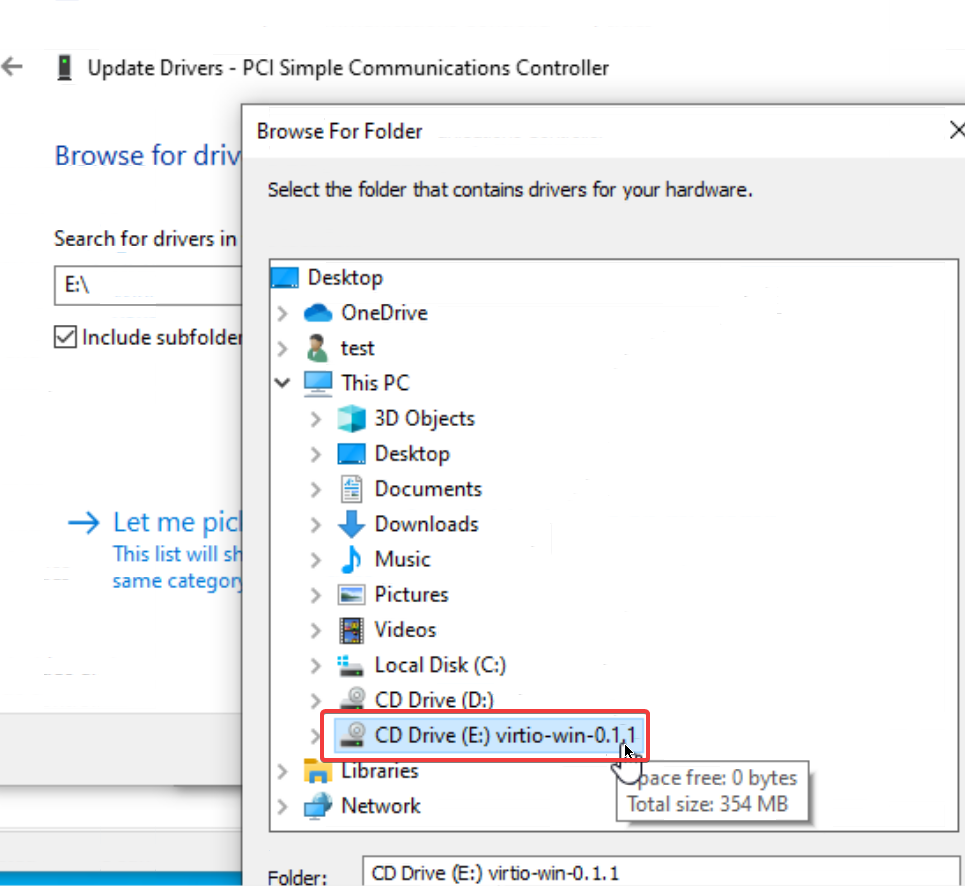
Click “Next”:
For the most part, this will find and install the proper driver. There may be one that is not found in the virtio drivers disk. Often there will be on driver that can’t be found. This is likely a system driver.
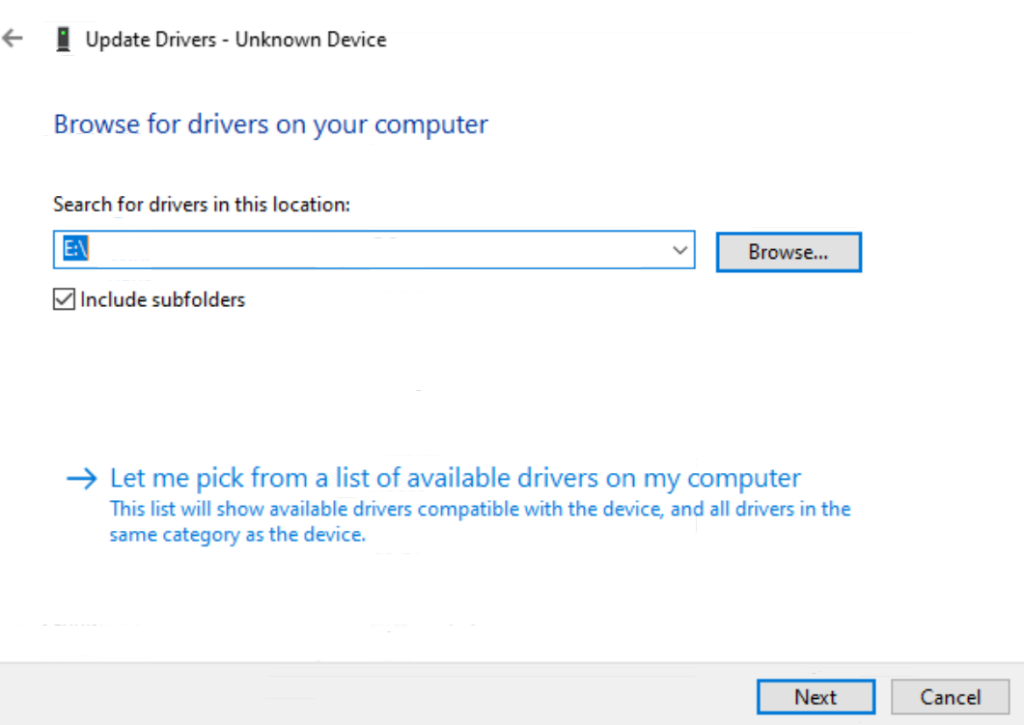
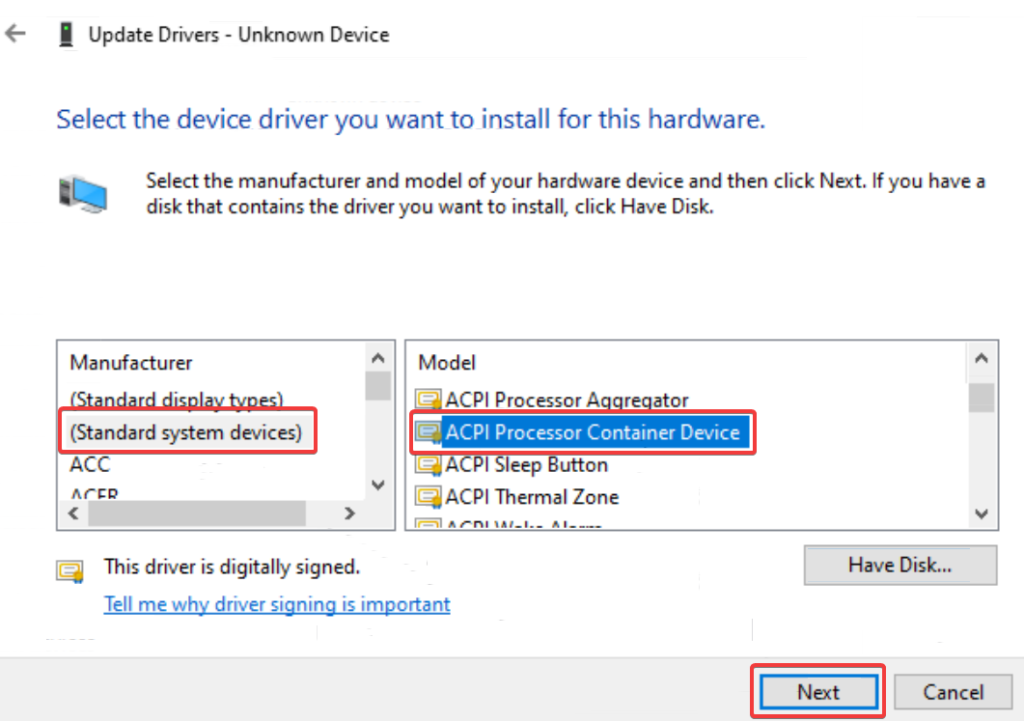
To try to solve this, right click the device, click “properties”, then click the “update driver…” button just like above. Now instead of browsing, click the “Let me pick from a list of available drivers on my computer” option in blue writing (see image above).
Near the bottom of the list, click “system devices” and then click “Next”. In the next window, click on “(Standard system devices)” option in the left column and “ACPI Processor container device”. Then click “Next”. Click “Yes” on the warning screen and install the driver. That should take care of the last driver problem.

Do another reboot for good measure and you should be set! From here, it’s just a matter of loading Steam and whatever games you want!
Wrapping Up
This is a lot of configuration. Take your time and go through it slowly. Hopefully we’ve provided enough details and images that you’re able to make this work right out of the gate. But if not, don’t worry- just delete the whole mess and start from scratch! That’s the beauty of virtual machines!
We sincerely hope you’ve enjoyed this series on home lab virtualization and that you’ve got a solid understanding of the basics of dealing with linux servers, virtualization, containerization, and the services that are possible because of these wonderful technologies!
What did we leave out? What would you like to see next? Let us know in the comments below! Thanks so much for reading!
Notes
- If you don’t want to sign in with a windows account, disable the network during setup (under the “NIC” section of the windows VM details window) by unchecking the active box. This can be done with the VM running. Be sure to turn it back on after the setup is done to run updates.
- Be sure to set the display resolution to the physical monitor’s recommended resolution.
- In order to increase performance even more, you can take it a step further by editing the XML more and assigning specific CPU cores to your VM. This is known as CPU pinning. Resources for this tactic, as well as other optimizations, can be found here
Terms
- iommu: Input/output memory management unit. Specifically used to (relatively) safely handle passing hardware devices directly to a virtual machine.
- vfio: Virtual function I/O. A framework used to expose direct access devices inside of the protected iommu environment.
Commands Used
- lspci: List PCI devices. Prints information about the PCI/PCIe devices connected to the computer.
- cd: Change directory. Allows users to navigate to different directories from the command line.
- cp: Copy. Copies a named file to a declared file (cp original original.backup)
- nano: A simple text editor.
- update-grub: Updates the grub file that defines how a machine should boot.

if GPU is not connected to the VM, can the host use it for other stuff? Ie mine crypto when not connected to the gaming VM?
Hey Miguel! Thanks for reading!
I know that you can pass the GPU to multiple VMs … IF… they are not being run at the same time. As for the host taking back GPU usage, yes this is also possible but I haven’t messed with it at all. Here is a link to a possible solution: https://github.com/joeknock90/Single-GPU-Passthrough/blob/master/README.md
Also look into “Looking Glass” as a possible solution: https://www.youtube.com/watch?v=U44lihtNVVM
I hope this helps! Please let us know what you end up doing and how it works out!