Overview
I will note, before we begin, that there is a very solid argument against virtualizing your file server. Many argue that it should be a separate and dedicated box. This is a great idea… however… given the requirements we started with at the beginning of this series- a small(ish) footprint, as little physical equipment as possible, cost savings, limiting upkeep/maintenance costs, etc – this solution is, in our opinion, perfectly acceptable. In this build, we have also implemented RAID for some level of redundancy as well as have a solid backup strategy in place (more on that in another post).
If you should choose to keep a separate network storage box that runs Samba on Ubuntu Linux, this tutorial will still work for you, just skip the bit about configuring the virtual machine and you can pretty much follow the exact same steps!
A Samba server can be as simple as one network share of an entire filesystem or as complex as many different shares with various levels of access for various users. We will aim for the middle, erring on the side of “simple”. The steps for this kind of setup are as follows:
- Create VM
- Pass through host RAID to the Samba VM
- Install Samba
- Backup and edit configuration file
- Add shares
- Create Samba users (and system accounts)
- Test on Windows client
Samba is the Linux/Unix implementation of the SMB and CIFS protocols.
Let’s dive in!
Before we get Started
Log into your host server from your ssh client. In our example it is a windows client. Let’s create a test file and add it to the raid-array for testing later…
sudo nano /mnt/raid-array/test1.txtWhen the nano text editor opens, simply type “Test 1” in the file and save and exit (“Ctrl+x”, “y”, “Enter”).
Now make sure that “Xming” is running on your Windows client (type “Xming” into the taskbar and click on it to start) and then jump into virt-manager in the ssh session by typing:
virt-managerSamba Server Creation Process
Create VM
To create the VM, we will use the process outlined in the previous post. For the CPU/RAM requirements, it will depend a bit on your situation (how many users and VMs will be accessing your shares? How often?). Another thought to consider is how are you using these network shares? as backup copies or will people be accessing and directly working on the files in the share? That can affect hardware usage significantly as well. In general, it’s a safe bet to start with:
- CPU: 4 cores
- RAM: 4096MiB (4GB)
The CPU cores are usually not the issue (and could probably be reduced in some cases), but rather the bandwidth on your network, RAM and your actual disks in the RAID array(their rpm speed and which RAID configuration you have will affect read/write speeds) are more likely culprits when it comes to a bottleneck. Feel free to play around with these numbers once you are up and running to maximize your transfer speeds.
If you are following the directions of the last post, name your server something that will make sense (like ‘file-server’ or ‘samba-svr’ or ‘sweetpea-mcsnickerdoodle’… whatever you want).
Then on the last screen, make sure the “Customize configuration before install” box is checked, then click “Finish”. You will be brought to the screen below:
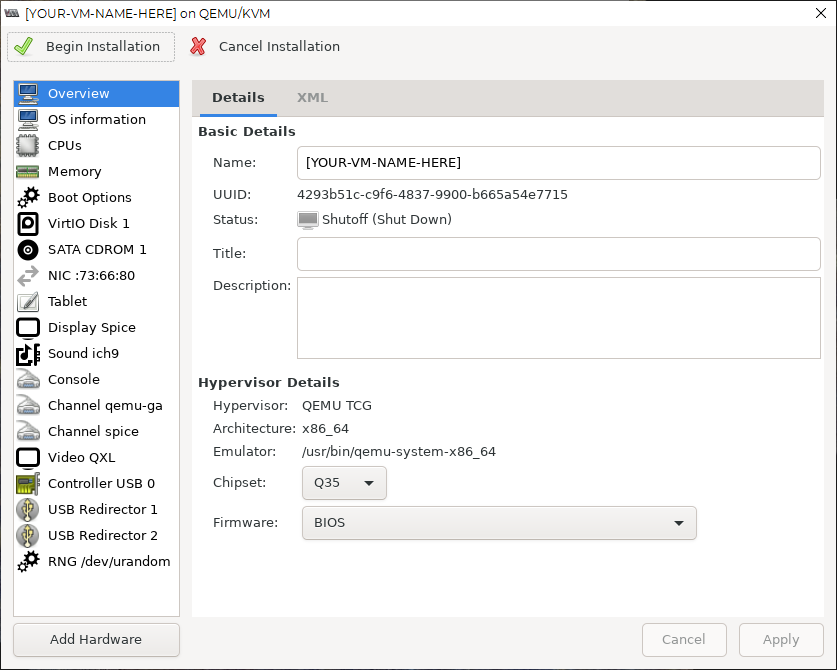
If You Didn’t Check the Box
(Skip this section if you checked the box and are at the above screen)
If you forgot to check the box, your install will begin. You can complete your install (see this post if you need help). Remember to statically set your IP as well (Check this post out for help with that). Once that is done and the operating system has been installed, you can shut down the VM. go back to the virt-manager window and right-click the name of the VM you just created and select “Open”.
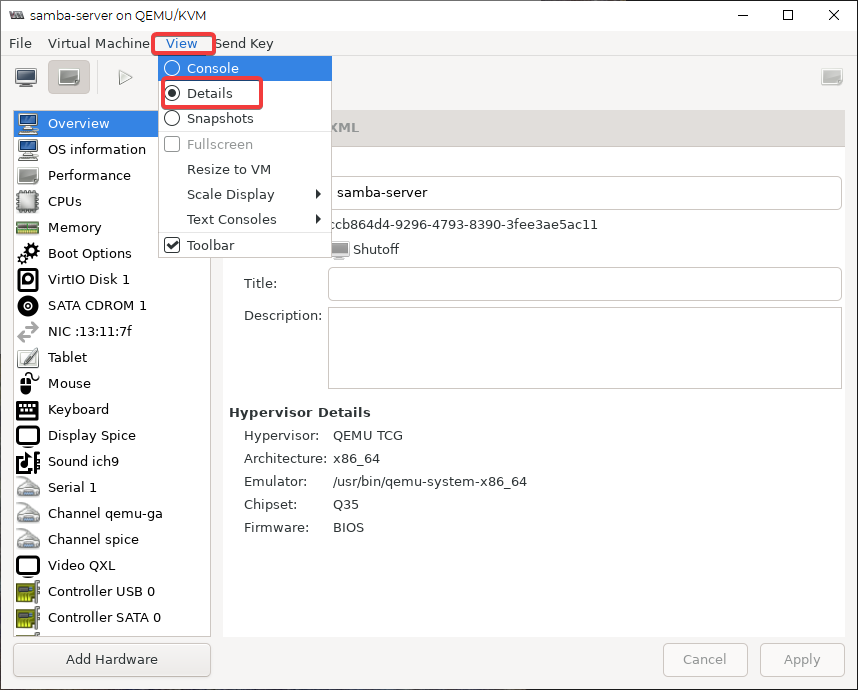
Once the window opens, select “View” and then “Details:
You’ll be brought back to the above window. From here you can continue with the tutorial.
Pass Through Host RAID to the Samba VM
With the configuration details of the virtual machine open, you have an opportunity to adjust things one last time before you begin installation. Most of these details have been set up already, but for the Samba server we still need to add some hardware- namely the RAID array filesystem so that we can share it to the network! To do this, click on the “Add Hardware” button in the lower left of the configuration screen (pictured above) and you’ll be brought to another window:
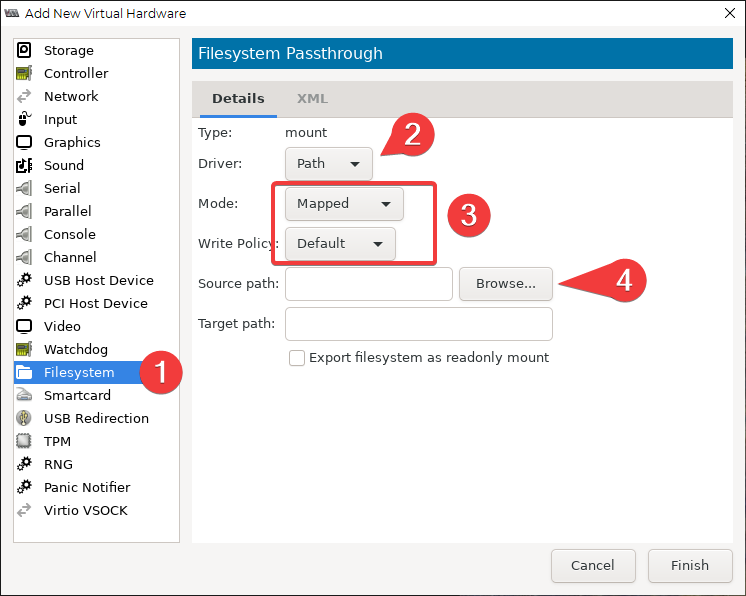
As above, select the “Filesystem” hardware option, then make sure you select “Path” on the first dropdown menu, and “Mapped” and “Default on the next two. Finally, for the “Source path” option, select “Browse”.
NOTE: A mapped filesystem will access the directories with the same permissions as the host (physical server) while the passthrough options will only allow for the client side (the samba VM) user permissions to be used, which could cause access issues for our purposes, but there are other scenarios where the passthrough option is preferred (just not here).
In the “Choose Storage Volume” window that opens, select the “Browse Local” option in the lower right corner:

In the next window, you’ll need to navigate to where your raid array is set up on the host server. In our series, we’ve set up the raid in /mnt/raid-array. To get there we can click on “Filesystem” on the left, then select the “mnt” folder and finally the “raid-array” folder:
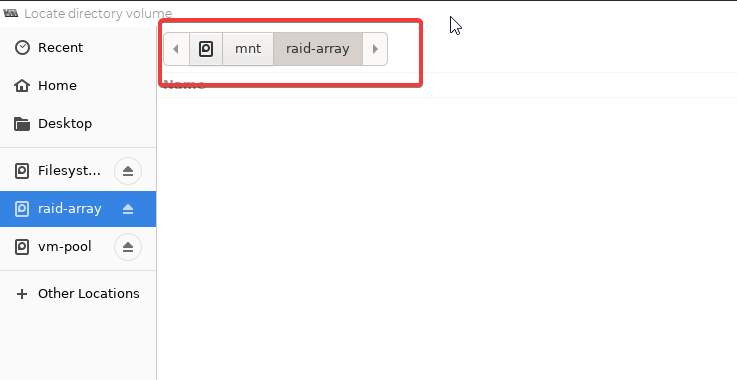
Click “Open” in the lower right.
Next we will fill in the “Target path” field. This is a bit of a misnomer in my opinion, or at the very least a bit confusing. It is not the actual directory that will hold the files on the Samba VM, but rather a sort of reference to use when mounting the filesystem on the Samba server (as you’ll see in a moment). Name this something that will help to indicate this. For our setup, we have chosen “/host-share”. So if the storage we want to share is in /mnt/raid-array on the host and our Target path is “/host-share” your window would look like the below:
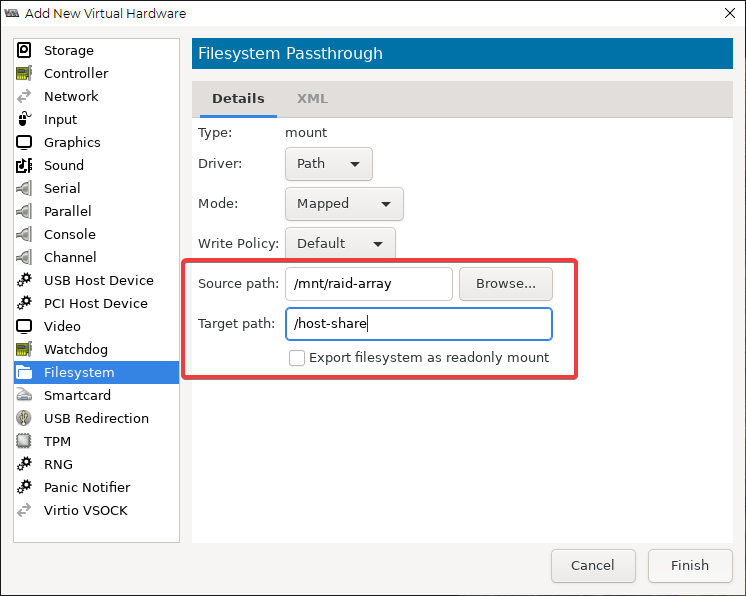
From here, you can click “Finish” in the lower right. This will add the filesystem your hardware list for the VM.
Now you can “Begin installation” near the upper left of your window and follow the steps here for installation and here to set the static IP for your server so you can reliably reach it on the network.
Once booted, log in and run your updates (if you haven’t already);
sudo apt update && sudo apt upgradeHit “Y” when prompted and let it do it’s thing. Once it’s all set, we’ll now have to create a mount point to attach the storage with the command format:
sudo mkdir /mnt/[DIRECTORY-NAME]This command makes a directory inside of the /mnt directory. We will mount the filesystem here. To keep things simple we will name our directory “shared-raid” for this example and would look like:
sudo mkdir /mnt/shared-raidTo mount our files automatically during boot, We will use a specific library called 9p to make this happen. We need to edit the fstab (filesytem table) under the /etc folder. To do this, let’s navigate to that folder:
cd /etcBefore messing with a configuration file, it’s a good idea to back up the original:
sudo cp fstab fstab.bakand now edit the file using the nano text editor:
sudo nano fstabNow we use the arrow keys to go to the bottom of the file and enter a line of the form:
[TARGET-PATH] /[PATH]/[DIRECTORY-NAME] 9p trans=virtio,rw 0 0In our example, this would look like this:

Once done, save and exit (“Ctrl+x”, “y”, “Enter”). Then do a reboot:
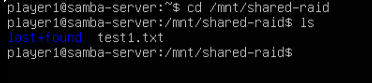
sudo rebootOnce it’s restarted, log in and head to the directory we created:
cd /mnt/shared-raidcheck to see if your “test1.txt” file can be seen from the samba server:
lsYou should see something like this:
Great! Now let’s try to delete that file from the Samba server:
sudo rm test1.txtWAIT- what???

This error is due to the fact that our file permissions won’t allow us to mess with the host’s raid storage. We also have an issue with file ownership that could cause issues down the line. To fix these issues we will have to alter a couple of things.
First, let’s open up permissions for the host’s raid array. You’re going to go back to the host’s ssh session. In that window, look in the /mnt directory (or whever you mounted your storage you’d like to share) and list the sub-directories:
ls /mntMake sure your directory is listed. Then type the following command in the format:
sudo chmod 777 [SHARED-DIRECTORY-PATH]On our host, we named the storage “raid-array” and put it in the /mnt directory our command would be:
sudo chmod 777 /mnt/raid-arrayWith that out of the way, let’s tackle the file ownership issue. For that we’ll have to navigate to the libvirt folder, which a sub-directory of the etc folder:
cd /etc/libvirtIn this folder, there is a file called “qemu.conf”. Before we start messing with it, let’s back it up:
sudo cp qemu.conf qemu.conf.bakand then enter the file to edit:
sudo nano qemu.confThis is a long file, but we are looking for the lines about “user”, “group” and “dynamic_ownership”. At the time of writing (in Ubuntu 20.04.1 LTS), the first line we need to edit is on line 459. To navigate there quickly, press “Ctrl+_” then type “459” (no quotes). you should see this:
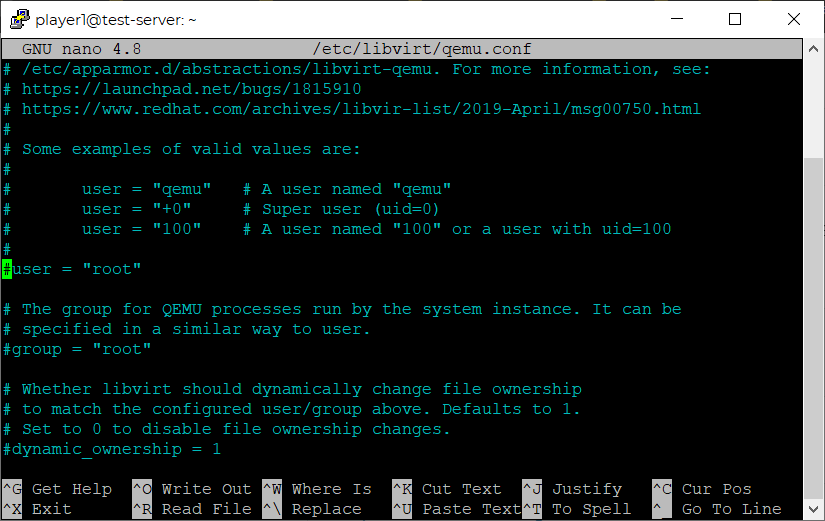
Remove the “#” symbol at the beginning of the lines for “user = “root””, “group = “root”” and “dynamic_ownership = 1”. This will uncomment those lines and make them readable by the operating system. Also as an extra measure, add your username, and a group called “kvm” so that the file looks like the below:
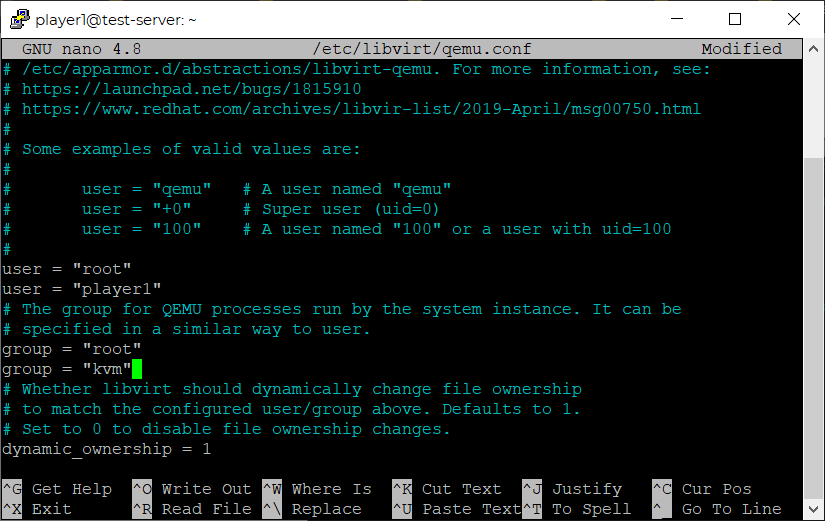
NOTE: The above step isn’t strictly necessary but it allows for more uniformity across VMs and host in addition to eliminating potential permissions issues down the line.
Save and exit, then reboot the entire system or you can exit virt-manager and in the host ssh session type:
sudo systemctl restart libvirtdThe above will restart the kvm/libvirt service and read the changes we made to the file. Give it a sec then jump back into virt-manager:
virt-managerand open up the samba-server again and navigate to the mapped storage and list the files:
cd /mnt/shared-raid && lsYou should see that persistently pesky test1.txt file in there. now run that remove command again:
sudo rm test1.txtBAM!
You can check on both the samba-server on QEMU/KVM window and the host ssh session window with “ls”…. it’s gone! Now you have full control of the host’s raid array from the samba-server VM. Congrats!
Now let’s get to sharing that to other devices on your network….
Install Samba
If you’re powering through this, your screen is probably filled up with past commands, let’s clean up both the samba-server window and the ssh session by typing into each window:
cd && clearthis will bring you back to your home directory in each window as well as clear the screen of all of your old commands.
Now, in your samba-server window type:
sudo apt install sambaAfter a few seconds, type “y” on the keyboard to begin the install. That’s it… easy section, right?
Create Samba Users (and Their System Accounts)
Next, let’s get some users that will work with samba. Samba users are separate entities from the user account, but must be linked to and actual user account. The first one is easy… whatever your user account name is… let’s add that to the samba users list by typing:
sudo smbpasswd -a [USERNAME]the “-a” means to add the user. So in our example:
sudo smbpasswd -a player1You will be prompted to enter and confirm a password for the user. Once that is complete, you will have yourself a samba user!
If we want to add more users, like our roommates or family members, we have to make sure they have a system account before creating their samba accounts. But we don’t need them taking up space with a home directory or anything, so we can add them to the system with:
sudo useradd -r johnwhere “john” is the username you want to add. The “-r” instructs the system to create an account without a home directory or any of the fluff of a standard account. This keeps user footprints small and simple to set up on the system.
Once that is complete, you can add them to samba:
sudo smbpasswd -a johnI’ll add one more for our example purposes in one line by combining commands with “&&”
sudo useradd -r sally && sudo smbpasswd -a sallyNow we have player1, john and sally for samba users to use as examples.
Before moving on, we need to group these users together into… well, a group. So lets create a new group and give it a mildly amusing name:
sudo groupadd sambazNow we add these users to the group with the following form:
sudo usermod -a -G [GROUP-NAME] [USER]Like so….
sudo usermod -a -G sambaz player1
sudo usermod -a -G sambaz john
sudo usermod -a -G sambaz sally
Alternately, instead of adding them one by one, you could also user the command:
sudo gpasswd -M [USER],[LIST],[NO-SPACES] [GROUP]So in our example:
sudo gpasswd -M player1,john,sally sambazNOTE: The gpasswd -M option overwrites any pre-existing list of users in a group and should not be used on groups already containing users
Backup and Edit Configuration File
Lets “clear” the screen again.
clearThen head over to the samba configuration file:
cd /etc/samba && lsSee the “smb.conf” file? That’s what we’ll be messing with, so let’s back up the original configuration:
sudo cp smb.conf smb.conf.bakBut before we start configuring shares, we need something to share…
Add Shares
First, let’s create a few folders on the samba server’s shared-raid:
cd /mnt/shared-raid && sudo mkdir folder1 folder2 folder3 folder4These would all be named something more descriptive an actual system, like “media”, “documents”, “photos” … you get the picture. At any rate, you now have 4 folders ready to be shared inside of the /mnt/raid-share subdirectory.
One more step, we need to change the group ownership of these folders to our “sambaz” group:
sudo chgrp [GROUP] [FILEs] [OR] [FOLDERs] For us it would be:
sudo chgrp sambaz folder1 folder2 folder3 folder4Keep in mind it can also just be one folder or file.
Now we come to the point about which entire books have been written. Sharing and permissions. It is well beyond the scope of this humble blog post to explain every aspect of these subjects. We will simply familiarize you with the process of creating shares and allowing access to them.
Now Let’s have one share be all access. Every folder should be accessible in this share. Because of this, we should restrict access to just one or a few people – administrator(s). In fact, let’s call this the “admin-share”. first, let’s navigate back to the smb.conf file:
cd /etc/sambaand now let’s edit the smb.conf file:
sudo nano smb.confOnce there, use the down arrow to get to the bottom of the file. Once there, type out the below, being mindful of the format (4 space indentation and all):
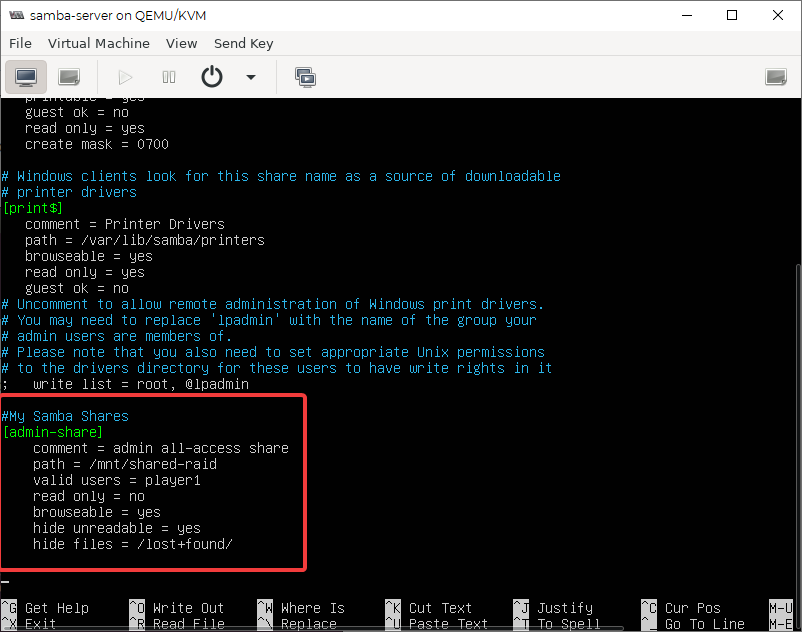
As you can see, this share has a path of “/mnt/shared-raid” which means that everything that exists under the “shared raid” directory (all of our folders1-4) are allowed to be shared. Also note that the only valid user is our main server user, ourselves (player1).
While there are more than just these options, let’s break down each line in the share configuration:
- comment – A description of the share
- path – The path to the directory to be shared (which includes all sub-directories of that folder)
- valid users – The only user(s) allowed to access this share.
- read only – Defaults to “yes”, this mounts the share as a read only. In the above, the admin should be able to create, remove, update and delete anything in the system, so it is set to “no”.
- browseable – States whether the share can be viewed in a network view prior to joining.
- hide unreadable – Completely hides files that users are not allowed to see.
- hide files = explicitly define files to hide.
Again there are other options, but these will take care of a good deal of what you generally want to do. If you really want to get familiar with all of the samba configuration options, check this out. For now, we will learn just a few more below.
now that you have the admin share taken care of, we should probably decide what John and Sally are allowed to see. Let’s assume that Sally is more trustworthy and/or uses more resources on the network than John. So Sally will have full access to folders 2,3 and 4, while John has full access to only 2, but can only read 3 and 4. Those shares would look something like this:
[folder2-share]
    comment = share for folder2
    path = /mnt/shared-raid/folder2
    valid users = sally john
    read only = no
    guest ok = no
    browseable = no
    hide unreadable = yes
    hide files = /lost+found/

[folder3-share]
    comment = share for folder3
    path = /mnt/shared-raid/folder3
    valid users = sally john
    read only = no

    read list = john
    guest ok = no
    browseable = no
    hide unreadable = yes
    hide files = /lost+found/

[folder4-share]
    comment = share for folder4
    path = /mnt/shared-raid/folder4
    valid users = sally john
    read only = yes

    write list = sally
    guest ok = no
    browseable = yes
    hide unreadable = yes
    hide files = /lost+found/
A few notes about the above permissions:
- folder2: The folder2 share will only allow access to what is inside of folder2. Sally and John are the two users that are allowed to use this share. No guests (users with no credentials to the server) are allowed and you cannot see the share on the network (you have to know it’s share name).
- folder3: This folder is nearly the same as folder2, except that John, while allowed to use the share, has been put onto a “read list” which means that while the folder is not read only in general…. it is for poor John.
- folder4: Here we see that the whole folder is set to be read only… except Sally. She’s been put on a “write list” which gives her the special privilege of being able to write to the share. Since the default of this share is read only, we’ve made it browseable (can be seen on the network so guests can easily find it).
NOTE: On a Windows Client, “browseable” does not work automatically. We must apply a separate patch to get this working, which can be found here.
Now we will restart the service and test our connections from our windows client. In the samba-server commnad line type:
sudo service smbd restartTest on Windows Client
Either exit out of all of your session windows or minimize them, but do not power down either the Samba-server virtual machine or your Virtualization server.
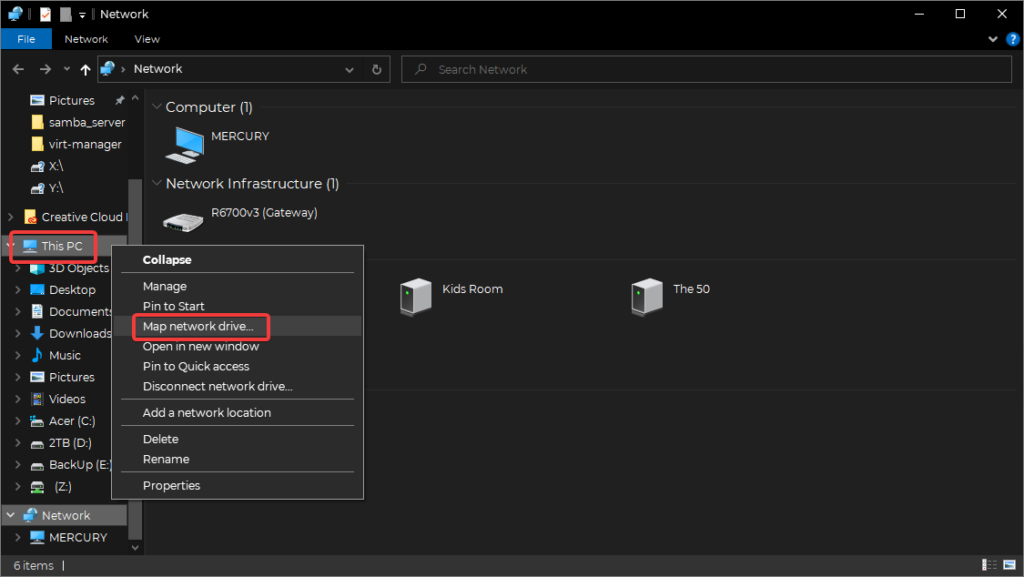
To test if our shares are working, we need to map them to our Windows machine. We can do this by opening File Explorer and right-clicking the “This PC” icon on the left, from there select the “map network drive” option from the dropdown list:
From here a window will open and you’ll need to fill in some information. you’ll need to pick a drive letter you’d like to assign to the drive. Next, you’ll need to fill in the IP address of your samba-server and the name of the share you’re trying to access. Let’s check out our folder3-share:
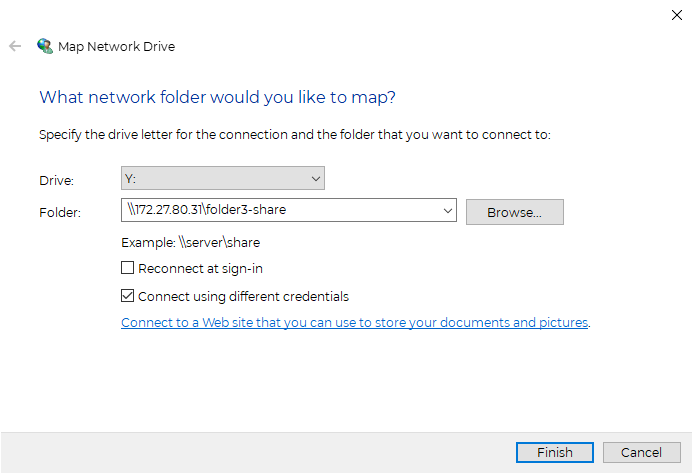
If you want to make the mapped drive permanent, check the “Reconnect at sign-in” box. You’ll also need to check the “Connect using different credentials” box. Then click “Finish”.
An observant person will notice that on Windows, the backslashes are the opposite of the forward slashes used in linux… this is simple a style or “syntax” thing… one of the many differences between the operating systems. Nothing to lose sleep over, just make sure you use backslashes on windows and move on with your life.
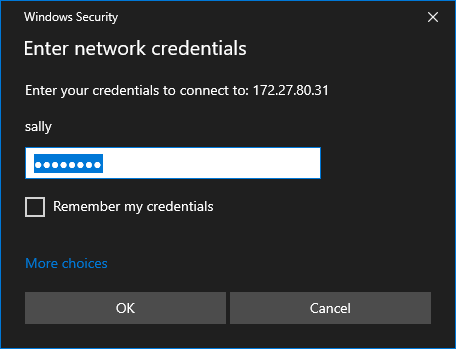
Yet another window will prompt you for information. You’ll need to enter your user information for the server, and then again for the samba share, so if your password is different for your system login versus your samba login, you’ll need to be mindful of that. In our example, we will input sally’s information first.
Once you’re in the folder 3 share try to add a new folder (subdirectory). Name it whatever you want! Add files to it like you would in any other windows program. Delete a couple. Do whatever you want!
Now… in the file explorer, right click the folder3-share on the left hand side and select “Disconnect”.
Follow the same steps to map the drive again (right-click the “This PC” on the left and choose “map network drive”). Only this time sign in as John. Once you’re in… go ahead and try to add a file. Delete one? How about a folder? Nope! Because remember – we only let John look- no touchy- at the files in this folder. Only Sally can mess with this stuff… hands off, John!
Wrapping Up
Well that about does it for this one, folks! There is one vital component that was described above but not emphasized that I think should be hammered home here. The creation of the “sambaz” group (an arbitrary name… you can call a group whatever you want), assigning the share folders to that group and the adding of users to said group is the foundation of making the sharing magic happen. Without those steps, the sharing and permissions of Samba can get very frustrating very quickly.
Samba is a powerful and extensible filesharing tool! I hope you’ve gotten the basics of it down in this tutorial. Keep playing around with it and you ‘ll see how flexible the system can be!
Do you have any tips on filesystem structure? On permissions or configuration? Drop ’em in the comments section so we can all learn a bit more!
Terms
- SMB – Server Message Block. A protocol used for network communication. SMBv1 is outdated and not secure to use.
- CIFS – Common Internet File System. Another protocol used for network communication. Samba utilizes this protocol to be able to share with modern windows systems.
- CPU cores – Central Processing Units have cores, or logical units of computing power. In modern CPUs, cores can support threads which can run separate processes simultaneously. The more cores, then more processes you can run, thereby making a heavier workload possible to handle and be completed in faster time.
- bandwidth – The maximum possible volume of transfer speed of data over a network or internet connection.
- fstab – File System Table. Defines the layout of filesystems on the operating system. Typically modified to mount additional drives (local or network shares) on boot.
- system account – An account that is defined in order to allow a user access to the operating system (Not to be confused with the samba account).
- samba account – An account that is defined in order to allow a user to access samba shares. A samba account must be linked to a system account.
Commands Used
- nano [FILE-PATH] – Opens the nano text editor to create or edit files. Beginner friendly editor. If you are in the same directory as the file, you only need to type the file name in the command, not the full path.
- virt-manager – Calls the virtual machine manager program. If calling this remotely, X11 forwarding needs to be enabled in the ssh config. If on a windows client, XMing or other X11 server must be installed and running in the background.
- apt update – Updates the local information about packages and what the most up to date versions are.
- apt upgrade – Performs the actual install of the most up to date packages.
- mkdir [DIRECTORY-NAME] – Make directory. Creates a new folder. You can create a new folder in the present working directory by simply typing the directory name, or place the folder in on a particular subdirectory by typing the path to the new folder (i.e. – “/mnt/existing-folder/new-folder”)
- cd – Change directory. Moves the user around the filesystem.
- reboot – Performs a restart of the operating system.
- ls – List. Shows files inside of the present directory. Can check other directories with “ls [PATH]/[TO]/[DIRECTORY]”
- rm [FILE-OR-DIRECTORY-PATH] – Remove. Removes a file. Can remove folders with certain options (-R ).
- chmod [PERMISSION-LEVELS] [FILE-OR-FOLDER] – Modifies the permissions and access of files or folders.
- systemctl [COMMAND] [SERVICE]– Checks and/or changes the status of system services on the OS.
- clear – Clears the screen of output.
- install [PACKAGE-NAME] – Installs a package so that the service, app or other functionality is available for use.
- useradd [OPTIONS] [USERNAME] – Adds a system user. the -r option creates a user without a home directory (small footprint in the system).
- smbpasswd [OPTIONS] [USERNAME] – Creates samba account. The -a in the tutorial is an option to “add” the user.
- groupadd [GROUP-NAME] – Creates an empty group.
- usermod [OPTIONS] [USERNAME] – Makes changes to an existing user. The options -a -G are used to add a user to an additional group as well as keeping their primary group.
- gpasswd [OPTIONS] [USERLIST] [GROUP] – Adds users to a group. The -M option overwrites a group and sets the entire list of users at once (should not be used in groups with pre-existing users)
- chgrp [GROUP] [FILES-OR-FOLDERS] – Changes the group ownership of a file, folder, or set of files or folders (files/folders must be separated by a space).
- service [SERVICE-NAME] [COMMAND] – Checks and/or changes the status of system services on the OS. Similar to systemctl, but has fewer command options and is a “wrapper” that covers a wide set of system services and init files, but does not offer the same depth of control as systemctl.


Pingback: Network Filesharing Made Easy! fstab and Auto FS Mounts – Ctrl Alt Develop
Pingback: The Best Virtual Library; Calibre-Web and Docker – Home Virtualization Server Part 12 – Ctrl Alt Develop
Pingback: Facebook Outage, Now Azure is down… What’s Next??? – Ctrl Alt Develop