
Welcome to the next phase! Having Configured your hardware, operating system and network connection, we are ready to start moving toward virtualization! But first, a word about servers…
In most enterprise environments, servers are not often locally accessed. System Administrators do not walk up to each server, wiggle the mouse, wake up a monitor and hack away at a keyboard. This would be too limiting and time consuming. In fact, most of the time servers are run in a headless state, which means without a keyboard, mouse or screen. Instead, they use something called remote access, where they will control the server from a completely different computer that is sometimes located just a room away, and sometimes halfway across the world! The method used for remote access is often a variety known as SSH, or Secure Shell. This method provides a secure way to communicate with a server even over an insecure network.
Overview
You are going to have to work on both the host (your server) and your client (the computer you will use to remote into the server) for this. The general steps to get this up and running are as follows:
- (Host) Install openssh-server
- (Host) Create .ssh folder to store key(s)
- (Host) Get IP Address
- (Client) Install PuTTY
- (Client) Generate key and save private key file.
- (Client) Access Host using Putty
- (Client) Configure key access and security settings
- (Client) Restart SSH session and verify access
Now that we know the workflow, let’s get into the nitty gritty…
On the Host:
Install openssh-server
If you’ve followed the previous post, SSH should be on and active already. If not, you can download the package using the command:
sudo apt install openssh-serverHit “y” to start the installation.
Already installed or not it’s a good idea to verify that the service is running. For that we’ll need the command:
sudo service ssh status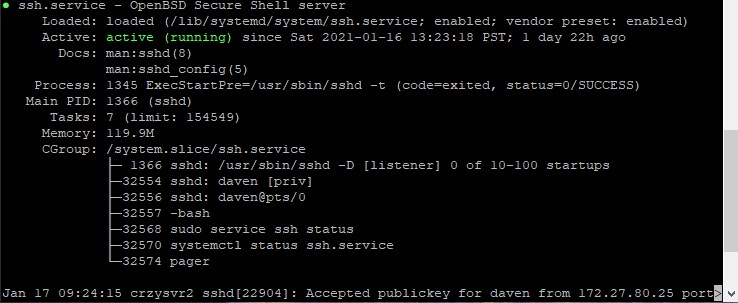
You should see an “active (running)” line in the output as in the image above. You may have to hit “Q” on your keyboard to quit the output of the ssh service and get back to the command line.
If you do not see any green lettering, but instead see something like “inactive (dead)”, then type the command:
sudo service ssh startthen double check the status again with the previous command. You should be good to go.
Create .ssh Folder to Store Key(s)
From here, type the following two commands (hitting enter after each)
cd
mkdir .ssh
The above will bring you back to your home directory (cd) and then creates a hidden subfolder in that directory/folder called “.ssh” (mkdir .ssh). The dot at the front makes it hidden.
Get IP Address
Before we move to the client, let’s grab the IP address of the server (we will need it in just a few minutes). If you’ve been following this blog series, you already know the IP (hint: it’s the IP address you manually assigned to bond0 in the previous post). Otherwise you can find out what your IP is easily. In the command line, type:
ip aThis will result in a bunch of text printing to the screen. What’ you’re looking for is an IP address that has the same first few numbers as all of the other devices on your nework:
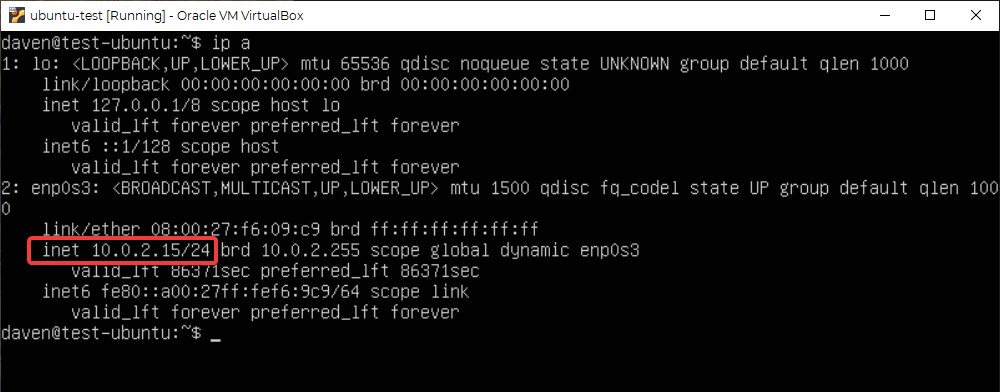
Make a note of the IP, and you’re good to go! That’s it for now on your host. Now it’s time to head over to the Windows client.
On the Windows Client:
Install PuTTY
Now- head over to your Windows device and start ‘er up! Before anything else, you’ll need to download an application called PuTTY, which can be found here. Click on the link on the page that pops up to download.
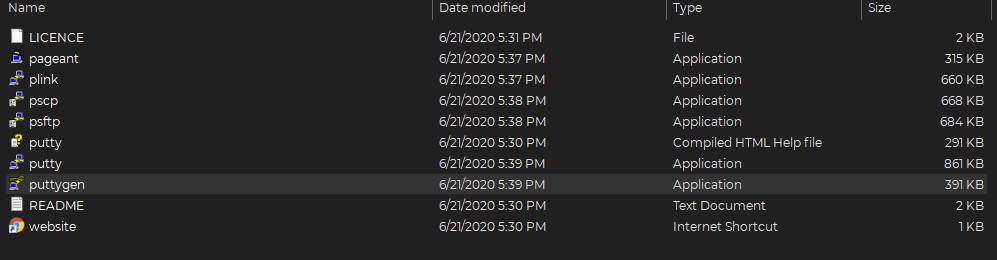
Once downloaded, take a look at the PuTTY folder (default download location is C:\Program Files\PuTTY). You will see 2 applications; “putty” and “puttygen”. First we will need to open puttygen.
Generate Key and Save Private Key File
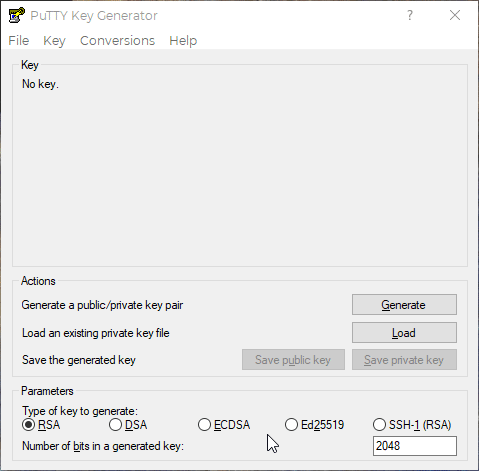
Once the program pops up, check that the key type is RSA and the number of bits in the generated key is 2048. From there, click the “Generate” button and then move your mouse around the blank panel to create a randomized set of characters:
Next, you can change the “Key comment:” field to your email (a standard practice). After that it is recommended that you create a “Key passphrase” as an extra security measure. Confirm the passphrase and make sure you have a record of it (I’d recommend a password manager of some sort). Click on the “Save private key” button. Make sure you know the file path (where it is saved).
Access Host Using PuTTY
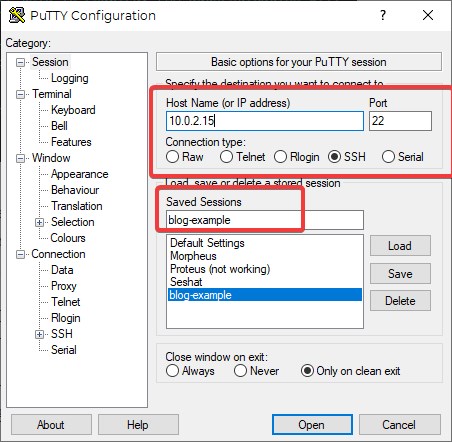
Don’t close out of puttygen but rather minimize it or ignore it for now. Start PuTTY itself. You can go back to the default folder to start it up, or click on the Windows start button and start typing “putty”. The PuTTY app should come up in the search and you can click on it to start the application. Once loaded, type in the IP you noted earlier like so:
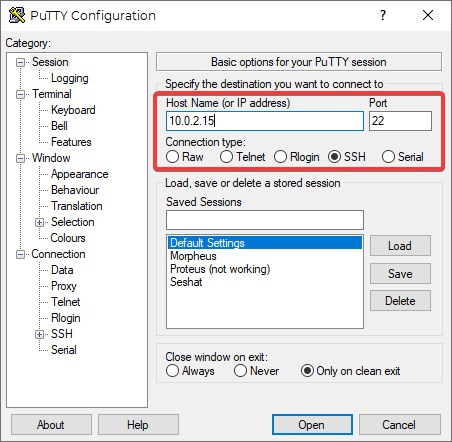
Click the “Open” button and if it’s your first time remoting into the server, you’ll get a security warning:
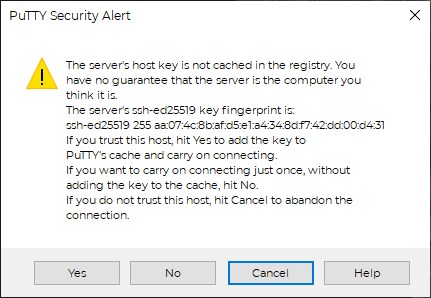
This is standard, Click “Yes” and you’ll be taken to a window that looks exactly like the command line terminal on your server- only in a window. You will be asked for your username and password for the server (also set up in the previous post) just like normal. Type in your credentials viola, you’re in!
Configure Key Access and Security Settings
Now that we’re in you can technically stop here. You are able to access your server and do whatever you need to do without ever touching the physical box! Unplug the keyboard, mouse and monitor from the server and leave it alone.
But wait! There’s more…
If you want to harden your security a bit and make it a little quicker to log in, follow along below.
Go back to puttygen- remember the program you minimized earlier? If you didn’t leave it open it’s no problem, just click the “Load” button and navigate to the key you saved earlier and open it back up. Your screen should look similar to the below:
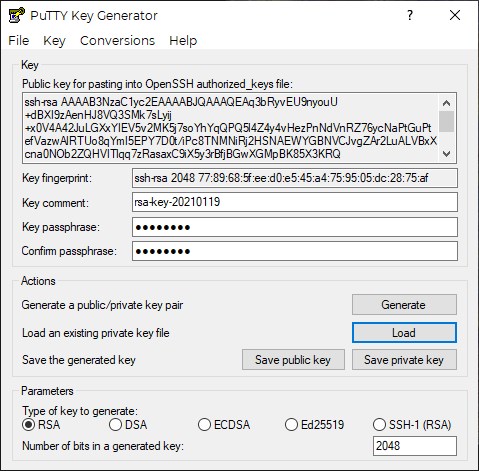
Load up your clipboard by highlighting the entire Public key, right-clicking and selecting “copy”. Be sure you got the whole thing, including the “ssh-rsa” at the beggining and the key comment (your email if you changed it) at the end.
head back over to your SSH window. If you didn’t do anything you should be in your home directory. If you’re not sure you can type
cd && cd .sshWhich will bring you home (cd ) and then move you to your .ssh folder.
To load your public key into a file, type the below:
echo [PUBLIC-KEY] > authorized_keysNOTE: after typing “echo “, where it says [PUBLIC-KEY] you’ll need to simply right-click with your mouse to paste the long key, then finish up by typing ” > authorized_keys”
It’s a little different pasting into the command line. Instead of right-click and choosing the “paste” option (like in Windows) it’s simply a right-click and BAM! Long key pasted.
To double check that the file is saved, type:
lsto list the file. You should see “authorized_keys” print to the screen.
Additionally, you can lock the file from being accidentally changed by typing:
sudo chmod 400 authorized_keysYou can now close puttygen.
From here we will move to the configuration file, back up the default settings and then edit the active configuration. Type the following commands (hitting enter at the end of each line)
cd /etc/ssh
sudo cp sshd_config sshd_config.bak
[ENTER-YOUR-PASSWORD-IF-ASKED]
ls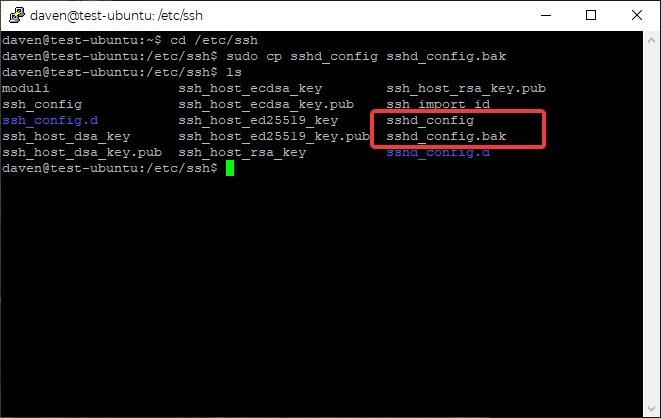
Now- to set up the key-based login and turn off password authentication (a preferred security measure), we will have to edit the “sshd_config” file:
sudo nano sshd_configOnce you’re in the editor, you’ll need to make several changes. Below is a list of those changes and a few screenshots for you to verify you are changing the right lines:
- #PermitRootLogin yes -> PermitRootLogin no
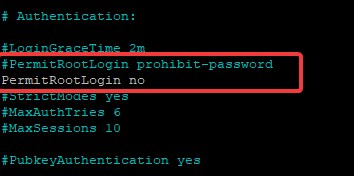
- #PasswordAuthentication yes -> PasswordAuthentication no

- UsePAM yes -> UsePAM no
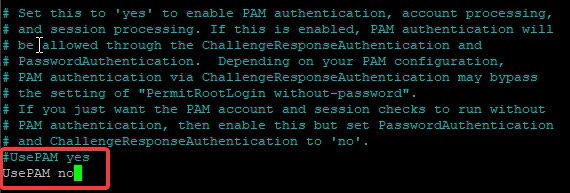
NOTE: You do not need to keep the commented lines (the ones that start with an “#” means that they are not read by the computer). You can remove the “#” and change the “yes”-es to “no”-s. The above is only to show the differences.
save and exit (“ctrl+x”, “y”, “Enter”).
Now close the session.
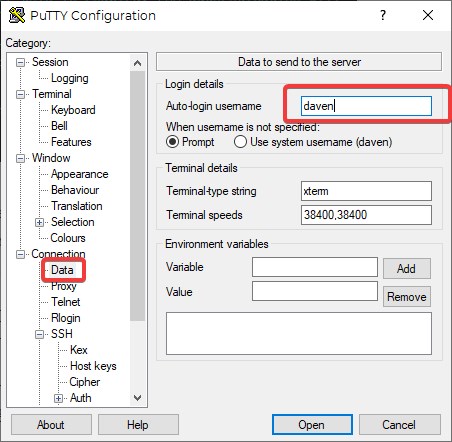
Back over in the PuTTY program, type in your IP address again. We are going to add a couple settings to the SSH session:
- Under the Connection>Data tab, enter the username you use to log into the server:
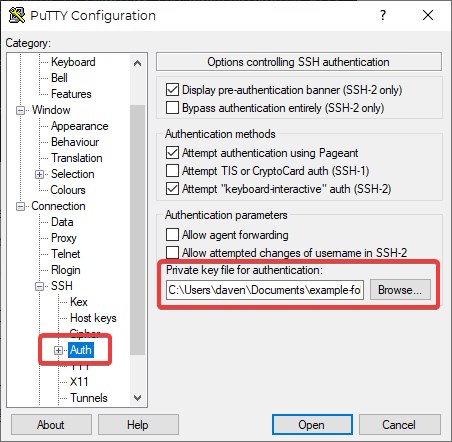
- In the SSH>Auth tab browse to where you stored your key file earlier and select the key:
- Go back to the Session tab and then enter a name in the “Saved sessions” field and click the “Save” Button:
Restart SSH Session and Verify Access
Now double click the saved session name and you should be greeted with the following screen:
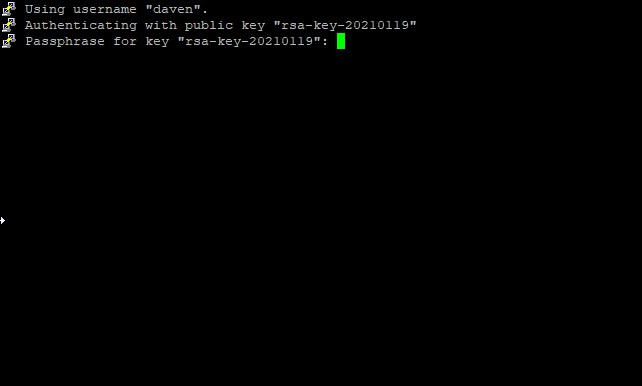
Enter the password you created for the key file (in puttygen).
Done! You are now able to log into the server by opening PuTTY, double clicking the saved session, and entering the password for the keyfile.
One quick note, when you perform a sudo action in the server, you will need to enter your user password (set up in the previous post), the key password is only used for login. You can see how this adds security, for even IF someone manages to somehow get your login key AND the password for it (already unlikely), they’ll still be up against a completely separate password to gain access to sudo or root functionality.
Wrapping UP
We hope you’ve learned a lot and are able to now jump into your server whenever and wherever (on your local network, at least) you want. The devil is indeed in the details, but the general steps are logical and easy. Just follow along with the above and you’ll be remoting into your virtualization server in no time!
Anything to add? More security hardening recommendations? leave a comment so we can all benefit from it!
Next time we will get you up and running with KVM!
Thanks for reading!
Important Terms
- Local Access – Getting into a computer or program by being at the physical computer itself.
- Headless – In computer terms, it means running a computer without peripherals like a monitor, keyboard or mouse. Many servers run in this way.
- Remote Access – getting into a computer or program that lives on a computer by using a client (other computer) to access a server/computer that is typically somewhere else.
- SSH – Secure Shell. Provides a secure method for remote access to other computers even over insecure networks.
- Host – The server or computer that “hosts” (owns or keeps on itself) network services and applications that other computers will request access to.
- Client – The computer that requests access to the host’s services and/or applications.
Commands Used
- sudo apt install [PACKAGE-NAME] – installs the package if available in the package manager (apt in the case of debian based linux distributions)
- sudo service [SERVICE-NAME] status – Checks the status (on, off, disabled, etc) of a given service on the device.
- sudo nano [PATH-TO-FILE] – Opens a file in the nano editor. The path to the file may be omitted and only the name of the file can be typed if your are already in the same directory as the file.
- mkdir (make directory)- Creates a folder (directory) in the current directory you are in.
- cd [DESIRED-DIRECTORY-LOCATION] (change directory) – Moves the command line into the desired location.


Pingback: So You Want to Build a Linux Virtualization Server? Part 6 – Installing KVM and Using virt-manager from a Windows Client – Ctrl Alt Develop
Pingback: Cheapest Access to your Home Network from Anywhere! – Ctrl Alt Develop
Pingback: The $40 Home Security System (Part 1) – Ctrl Alt Develop